eBay has been here for 15 years now. Buyers and sellers had ample time to learn all the tricks of the trade, and if reasonably careful, they face little risk of a really bad surprise.
A significant percentage of the sellers on eBay are professionals, or experts in their field. Others have been using a product for years and can write about its history. Most know the value of the products they’re selling, and how to attract the attention of their audience. They take good pictures of the items they want to sell, and because they want to preserve their hard earned feed-back, they won’t provide blatantly misleading product descriptions.
But if the risk is somehow limited, the odds of scoring big are also getting pretty slim. With more than 200 million registered users, 2 million new auctions a day, and all sorts of search and reporting options, eBay is as transparent as a market can get. If the seller did his home work and followed the rules of the game when posting his listing, more than one buyer will notice, a small bidding war will take place, and the final price of the item will be very similar to the average of what similar items sold for during the weeks preceding the auction.
Shopgoodwill.com – the online auction site of Goodwill Industries – is a much smaller marketplace. Founded in 1999, it “provides a safe and secure venue for Goodwill® member organizations to sell donated items through an online auction“.
The photography related auctions of the day
On Shopgoodwill, the cameras and lenses presented for auction have been donated, and the people describing the products know very little about their past. Most of them are not specialists of photographic equipment, either. They do not want to raise false expectations, and will stay extremely conservative in their assessments. In the best case, they will write that the product “appears to be in a good condition” or that it “appears to be working”, but all items are sold as is.
The item descriptions are sometimes very generic (“Nikon Camera”) or written by someone who can’t tell the difference between a filter and camera (“Hoya 49mm camera made in Japan”). The quality of the pictures of the items improved significantly lately, but they are still low res, and it’s often difficult to find out what’s really being sold.
While not as large as eBay, the number of potential buyers is far from small, and the odds are that a rare and valuable item will be discovered by more than one buyer. I’ve seen a few Leica cameras for sale on Shopgoodwill, and they all fetched good prices. But I’ve also seen nice vintage cameras stay unnoticed.
So where is the fun? Shopgoodwill is like a garage sale or a flee market. Tonight 27,000 film cameras were listed on eBay. Less than 300 were listed on Shopgoodwill. You have relatively few items to look at, and you can go rapidly through the list of cameras or lenses being auctioned. The product descriptions are not always very good, but lovers of old equipment will raise to the challenge and put their geekiness to good use, with the hope of discovering a true gem.
Example of a listing on Shopgoodwill.com
Buying a camera or a lens at Shopgoodwill is a bit of a gamble. The intentions of the sellers are undoubtedly good, but their expertise is somehow limited, and the buyer will know little about the true condition of the item he’s bidding for. I never had the guts to buy a really expensive camera or lens on Shopgoodwill, and I never spent more than $30 on an item.
The camera I bought (a Praktica camera sold under the “Cavalier” name in the US) was cosmetically nice, and ended up working after some TLC, in spite of its old age. I also bought a lens, on a separate occasion. Although a bit dirty, it was in good general condition, and proved to be a very nice item once cleaned. A good experience overall. Try your luck too; it’s for a good cause.
The Voigtlander 90mm f:3.5 SL II, as presented on CameraQuest's Web site.
Voigtlander is an old brand of German origin, now belonging to Cosina.
Cosina is a Japanese contract manufacturer – their 35mm cameras were adopted and sold successively by Canon, Olympus, Nikon, Contax and Zeiss, and they are one of the few companies still producing 35mm film cameras today. A few years ago, they started manufacturing manual focus prime lenses, available in the Canon EF, Pentax K and Nikon F (AI-S) mounts under the Voigtlander brand.
The lenses made for Nikon cameras had one limitation, though. While perfectly compatible with manual focus SLRs, they did not have the electronic chip and the electrical contacts needed to communicate with recent autofocus bodies. Like Nikon’s own AI-S lenses, they could be mounted on mid-level dSLRs like the Nikon D80 or D90, but they were not recognized by the camera, which disabled its exposure metering circuit and forced the photographer to use a hand-held exposure meter, or to rely on the analysis of the histogram, after the picture was taken. The lens mount of higher end Nikon models such as the D300 or the D700 still has the pins, levers and springs needed to be fully AI-S compatible.
The new generation of Voigtlander SL II lenses has the right chip and the right electrical contacts, and is now compatible with any Nikon autofocus SLR or dSLR (the photographer still has to focus manually, of course).
A few days before the PMA, Cosina presented the APO-Lanthar 90mm f:3.5 SL II Close Focus lens (yes, that’s its name), a compact close focus lens. It targets a small niche of photographers who still want to buy new manual focus equipment. With a maximum aperture of F:3.5, it’s pretty slow compared to Nikon’s 85mm f:1.4 prime, and will not compete in the “portrait lens” category. With a magnification ratio of 1/3.5, it’s not a macro lens either. It’s available in Nikon and Pentax mounts, but non in Canon’s EF.
A product for a niche within a niche, obviously.
More about the Voigtlander APO-Lanthar 90mm f:3.5 SL II Close Focus
A large proportion of photographers wears prescription glasses – I know, I’m one of them – and almost everybody wears sun glasses occasionally. But surprisingly, until high eye point or high eye relief viewfinders appeared – on the Nikon F3 HP in the early eighties, photographers with glasses could not see the integrality of the scene – let alone the aperture or speed information on the LED displays surrounding the view of the scene- without having to move their eye balls up and down and left to right.
As far as viewfinders are concerned, some cameras are better than others, though. The quality of the viewfinder of a manual focus camera is influenced by three factors:
Coverage: It’s the percentage of the image captured through the lens which is going to be shown in the viewfinder. 100% coverage is desirable – but expensive to manufacture, and only top of the line cameras (the real “pro” models) show the integrality of the scene in the viewfinder. Most SLRs show between 85% and 95% of the scene. Point and shoot cameras, (more precisely the few P&S which still have an optical viewfinder) are much worse. The best of them, the Canon G11 only shows 77% of the scene that will be captured through the eye piece.
Magnification: If the magnification was equal to 1, an object seen through the viewfinder would appear to be the same size as seen with the naked eye (with a 50mm lens on a 35mm camera). The photographer could even shoot with both eyes open. If the magnification ratio is lower than 1, then the object will appear smaller in the viewfinder than seen with the naked eye.Magnification has an impact on composition and focusing. If the magnification ratio is very low (below 0.4) the image becomes so small that it’s difficult to compose the picture. Magnification is also a critical factor for picture sharpness on manual focus cameras: the accuracy of the focusing is directly related to what the photographer can see on the matte focusing screen, and the higher the magnification, the easier it’s going to be for him or her to focus accurately.On a 35mm single lens reflex camera, the magnification is measured with a 50mm lens, and varies between 75 and 95%. Full frame digital SLRs have viewfinders offering comparable magnification values. dSLRs with so-called APS-C sensors advertise very high magnification ratios, but after the crop factor of the small sensor is taken into consideration, the real magnification value lies between 0.46 and 0.62. Read Neocamera‘s article for more information about the real viewfinder magnification ratio of dSLRs.
Eye relief: “The eye relief of a telescope, a microscope, or binoculars is the distance from the last surface of an eyepiece at which the eye can be placed to match the eyepiece exit pupil to the eye’s entrance pupil.” (Wikipedia, eye relief entry).The longer the eye relief, the more comfortable the camera is going to be for a photographer wearing glasses, but the smaller the focusing screen is going to look.A photographer wearing glasses will need an eye point of approximately 20mm (depending on the dimensions of the frames and the thickness of the lenses of the glasses) to be able to see entire the viewfinder image, plus the exposure information without having to move his eye balls left to right and up and down. Camera manufacturers describe them as “High eye Point” or HP viewfinders.
A comparison between a few 35mm cameras
As is often the case with engineering, a good design is the result of a successful compromise between conflicting requirements. Most photographers desire a long eye relief, but at the same time want a magnification ratio high enough, so that they can compose their image with precision and focus accurately. With the F3, Nikon offered 2 versions of its standard viewfinder. The DE-2 of the original F3 had an eye relief of approximately 20mm, and a magnification of 80%; the DE-3 viewfinder of the F3 HP had a much longer eye relief (25mm) but a smaller magnification ratio of 75%. The market decided in favor of the longer eye relief and the DE-3 became the standard viewfinder of all subsequent versions of the F3. The advent of autofocus SLRs accelerated the trend towards longer eye relief and lower magnification ratios.
Subjective results
The experience confirms the figures. The Nikon F3 has by far the best viewfinder, followed by the tiny Olympus OM-1. The Nikon FM-FE-FA are far behind.
Nikon launched the F3 with a standard viewfinder (model DE-2) which offered 100% coverage and already had a relatively long eye point. The standard F3 can comfortably be used by photographers wearing glasses. A few years later, Nikon introduced another version of its flagship camera, the F3 HP, which was the first to offer a viewfinder with the very long eye point of 25mm (one inch). The long eye point came at the cost of a lower magnification (down to 75%) and an higher weight. The F3 HP was a sales success, and all subsequent F3 cameras would come from Nikon with the HP viewfinder (the DE-3).
The Olympus OM-1 has an incredible viewfinder, with a very high coverage and a very high magnification. The viewfinder does not offer any exposure information besides the match-needle arrangement at the right of the image, and even if the eye point is rather short, the photographer has the impression he’s watching all of the scene. Subsequent OM models offered a little more information at the periphery of the viewfinder and a little less magnification, and in a world where hi-point viewfinders were becoming the norm, they were far less remarkable than the OM-1.
The Nikon FM, FE and FA provide more exposure information than the Olympus cameras (the selected aperture, in particular). Compounded with the very short eye relief (14mm), it makes it impossible for a photographer wearing glasses to see the whole scene and the exposure information at the periphery without some eye movements. While similar on paper to the other compact Nikon SLRs, the viewfinder of the Nikon FG fares worse than its stablemates in real life.
Rangefinder cameras work by different rules. Their viewfinder covers far more than what will be captured on the film, and very little exposure information is displayed in the viewfinder. Even if the Leica M offers an eye relief of only 15mm, a photographer wearing glasses will not have any problem visualizing the image in the viewfinder.
With a few exceptions such as the Canon G11, Point and Shoot digital cameras don’t offer optical viewfinders anymore. The G11’s may be used as a last resort in a very bright environment, (when using the LCD is not an option), but it’s very small and very unpleasant to use. Low end digital SLRs with small sensors (Four Thirds or APS-C) are equipped with very low magnification viewfinders, and have a very pronounced tunnel effect. Manual focusing is not an option, and composing an image with precision can be challenging. Mid-level dSLRS (like the Canon 7D or Nikon’s D90 and D300) have much better viewfinders, with relatively long eye relief (22 and 19.5mm respectively) and real magnification ratios of approximately 0.625.
Foca *** with a Foca turret viewfinder / Olympus OM-1n. The Foca is a French rangefinder camera from the late forties, and its viewfinder is unusable if you wear glasses. And hardly usable even without them.
Model
Coverage
Magnification
Eye Point
Comment
Nikon F3 HP (DE-3 finder)
100 %
75%
25mm
The camera that introduced Hight Point viewfinders to the public.
Nikon F3 with the standard DE-2 viewfinder
100 %
80%
Not known. Probably 20mm
The original pre-HP viewfinder. Even with glasses one can easily see all of the scene and the little LCD display.
Olympus OM-1
97%
92%
Not known. Probably 15mm
Incredible. How can such a small camera deliver such a large image? Short eye point, but since the viewfinder does not provide any exposure information at the periphery of the frame, not much of a problem.
Nikon FM, FE, FE2, FA
93%
86%
Not known. Probably 14mm
Short eye point, plenty of information at the periphery of the viewfinder. Not the best recipe for photographers wearing glasses.
Manufactured in relatively small volumes by a renown French company, this lens disappeared from the shelves in the mid nineties, only to resurface – slightly modified – as an AT-X Pro after Tokina bought the design. So says the legend, at least.
More about the Tokina AT-X Pro saga can be found in a page published in November by John Cazolis in his blog Nikon Glass. John explores the different versions of Tokina’s 28-70 zoom, and tests extensively the AT-X Pro 28-70mm f:2.6-2.8, which is considered the closest to the original Angenieux design.
There are always a few Tokina AT-X Pro 28-70 lenses for sale on eBay, but the first iteration of the Pro model – the one that John Cazolis recommends – is relatively difficult to find. Expect to pay between $200 and $300 for a nice lens in good condition.
The Nikon FA is the last major manual focus SLR launched by Nikon. An evolution of the FM2 and FE2 cameras, it shares with the latter most of its body shell, a very fast shutter (up to 1/4000sec., 1/250sec. flash sync speed) and a on the film (OTF) flash metering mechanism. It finally catches up with Canon’s A1 and offers the same four automatic exposure modes (aperture and shutter priority, program and semi-auto).
Its “Automatic Multipoint Metering” (AMP) – a world premiere – is its real claim to fame. Better known under names such as “matrix”, “evaluative” or “multi-segmented” metering, it is now the default metering system of every dSLR in production.
Launched in 1983, this conservatively styled camera with very conventional ergonomics had a relatively short sales career. It was made obsolete in 1985 when Minolta took the market by storm with its first autofocus SLR, the 7000 (Maxxum 7000 in the US). Minolta’s competitors, Nikon included, spent the best part of the following three years trying to catch up. The FA stayed on Nikon’s catalog until 1988, and was not replaced. Its semi-automatic sibling, the FM2n would be sold until 2001, when the FM3a, a sort of combination of the best characteristics of the FM2 and the FE2, was launched.
An impressive (and heavy) camera: the Nikon FA with the MD-15 motor drive.
The metering system
Until the FA was launched, most of the cameras only offered some form of center weighted metering: the exposure sensor evaluated the luminosity of the whole scene, and because the sky is typically in the upper third of the frame, and the main subject of the picture in the center, it was designed to give more importance to the portion of the picture located at the center of the lower part of the frame.
It worked for most of the cases. If the subject was back-lit and not centered, the photographer had to determine the exposure with the subject at the center of the frame, memorize the exposure settings, and move the camera to compose the desired picture.
Some high end cameras also had a second exposure metering system, which evaluated the luminosity of a much narrower portion of the scene, almost a spot in the middle of the viewfinder. But spot metering and exposure memorization are not always easy to use, and are far from being idiot proof. The engineers at Nikon were pretty sure that with the newly unleashed power of integrated circuits, they could develop a new approach.
It was introduced with the FA, as the Automatic Multi Pattern (AMP) exposure system. The camera was equipped with a database containing the mathematical description of thousands of real world pictures taken by Nikon technicians, with the exposure value that had given the best results in each situation. The light meter was divided in five zones (a large central zone, two zones at the bottom left and right, two zones at the top, left and right also), and the electronic circuit would correlate the exposure value of each zone with other elements such as the focal length of the lens to define the characteristics of the scene, and associate it with one of the many typical pictures described in the database of the camera.
Nikon FA: the small and unmarked knob controlling the exposure mode (matrix or center weighted) is on the side of the lens mount housing, at the top of this picture
The Nikon engineers were so sure of the superiority of their AMP that they did not even equip the FA with an exposure memorization button – which so far had been a standard feature on high end automatic cameras. They just installed a little unmarked on-off switch on the right side of the lens mount housing, that conservative photographers could use to set the camera in the conventional “average center weighted metering” of yesteryear.
The beauty of most manual SLRs resides in part in the simplicity of their commands. Each knob, switch, lever has only one function. If you turn the aperture ring on a semi-auto camera, the pre-selected aperture will change. Similarly, if you turn the shutter speed knob , the selected shutter speed will change.
The introduction of a automatic exposure did not really change the ergonomics. On a camera with aperture priority automatic exposure, you just had to select the “A” position of the shutter speed knob to let the camera determine the shutter speed automatically, and similarly on a camera with shutter speed priority, positioning the aperture ring on “A” indicated that you were willing to let the automatism manage the aperture for you.
Developing simple ergonomics became more difficult with cameras that could alternatively operate in semi-auto, aperture priority, shutter priority and program auto exposure modes. Most manufacturers added a big four way switch on the top panel, which could be set in Program, Shutter, Aperture or Manual. But when the PSAM switch was set on P or A, the shutter value did not match what was shown on the shutter speed knob, as shown in the example below.
On a semi-auto camera (like this Nikon FM) the shutter speed knob and the aperture ring of the lens show the shutter and aperture settings that will be used to take the picture.On the Nikon FA, the value displayed on the shutter speed will not necessarily be used to take the picture. The camera is set in “A” (aperture priority) mode and the shutter speed will be determined by the electronics of the camera.
On the Nikon implementation, the photographer also had to remember to set the aperture ring to the smallest aperture, and the indications in the viewfinder (a very small LCD display showing alternatively the speed or the aperture selected) did not really help.
The ergonomics of modern “all-electric” cameras are totally different. The aperture ring and the speed knob are gone, leaving room to an “electronic input dial” and to a large LCD. Not as intuitive and immediate as the knobs and rings or yesteryear, but far simpler than the complex combinations of knobs and switches of the Nikon FA.
Using a Nikon FA as an everyday camera
When it was launched, the FA was nicknamed the “techno-camera”. Positioned at the top of the FM-FE family of cameras, it came with an impressive specs sheet: matrix metering, multi-mode exposure automatism, very fast shutter, on-the-film (OTF) flash metering. Its detachable motor drive was reasonably fast (3.2 frames per second) and could power the camera (and save the precious LR44 batteries).
With the exception of the prism housing (in poly-carbonate), the camera is still built in metal, and is very nicely finished. If the complex electronics from the early eighties survived, the FA is still perfectly usable, and will take great pictures.
Should you buy a Nikon FA? That’s a matter of taste. More recent cameras (film or digital) provide the same technical features, but with their large LCDs and their electronic dials, they’re easier to use and less conducive to set up errors than the FA. The AMP metering of the FA is still relatively primitive – it did not reach the level of performance of today’s matrix metering, and it deprives the photographer of his control over the exposure. Switching to the center weighted mode does not really offer more control, unless the semi-auto exposure mode is used, because no exposure memorization mechanism has been provided.
The Nikon FE2 or the FM3a share some of the technical advances of the FA (the titanium shutter and the flash metering in particular), but their simpler ergonomics (match needle in the viewfinder, shutter speed knob and aperture ring always showing the actual settings) as well as their more predictable exposure metering make them a better fit for photographers who want to be in immediate control of the basic settings of the camera.
The value of the camera on the used market reflects this. In spite of its impressive list of specs, the FA sells for approximately the same price as the Nikon FE2 ($125 to $200 on eBay depending on the condition of the camera), below the FM2n (approx. $250) and far below the FM3a ($500 and above).
The hand grip (on the left) has to be removed to leave room for the MD-15 motor. As a consequence, this tiny accessory has often been lost and most surviving FAs don’t have it.
Few cameras have more obscure and incestuous origins than this one.
At the beginning of the Sixties, Mamiya was ready to launch its first 35mm SLR, the Prismat, and following a suggestion of its US importer, agreed to develop and manufacture a version of the camera for Nippon Kogaku, the maker of the already famous Nikon F. The Nikkorex F was launched in 1962, at half the price of the model F. Nikon expected that the new camera would penetrate the amateur phographer market and increase the sales potential of the Nikkor lenses. Nikon learned quite a few things in the process, and put that experience to good use when they launched the Nikomat in June 1965.
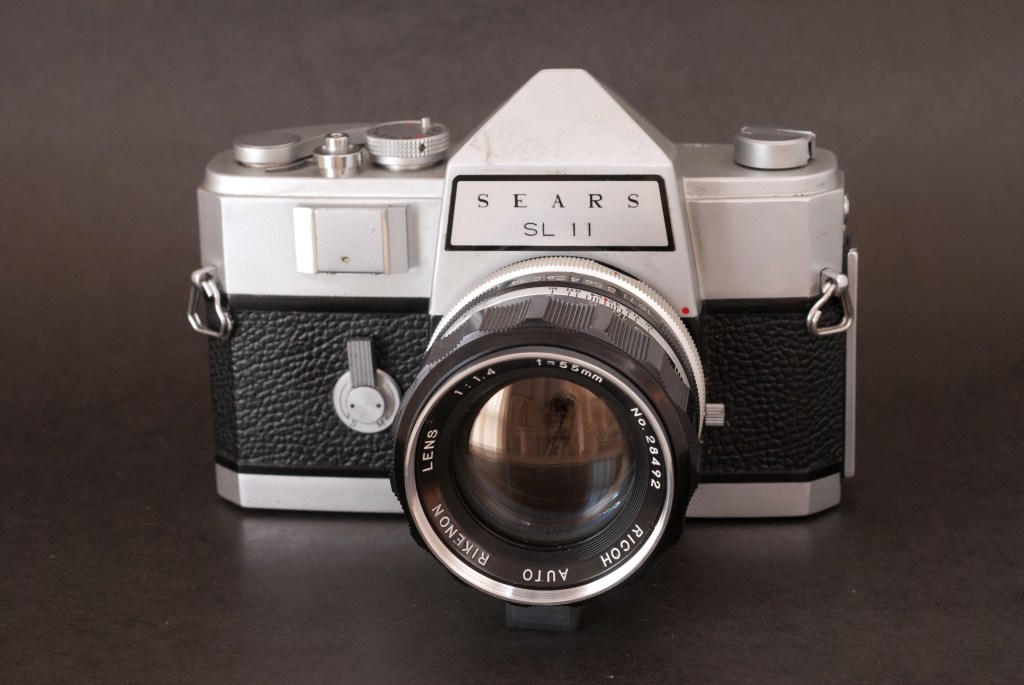
In 1964, Ricoh presented the Singlex, which was very similar to the Nikkorex F, F mount included. It is unclear whether Ricoh was just relabeling cameras made by Mamiya, or whether they had bought the plans and the tooling after Nikon and Mamiya had lost interest in their joint venture. In any case, Ricoh was one of the main manufacturers supplying Sears-Roebuck with private label cameras, and the Singlex was rapidly incorporated to the Sears catalog under the Sears SL11 moniker.
The Sears SL11 with the standard Rikenon 55mm lens
Technically, it can be argued that the Ricoh and Sears cameras were not using the real “F” mount, but only a very close variant: Nikon’s bayonet mount is using lugs to help position the lens on the body (3 body-side lugs imbricated with 3 lens-side lugs). On the Ricoh and Sears bodies, one of the lugs was shorter than Nikon’s , leaving room for a larger lug on the lens side. As a consequence, a Nikon lens with its “small lug” could be mounted on the Ricoh and Sears camera bodies, but the “big lug” Rikenon lenses shipped with the cameras could not be mounted on a Nikon body.
In 1967, Ricoh and Sears replaced the Singlex and the SL11 with new models designed and built by Ricoh. They did not use the Nikon F mount, but the ubiquitous 42mm screw mount, and were equipped with a TTL CdS exposure meter. It seems that Ricoh and Sears designated the new models with the same Singlex and SL11 names as the models they were replacing, at least for a while. The cameras were also sold as Ricoh Singlex TLS and Sears SLS or TLS in the subsequent years. As we can see, using confusing product references is not a recent practice.
How to spot a Sears SL11?
The Sears label is glued on the pentaprism housing. The Sears SL11 retained the vertical accessory holder of the Nikkorex, at the left of the mount.The Copal metal shutter. Mamiya was the first camera manufacturer to use a vertical Copal shutter. Nikon and Ricoh kept it in the Nikkorex and the Singlex.On the back of the body, the name of Ricoh is engraved. There are some traces of glue. A Sears label may have covered Ricoh’s name originally.
Using the Sears SL11
The big difference between film and digital photography is that the body of a film camera does not play such an important role as the body of a digital camera in the final quality of the picture. If the photographer is technically competent and has enough time to set up the camera, any Single Lens Reflex with no light leak and an accurate shutter will give good results, provided a good film and a good lens can be used.
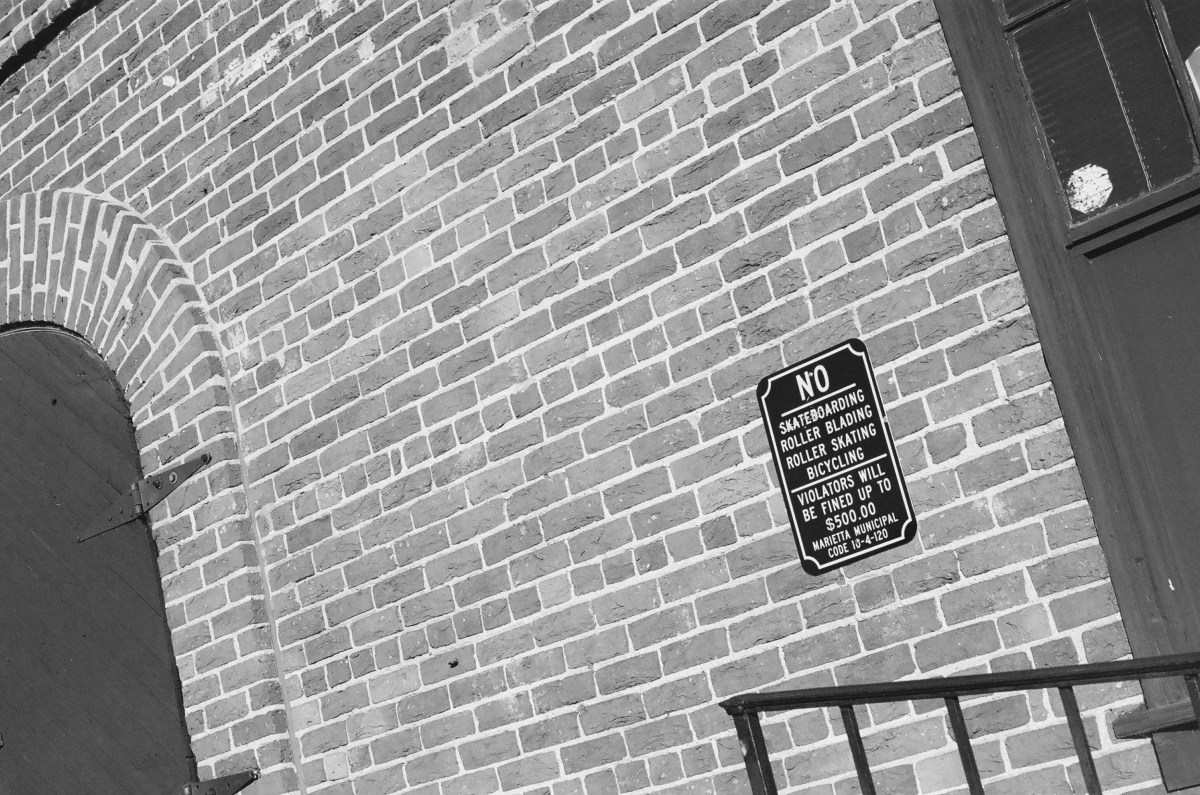
Marietta, GA- The wall of old the train station. The shutter release of the SL11 is very sensitive, and this picture was taken accidentally. The camera took the decision for me and I tend to like the result.
With a recent Nikon fast prime lens and fine grain film, the SL11 will not be as convenient to use as a modern film SLR (no exposure metering, no autofocus), but if the subject is static or cooperative, there will be little difference as far as the pictures are concerned.
The SL11 is a fairly large and heavy camera – it’s larger than the Nikon F and with its standard 55mm lens, it tips the scale at more than 1.2 kilos. I’ve also held a Nikkorex F in hands, and both cameras share the same matte aluminum finish, which seems very difficult to keep clean in the long run (dust and grease seem like ingrained in the camera’s outer shell). The body shell of the Sears model is not exactly similar to the Nikon’s, but the SL11 is absolutely identical to the Ricoh Singlex, with the exception of a Sears label pasted on the prism cover; Ricoh’s name is engraved on the back of the camera, so that there s no doubt on its origin.
As can be expected from a camera designed in 1962, no exposure meter has been incorporated, and the photographer will have to rely on his experience, on a hand exposure meter or on the Sunny 16 rule to determine the right aperture/shutter speed combination. The camera and the lens support Nikon’s automatic aperture pre-selection, and the diaphragm stays at full aperture until the shutter release is pressed. As a consequence, and surprisingly for a camera that old, the viewfinder is very bright.
In the field, the camera surprises with a very sensitive shutter release, and the very high demultiplication of the focusing ring of the lens seriously slows down the operations. As expected, the shutter is rather loud. The lens is still very good. There is some flare in back-lit situations, but at mid aperture (f:8 or f:11), it produces razor sharp pictures.
A camera without a built-in exposure meter is too slow to use to my taste, but this one is an interesting curiosity. Compatible with any Nikon lens made in the last 50 years, provided it has an aperture ring, it will find a place in the equipment bag of a “Nikonist” between a FE2 and a D300, for a film roll of nostalgia.
More about the SL11 and its cousins
The Sears SL11 with a Nikon 24mm AF lens. The SL11 is compatible with any Nikon lens provided it has an aperture ring.
The predecessor of the SL11: the Nikkorex F and Nikon’s own version of its history, reported by Kenji Toyoda.
Kenji Toyoda went to the source and talked to the Nikon engineers who worked on the development of models such as the FM, the FE or the FA. For Nikon, they’re “the best of the rest”.
A few sites have a pages dedicated to the twins of the SL11:
– the Ricoh Singlex (first model).
– another source of information for the Singlex and the Nikkorex F : Richard de Stoutz and his Nikon F collection.
As explained above, Ricoh and Sears kept on using the Singlex and SL11 names after they abandoned the original design of Mamiya. The user manual of Ricoh Singlex TLS of 1967 is still available.
The Sears labeled version of the camera is also shown here as the Sears SLS.
Marietta, GA – Jan. 2010 – Sears SL11 with Rikenon lens (55mm f:1.4)-Lodak CN400
In 1972, Olympus launched the OM-1. Much smaller and lighter than any other single lens reflex (SLR), it opened the path for a new generation of more compact cameras. Nikon’s own FM (launched in 1977) was remarkably smaller than the Nikkormat cameras it was replacing, but still a tad bigger than the Olympus OM-1n. Built like a tank, it was not light, either.
It would take another model, deliberately designed for the beginners, the Nikon EM (1979), to finally beat the OM-1 at its own game (weight: 460g against 510g, width: 135mm instead of 136mm). Small and light, the EM had a plastic (polycarbonate) body over an aluminum chassis, an aperture-priority exposure control system, and very few ways to over-ride the automatism. A magic -2EV button could be used for back-lit scenes, and that was about it: there was no semi-automatic exposure mode. It could use all Nikon’s previous AI (auto-indexing) lenses, as well as a new series of cheaper lenses (the E-Series) launched for the occasion. The E-series lenses were smaller and less elaborate than the other Nikkor lenses, but some of them (like the 50mm f:1.8) gained a very good reputation over time. It has to be noted that the E-Series lenses were the first to use the AI-S version of the F mount. Geeks can learn more about the evolution of the lens mounts of SLRs in the pages published a few months ago in this blog. 50 years of lens mount evolution.
Nikon FG
In 1982, Nikon extended their “ultra-compact SLR” range with the FG. It retained the platform, the dimensions and the shutter of the EM, but its electronics had been revised to incorporate two exposure modes, a semi-auto and fully automated program adjusting the aperture and the shutter speed. It also adopted the On the Film (OTF) flash metering system of the FE2. Not a pro camera yet, but not a beginner’s camera anymore.
To this day, the FG remains the smallest of the manual Nikon SLRs targeting the “advanced-amateur” market. A few “all-plastic” autofocus SLRs tipped the scales at 350g in the subsequent years, but Nikon’s digital reflex cameras are all bigger and heavier.
Shooting with the FG
The FG was available in two versions: “chrome” or black. Both had a small removable grip at the right of the body, and looked like smaller copies of the F3. After all these years, the FG is still a very nice little camera. Like the EM, it’s built around an aluminum chassis, and the body itself is in polycarbonate. The commands are simple and well organized. A single selector controls the shutter speed (for semi-automatic operation) and the type of exposure automatism (aperture priority or program). When the program mode is selected (after pressing a safety lock), the aperture ring of the lens has to be set at the smallest aperture. If the photographer forgets to set the aperture, the “overexposure” LED will flash in the viewfinder. The shutter is taken over from the EM and can not offer anything better than 1/1000 sec, with a flash synchro speed of 1/90. Incidentally the shutter still works at 1/90sec when the batteries are dead.
There are few other controls on the FG. A switch disables the warning beeps that the camera emits in multiple occasions, and a push button on the left side of the body can be used to open-up the exposure by 2 stops, to prevent under-exposure in back-lit scenes. There is no way to switch off the camera, and the best way to prevent battery drain is to leave the shutter speed selector on the manual 1/90sec setting when the camera is not in use.
Nikon FG – The commands
The viewfinder is one of the places where savings were made. With 0.84x magnification and 92% coverage, its performances are similar to the FM or the FE’s, but remarkably inferior to the exceptional OM-1, which in spite of being so compact, still combines a magnification of 0.92x with 97% coverage. At the right of the viewfinder, the photographer will find a scale representing the shutter speeds, with one or many (up to three) red LEDs showing the actual shutter speed and/or the ones recommended by the metering system. Red LEDs, as usual, happen to be invisible when the camera is used in a bright environment.
Derived from the EM and largely built in plastic, the FG is obviously not in the same league as the FE2 or the F3 when it comes to build quality. The articulated winding lever is not as smooth as the F3’s (which is mounted on roller bearings) or the FE2’s, which gives the impression of being mounted on a bronze bearing. The camera has the reputation of being prone to a scary shutter lock (nothing dramatic – set the shutter dial to Manual 1/90sec , and everything goes back in order). To me, it looks more like a “bug” than anything else.
In a few words, the FG is a strange combination of relatively advanced features (multi-mode exposure automatism, on the film flash metering) with a base which is derived from an entry-level camera. In particular in its black version, it looks very competent and professional, which could lead to some disappointment. Because of its small size and its serious looks, it’s easy to believe that it’s a pro camera, comparable to its FM2 and FE2 stablemates, or to the Olympus OM-2.
Nothing could be more wrong. The Nikon FM2 and FE2 are equipped with an exceptional titanium or aluminum shutter, with flash sync speeds up to 1/250sec and a maximum speed of 1/4000 sec. The shutter of the FG is much more limited, and its top speed of 1/1000 sec is a serious limitation on a bright sunny day now than 400 ISO seems to be the universal film sensitivity, in black and white as in color.
The FM2, FE2, OM-1 or OM-2 were cameras built for demanding amateurs or professionals; a small size was one of the design objectives of their manufacturers, but it came second to build quality.
The second hand market recognizes those facts: a nice FE2 costs at least $ 125, with the FM2 and some late Olympus models crossing the $250 barrier. Well received on the market when it was launched, the FG is still abundant on the second hand market and a very nice one can be found for approx. $50.00. A nice compact SLR for casual photography.
More about the Nikon FG
Nikon’s own words about the FG
Photography in Malaysia: the “bible” for the amateurs of Nikon cameras. Check the Nikon FG pages.
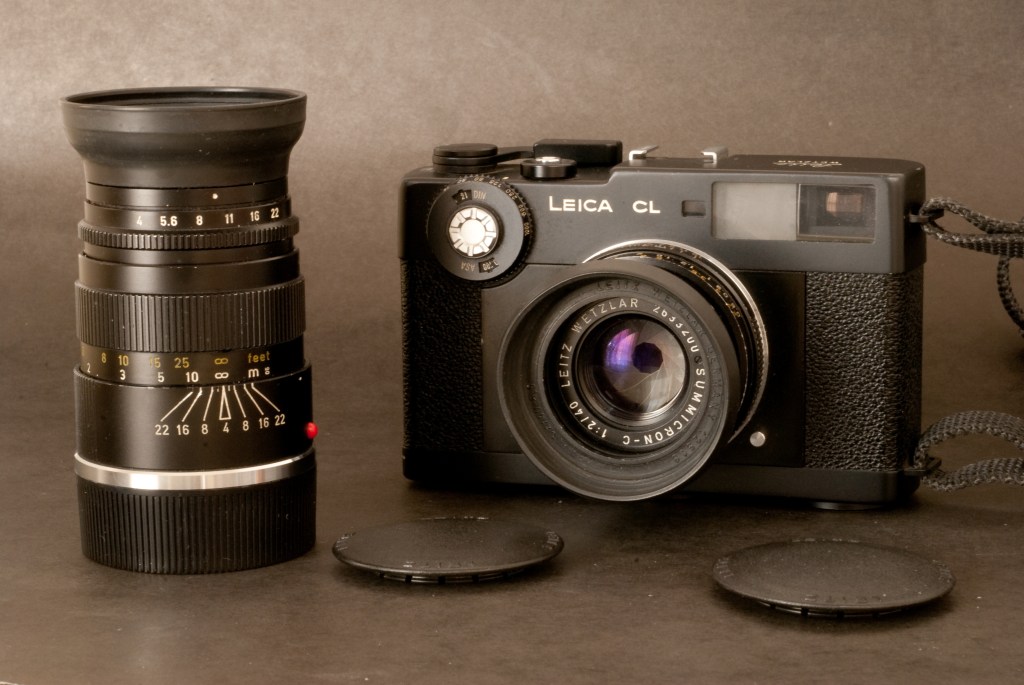
I was back in Paris for a few days at the end of last year, and since there was still room in my equipment bag, I pulled my old and battered Leica CL from a drawer and took it with me. A good opportunity to check whether I could get acceptable results out of it this time.
I never was a rangefinder guy. When I started being interested in photography, semi-automatic Single Lens Reflex cameras (SLRs) were already the norm, and Leica an expensive brand of obsolete cameras. My formative years were spent with a Pentax MX, and I’ve always found natural to see the world on the matte focusing screen of a reflex camera. But I was intrigued by the Leica legend, and one day, purchased a Leica CL. Over the last 15 years, I used it rarely, but being light and compact, it could find a slot in my equipment bag from time to time.
Leica CL with its two lenses
The CL was a sort of entry-level rangefinder camera, designed by Leitz in Germany and built by Minolta in Japan from 1973 to 1976.
From a technical point of view, it is a miniature M5, and very advanced for a Leica of its time. A semi-auto camera with through the lens metering, it used a mechanism very similar to the system used in the much maligned M5’s.
After the CL and the M5 were abandoned in the mid seventies, Leitz reverted to fully manual cameras with no metering capabilities, and aficionados had to wait for another 10 years before a semi-auto rangefinder camera was proposed again by the German firm.
With its M bayonet mount, the CL could use the 50 mm lenses of its bigger brothers, but Leitz had also designed two lenses specifically for the CL, a 40mm Summicron (F:2) and a 90mm Elmar (F:4).
Using the Leica CL
A true Leica, it also used a focal plan textile shutter (1/2 sec up to 1/1000 sec). The rangefinder has a short base and is not as accurate as the M6’s, but is good enough for the 90mm Elmar.
A class at the Louvres Museum- The CL is small and silent, and nobody paid attention to me or to the camera.
With its mechanical shutter, the CL only needs a battery for metering, and uses it sparingly. Mine still has the mercury battery I bought it with, but I suspect it must be at the end of its life, because the recommendations of the metering system were so bizarre that I decided to forget about it and apply the “sunny 16” rule. With a battery in working order, the determination of the exposure is very simple (a match needle at the right of the viewfinder).
On the CL, the image in the viewfinder is large and clear. The viewfinder has a greater field of view than the 40mm lens normally mounted on the camera, and projected bright lines show to the photographer what the actual picture will look like. There is little difference between the respective field of views of the viewfinder (similar to a 35mm) and of the 40mm lens, but the bright frame projected of the 90mm lens will seem minuscule at the center of a viewfinder, whose enlargement factor does not change. Disconcerting, but not dramatic.
What really requires adaptation is focusing. On a manual focus Single Lens Reflex camera, the image of the subject is projected on a matte ground glass, and the photographer can see immediately whether the image is in focus or not. Similarly, with tele-zooms used at large apertures, the effects of the reduced depth of field are easily visible, and the photographer can visualize what will be in focus, and what will be pleasantly blurred.
The back of the Leica CL – Note the viewfinder at the top left corner of the body, leaving ample space for the nose of the photographer
On a rangefinder camera, the finder does not provide any feed-back when it comes to focusing. Every element of the image seems in focus: it’s very easy too forget to set the focus, and very difficult to predict the depth of field.
The coupled rangefinder is materialized by a small window at the center of the viewfinder. It’s extremely accurate, but the focusing ring on the small lens is narrow and rather stiff, and you get the impression that you could have reacted much faster with the large focusing ring of the 50mm lens of your SLR.
I guess it gets better with experience, but it’s very frustrating for a beginner.
If you can get over the idiosyncrasies of the viewfinder, the Leica experience is very rewarding. The camera is virtually silent, and being small and black, gets totally unnoticed. The pictures are sharp, with a lot of micro-contrast, and give the impression of being of higher quality than the images taken with most of the SLRs (provided you could master the focusing system). Your success rate will be lower than with a manual SLR, and far lower than with a dSLR of the latest generation, but when the images are good, they’ll be very good.
Buying a rangefinder camera
Rangefinder cameras are markedly different from SLRs, and will not produce good pictures without some serious practice. The first attempts will be frustrating, and there is no point in spending a lot of money in a Leica M9 if you discover after a few days that you’re totally allergic to this style of cameras.
The Leica CL is one of the cheapest options for a photographer who would like to try rangefinder cameras. Good Leica CL are rather easy to find in the US or in Europe. Even in a pristine condition, they never cross the $1,000 threshold, and nice items can be found between $300 and $600. In Japan, the CL was sold as a Leitz-Minolta camera, with no other difference with the “Leitz only” CL than the logo.
A few years after the production of the CL was stopped, Minolta launched the CLE, an automatic exposure version of the CL, and the first camera to propose On the Film (OTF) flash metering. There is no semi-auto or manual mode. The CLE contains much more electronics than the CL, and it can not be repaired if the main circuit decides it had enough. The CLE is much more difficult to find than the CL. Expect to pay $600 for a nice one, and thousands for collector editions.
Full size M series Leica are either more primitive (no exposure metering) or more recent and significantly more expensive than the CL. Even in poor condition, a Leica M6 can not be found for less than $1,000. Cosina is still producing a line of rangefinder cameras, sold under the Voigtlander brand, and available with Leica M lens mount as well as less common mounts such as the Nikon and Contax rangefinder mounts. Amongst all the the rangefinder cameras from Voigtlander, the Bessa R3M is the closest to the CL (it accepts the same 40 and 90mm lenses), and can be found between $400 (used) and $600 (new).
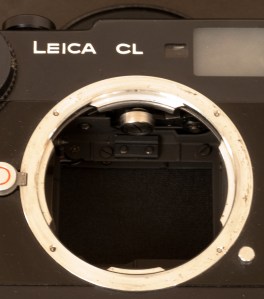
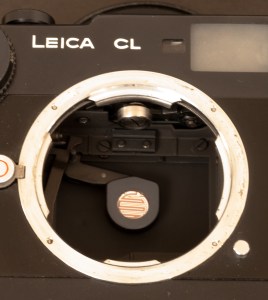
The light chamber of the Leica CL – In this picture, the shutter is not armed. As a consequence, the CdS sensor of the exposure meter is not deployed.The shutter is armed; the CdS sensor of the exposure meter is deployed. It will retract when the shutter release is pressed, just before the shutter opens.
Canal St Martin – Paris – Located between the Gare de l’Est and the Bastille, the Canal was a favorite set of the French film makers in the thirties. Using a Leica with B&W film seemed appropriate
All film cameras have to live with the same design constraint: their shutter and their diaphragm are built in such a way that, for a given picture, the shutter speed and the aperture are the same for each square millimeter of the film. There is no way for the shutter of a film camera to block the light in excess in a particular zone of the scene, or to stay open longer only for the portion of the scene located in the shade. At some point the researchers of Canon were rumored to be working on an LCD based shutter, which could to exactly that, but the research never materialized.
Olympus OM-3. Picture: Wikipedia
Since the shutter only works in an all or nothing, one-duration-fits-all mode, some zones of the film will receive more light than the optimum, and others will receive less. Films have the ability to give acceptable results when portions of the scene are a few f: stops brighter and a few stops darker than the optimum (that’s the exposure latitude of the film). As a consequence, the exposure metering systems of the cameras are calibrated to determine the correct exposure for the portion of the subject located in the mid-tones, with the expectation that the film will have enough exposure latitude to render the highlights and the shadows correctly.
Unfortunately, in some cases, the brightness range of the scene greatly exceeds the exposure latitude of the film (think of the backlit portrait at sunset with the sun in the frame); supposing the photographer can not reduce the brightness range of the scene – using a flash or a reflector to bring more light to the subject, for instance, the exposure parameters will only be optimal for a subset of the scene, the highlights or the shadows, and the rest of the picture will be burned or left in the dark.
When cameras started being equipped with Through the Lens (TTL) metering systems in the sixties, most of the manufacturers opted for Average or Center Weighed Average Metering. Those metering systems were not adapted to high contrast scenes, and the photographers had to put their experience to good use and take control manually of the exposure metering process. If they had automatic cameras, they had to use exposure lock or exposure compensation systems. The alternative – measuring the brightness of a very narrow section of the scene with a spot meter, was not easy to master for the average photographer. Elaborate exposure determination procedures such as the “zone system” were adapted to small format cameras using roll film, but their complexity put them out of reach from the majority of photographers.
The Olympus OM-4 and the Nikon FA
In 1983, two cameras manufacturers tried to address the problem of high contrast/high brightness range scenes, and they chose two very different approaches.
Olympus tried to make the principles of the zone system accessible to more photographers, and developed a multi-spot system for the new OM-3 and OM-4 cameras. With the new OMs, the photographer could make up to eight successive spot measurements, whose result were presented in the viewfinder on an analog bar scale showing each individual result and the average. The cameras also had a “shadow” and a “highlight” push button, letting the photographer compose his picture following the principles of the zone system.
The photographer Ken Norton described the process in his blog:
Olympus OM-3 and OM-4: exposure metering controls. Picture: Wikipedia
“for example, I can take a spot reading of a highlight, a midtone and a shadow. Three dots will appear on the display. If I’m using a film with six stop exposure range, I’ll make sure that all three dots appear within the +/- 3 stop marks. Of course, I can bias my exposure to place a highlight or shadow anywhere I want on the scale. Digital cameras are capable of producing a histogram of an image. The multi-spot scale, with the “dots” is a poor-man’s variation of the histogram where we are able to define our bright areas and dark areas of a scene and like a histogram we are able to move these points around to place them within the acceptance range of the film.
You can read more about the subject, and see actual pictures of the viewfinder on Ken’s pages.
Nikon chose a totally different approach. In the first iteration – the Automatic Multi Pattern (AMP) of the Nikon FA – the camera was equipped with a database containing the mathematical description of thousands of potential pictures, with the exposure value to be used in each situation. The light meter was divided in five zones (a large central zone, two zones at the bottom left and right, two zones at the top, left and right also), and the electronic circuit would correlate the exposure value of each zone with other elements such as the focal length of the lens to define the characteristics of the scene, and associate it with one of the many typical pictures described in the database of the camera.
Nikon FA (the round knob controlling the exposure mode ( matrix or center weighted) is on the right side of the lens mount, at the top on this picture
The FA could also be operated in a more conventional Center Weighted Metering mode, and in all honesty, the results of the AMP system were not that different from the center weighted mode. But the system required no intervention and no expertise of the user, and was rapidly made more efficient with the addition of more metering zones and the capture of more parameters (focusing distance, color of the subject, for instance). Current Nikon cameras have a color sensor dedicating to metering, with more than 1,000 metering points. Equivalent systems have been developed by Canon, Minolta and the other manufacturers, under different names: Canon’s system is “evaluative”, and Nikon’s AMP is better known now as “Matrix metering”.
Modern digital cameras all use elaborate variants of matrix or evaluative metering as their default exposure mode, and give good results in a huge majority of cases. They use so many parameters that it’s sometimes very difficult to understand how the camera chose a particular exposure value; in doubt, photographers can visualize the picture they’ve just taken on high definition displays, and use histograms to analyze the exposure of their pictures. Olympus’ Multi-Spot system happened to be too complex for the huge majority of photographers, and left no legacy.
More about Exposure and Metering
Cambridge in Colour. A good (and free) on-line tutorial about digital photography.
A good book about exposure: “Exposure“, by Chris Weston.
Destin- The beach (Nikon FA- Nikkor 24mm AF - Kodak Ultramax) Sept.09
Launched in 1983, the successor of the FE had a relatively short sales career, but a long legacy. It can be argued that the Nikon FM3a, sold from 2001 to 2006, is much more a descendant of the FE2 than of the FM2.
Nikon FE2 – The titanium blade shutter was the most advanced at the time of the camera’s launch, with a top speed of 1/4000 sec and a flash sync speed of 1/250 sec.
In 1977, a few years after Olympus initiated the compact SLR revolution, Nikon presented the FM. Like the Olympus OM-1, the FM was a compact semi automatic camera with a mechanical shutter, which could be equipped with a motor drive. But contrarily to the OM-1, which still relied on a CdS light metering system and on mercury batteries, the FM used modern gallium photo diodes and silver oxide batteries. It also benefited from a vertical blade metallic shutter, and the exposure metering was relying on 3 LEDs instead of the more conventional match needle arrangement of the OM-1. Solidly built and reliable, the FM was very successful commercially, and the ancestor of a large family of models whose production only stopped in 2006.
Nikon FE2 with the MF-12 data back – the data back connects to the PC Sync of the camera
The FE from 1978 is the automatic exposure version of the FM. It looks very similar to the FM, but instead of LEDs, it uses two needles to show the shutter speed selected by the photographer (semi-auto mode) and by the automatic exposure system (aperture priority auto mode). In 1982, the FM became the FM2, receiving a new mechanic shutter with titanium blades, which could reach 1/4000 sec and had a flash synch speed of 1/200 sec.
Nikon FE2 – Auto Exposure Mode – the thin black needle shows the shutter speed selected by the metering system of the camera. Note the aperture value at the top of the viewfinder.
One year later, the FE2 was launched. Its titanium shutter is an improved and electronic version of the FM2’s, with a X synch speed now reaching to 1/250 sec. The FE2 also benefits from a modern on the film (OTF) flash metering system (that the FM2 never got). The FM/FE range of products was extended the following year with the presentation of the Nikon FA, which added matrix metering (a world premiere), a programmed exposure mode and trade the brass prism cover of the FM/FE models for a polycarbonate one. Both FE2 and FA were discontinued in 1988. The FM2 lived longer, and was ultimately replaced by the FM3a, which merged the mechanical shutter of the FM2 with the electronics of the FE2.
Using the FE2 as an every day camera
Reasonably light and compact, the Nikon FE2 is very solidly built, and very nicely finished. Compared to a previous generation model like the FM, the FE2 has smoother commands. The viewfinder is typical from a pre-high eye point construction – the enlargement factor is high (0.86) for a good focusing precision, but the frame coverage is limited (93%), and the eye point is very short (14mm), which could be an issue for photographers wearing glasses. Even with thin glasses, it’s impossible to see 100% of the image projected on the focusing screen without having to move one’s eye ball right to left and left to right: you only perceive 90% of the focusing screen when you look straight into the viewfinder, which compounded with the rather limited frame coverage, ensures that you’ll have a wide safety margin on both sides of your prints.
Nikon FE2 / Olympus OM-1n – The FE2 is a bit larger, but not significantly.
The determination of the exposure is very conventional for a camera of its generation, with a center weighted measurement provided by two silicon photodiodes. In automatic mode, a needle indicates the speed selected by the exposure system of the camera on a large scale at the left of the viewfinder. The photographer has multiple ways to override the automatism: he can memorize the exposure (pushing the self timer lever towards the lens), apply a correction factor on the film speed selector (from -2 up to +2EV), or switch to semi-auto mode. In this case, a second needle – larger and transparent – appears in the viewfinder, showing the shutter speed selected by the photographer.
Nikon FE2 – Semi auto exposure mode. The fat blue needle shows the selected shutter speed, the thin black needle shows the shutter speed recommended by the metering system.
In a very simple matching needle arrangement, the photographer just has to align the meter needle with shutter speed needle. The shutter speed knob is much smoother than on the FM (in the FE2 the shutter is controlled electronically), and surprisingly the camera is more pleasant to use in semi-auto mode than the FM. No wonder that Nikon derived the exposure control system of the FM3a from the FE2’s and not from FM’s.
A very clean Nikon FE2 with the MF-12 data back – All the commands are grouped on the top plate – with the exception of the depth of field preview and the exposure lock levers, located at the right of the lens mount. A very simple and efficient layout.
Conclusion
Powered by two easy to find LR44 silver oxyde batteries, the camera also operates without battery at a speed of 1/250sec. Compatible with any AI, AIs and AF lenses, it’s still perfectly usable today.
Less rugged than its FM and FM2 cousins (it has an electronic shutter and a potentially more fragile match needle metering system), it is more pleasant to use and can respond efficiently to a larger variety of photography opportunities. Like the FA and the FM3a, but unlike the FM2, the FE2 benefits from a modern through the lens (on the film or OTF) flash metering system, compatible with the flash units currently sold by Nikon.
Nikon FE2 with the MF-12 back. The MF-12 back was designed for the FM/FE cameras, which did not have internal synchronization contacts for a data back inside the film chamber. Hence the need for an external synchronization cord. The FE2 could also use the MF-16 data back, which did not need the external sync cord.
Its automatic exposure system is very easy to override, and does not get in the way. The matching needle system in the viewfinder is very informative, easier to read in the sun light than the LEDs of the FG, and than the small LCD display of the FA.
With the F3, the FE2 is probably the most usable Nikon camera of the early eighties.
How much for a Nikon FE2?
The Nikon FE2 is a very good automatic exposure film camera, and its reputation has obviously an impact on its price. Specialized retailers like KEH sell it between $130 (Bargain) and $270 (Top Condition).
As usual, prices are a bit lower on eBay, but the FE2 does not seem to sell for less than $100, with peaks up to $180 for very nice items.
There are few alternatives to the FE2: the more recent FM3a is much more expensive (typically from $400 up to $700) and the FE, with its modest shutter and no OTF flash metering, is far more primitive and more difficult to recommend.
Eight years later…
I wrote this blog entry in 2009. Eight years later, after having tested and used many other SLRs from Canon, Fuji, Nikon, Olympus and Pentax, the FE2 is still one of my preferred cameras:
it’s simple – very few options and commands. You read directly on the rings and knobs how it’s set up (pretty easy – aperture, shutter speed, ISO – that’s all). Controlling it rapidly becomes instinctive – an extension of your eyes and hands .
with average metering weighted towards the center/lower half of the scene, and an easy to find exposure memorization lever – it’s easy to get the exposure right.
the focusing screen is very clear – almost as clear as the viewfinder of a rangefinder camera, but not at the detriment of precision – you can get the focus right, even with very luminous lenses. It’s a relatively short eye point viewfinder – if you wear glasses, you won’t see the borders of the focusing screen unless you really pay attention to it. You just see the scene – you’re in the middle of it – it’s an immersive experience.


")
. Sept. 2009")