For a single lens reflex camera or a lens manufactured after 1975, full aperture vs stopped down metering is a non issue. But it was a key differentiator between 1965 and 1975. And if you’re considering mounting an old lens (manufactured before 1975) on a mirrorless camera, it may still impact you.
On a single lens reflex camera (SLR), the photographer composes the picture on a mat focusing screen, where the image formed in the lens is projected. This layout has all sorts of advantages, but the viewfinder tends to get too dark for focusing when the lens aperture exceeds F/8, and at smaller apertures (F/11, F/16), even composition becomes impossible.
Therefore, the best practice in the 50’s was to open the lens at the widest aperture, focus carefully, and then rotate the aperture ring to stop down the lens at the aperture needed to expose the picture optimally. It worked, but it was slow. The process was easy to automate, and that’s what aperture pre-selection systems do.
Aperture pre-selection mechanism
Their goal : let the photographer compose and focus at full aperture, and then stop down at the last fraction of a second, when he/she presses the shutter release. Practically, the diaphragm stays wide open, until the shutter release mechanism (through various cogs, springs and levers) activates a rod in the lens which closes the diaphragm to the aperture pre-selected by the user.
Two implementations
- manual pre-selection : the lens stays stopped down after the picture has been taken. The pre-selection mechanism has to be re-armed by the photographer if he/she wants to return to full aperture; it’s a slow process (shoot, rearm the shutter, rearm the lens).

This big lever on this Nikkorex lens has to be pushed down to re-arm the pre-selection system after each shot - auto pre-selection: the pre-selection mechanism does not need to be re-armed after each shot. The lens returns automatically to full aperture after each shot (that’s why lenses from the 1960-1975 period are often labeled “Auto”). It’s transparent for the user, who can operate faster and with a better chance of catching the decisive moment.

M42 Lens mount – this lens is designed for “auto” preselection. It stays at full aperture until the pin is pushed to force the lens to a stop down position.
Through the Lens (TTL) metering
Aperture preselection solved the problem of composing and focusing at slow apertures, but the introduction of CdS cell meters to evaluate the illumination of a scene Through The Lens (TTL) brought a new set of challenges: the camera needed to know how open the diaphragm was going to be when the picture is finally taken. There were two ways to do it:
- after the photographer had set the aperture, he had to press a dedicated lever to stop down the lens, and only then would the camera evaluate the illumination of the scene. It’s stopped down metering.
Technically, it’s the quick and dirty answer: the metering system of the camera does not need to know the value of the aperture pre-selected on the lens. It just measures the light going through the lens when stopped down. The pre-selection lenses don’t need to be modified – they simply work. But it’s cumbersome for the user:- it’s a step back – aperture preselection had removed the need for the photographer to stop down the aperture before pressing the shutter release. Now it needs to be done again.
- the viewfinder is darker during metering (the photographer loses contact with the action, he can’t adjust the focus, and it’s difficult to see needle of the meter) – you cannot compose or focus and adjust the exposure at the same time.
- it’s a disaster from an ergonomics point of view. Even in the best implementations, the photographer has to maintain the lens stopped down by pressing or lifting a dedicated lever on the camera’s body, while trying to turn the aperture ring or the shutter speed knob to adjust the exposure. You need three hands for this type of gymnastics.

The Canon FT/QL and the Pentaxx Spotmatic SP both offer Stopped Down Metering. To determine the exposure, the photographer has to push the big switch to the left (Canon) or to lift the switch in the red circle (Pentax) – which is not a very natural movement. You wish you had three hands.
- full aperture metering is transparent for the user. The diaphragm is stopped down a fraction of a second before the shutter curtains open and the picture is actually taken. The lens stays at full aperture all the time, including during the exposure determination.
But for full aperture metering to be possible, the lens has to communicate the aperture pre-selected by the user to the metering system in the camera body, so that it can determine the right shutter speed/aperture combination.
Most vendors chose to add a new dedicated lever inside the lens mount (this solution was chosen by Canon, Minolta, Olympus and Pentax).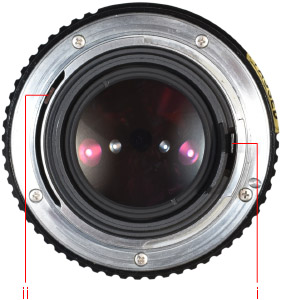
Pentax K mount: Aperture control lever (i);
Aperture simulator (ii):
Source:pentaxforums.comA few other vendors chose to simply modify the design of the aperture ring of the lens, and use it to transmit the aperture value to the camera’s metering system. At the beginning, Nikon used an external fork (the “rabbit ears”) screwed at the periphery of the aperture ring to communicate the pre-selected aperture to a pin connected to the metering system in the body.

Before the adoption of Auto-Indexing, Nikon lenses used a metallic fork (“the rabbit ears”) to transmit the preselected aperture to the metering system of the camera. Later, Nikon redesigned the aperture ring to add a small protruding tab at its back, and this tab moved a sensor on the circumference of the body’s lens mount (Nikon Auto Indexing or “AI” lenses). Nikon’s system is similar (in its principle) to Fuji’s implementation of full aperture metering on the m42 universal mount of the ST801 (pictures below).


Mounting an old lens on a mirrorless camera
When the photographer is using an old lens through a lens mount adapter, the cameras needs to work with the lens stopped down (only semi-auto and aperture priority automatic exposure modes are supported). There are none of the inconveniences associated with stopped down aperture on a reflex camera: on a mirrorless camera, the viewfinder always shows the image as it will be exposed, and if the exposure parameters (aperture, shutter speed and ISO) are correctly set, the image will be perfectly legible in the viewfinder, even if the lens is set a f/11.
But the challenge is to force an old lens to operate stopped down:
- lenses designed for full aperture operations and stopped down metering (typically the m42 lenses with auto-pre-selection and the Canon FL) have a slider to switch off auto-preselection and operate permanently at stopped down aperture, in a manual mode. When mounted on a mirrorless camera through a lens mount adapter, they need to be switched to “manual”.

Lenses of the 1965-1975 era often had an auto/manual switch – by default they operated at full aperture but could revert to manual if mounted on an older reflex camera. 
The “manual” mode has to be switched on when used on a mirrorless camera. - Nikon lenses – the diaphragm of the Nikon lenses is opened at full aperture when the camera is mounted on a Nikon camera (the camera side of the mount has a lever which forces the lens open), but is stopped down when the lens is removed from the camera, or mounted on an adapter deprived of the full aperture lever. Which is perfect if you’re mounting the lens on a mirrorless camera.
- Canon FD – when the lens is removed from a Canon camera, the diaphragm command is decoupled (the lens stays at whatever aperture it was pre-set the last time it was on a Canon FD camera). The adapter needs to be designed with a pin that will force the lens to stop down when mounted on the adaptor.

- Fuji’s EBC-Fujinon lenses are highly regarded, but the brand’s implementation of full aperture metering on the m42 mount presents two problems for modern mirrorless camera users:
- most of the lens mount adapters receiving m42 lenses do not leave room for the aperture ring’s protruding tab of Fuji’s lenses. The lenses cannot be fully screwed down on the adapter and as a consequence may not focus to the infinite,
- Fuji’s lenses don’t have a “manual” position and cannot be forced to operate stopped down on their own (that function was provided by the Fujica camera itself, not by the lens). There are work arounds to both issues, some nice, some ugly, but a lens mount adapter designed specifically for Fujica m42 lenses still has to be developed.


")
. Sept. 2009")