I have too many cameras and my recent interest for Pentax film cameras means that my small Contax collection must go – splendid cameras, superb lenses, but I don’t use them enough.
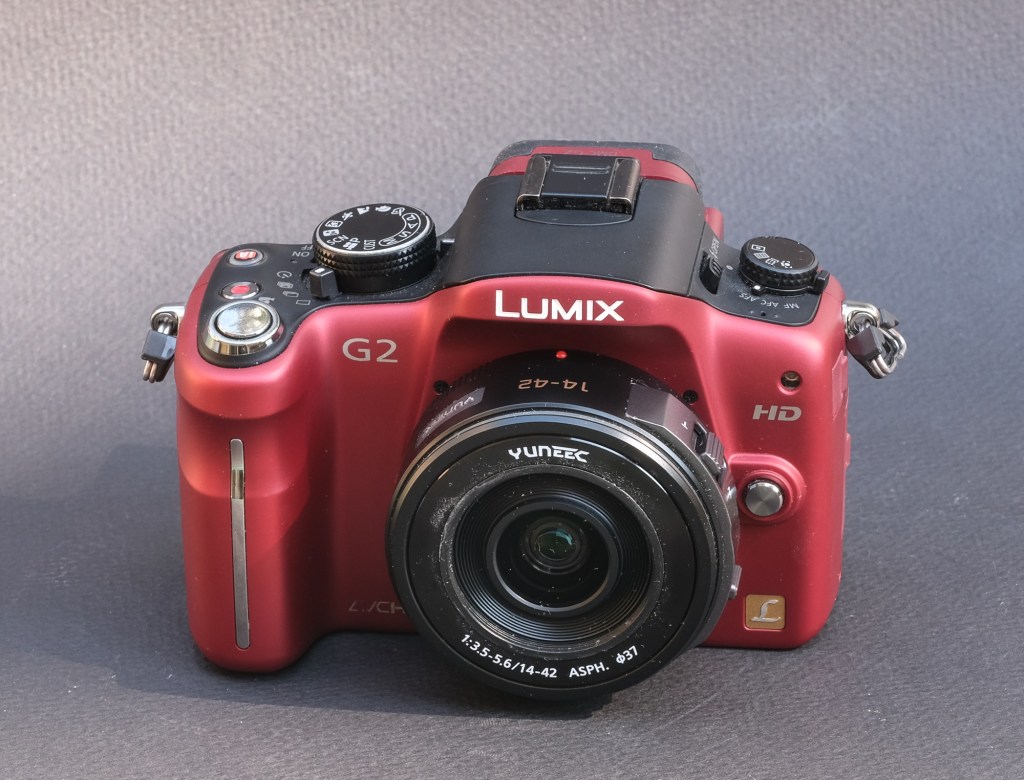
As for the Panasonic G2, it’s cute but too close in size and weight to my current Fujifilm equipment, and I know I won’t use it.
I rediscovered the Pentax ME and its close family of derivatives recently, after having been disappointed by the Pentax P3 (also know as the P30).
I would have loved to like the Pentax P3. When it works, it’s a great camera. But I bought three copies of them (a P3, a P3n, a P3t) at different times, and they all failed me. Always an issue with the film advance. But if I could not rely on a P3, what about shooting with the Pentax cameras of the following or previous generations?
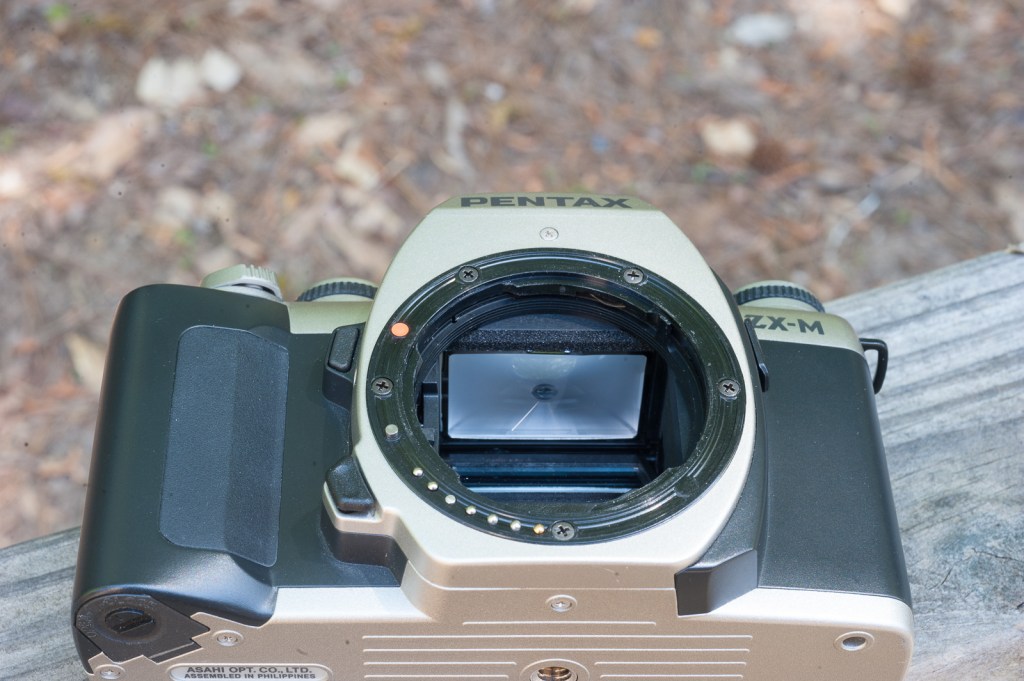
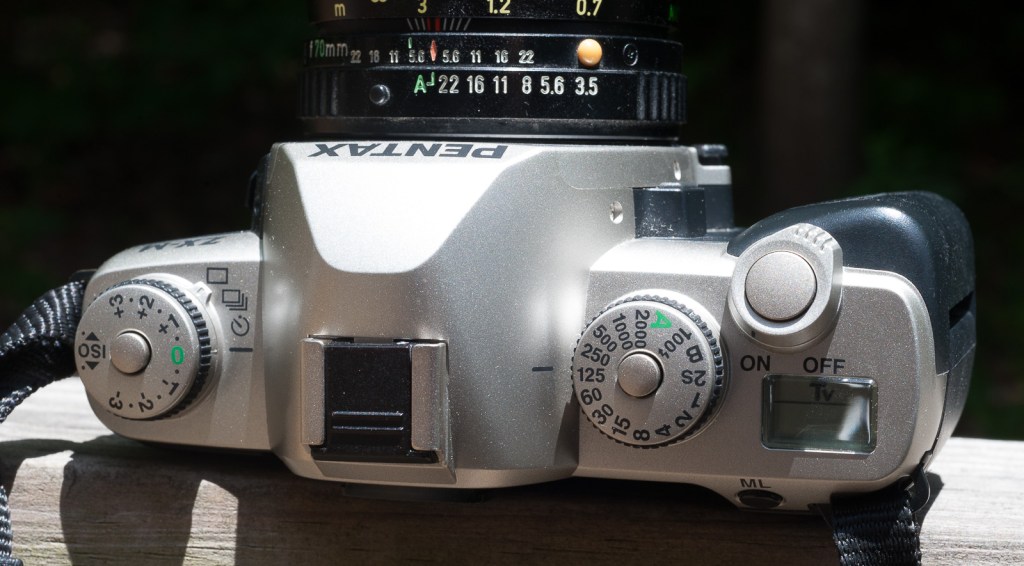
Pentax ZX-M: the bayonet mount is in polycarbonate, like almost everything else in this camera
I’ve burned a few rolls of film with a plastic-fantastic ZX-M (also sold as the MZ-M), a motorized entry-level autofocus camera that Pentax had deprived of its autofocus system to make it a “learner’s camera”. Launched in 1997 to replace at the same time the venerable K1000 and the P3, the ZX-M was one of the last film SLRs released by a major vendor before the amateur photographers switched to digital, and for that reason it did not sell in large quantities.
It works well, but it’s plasticky, it’s loud, the exposure metering is a bit too primitive, and its pentamirror viewfinder is dark and narrow. People shooting with film nowadays do it at least partially for the gratifying experience of interacting with a nice piece of conventional machinery – and it’s definitely something that the MZ-M can’t provide.
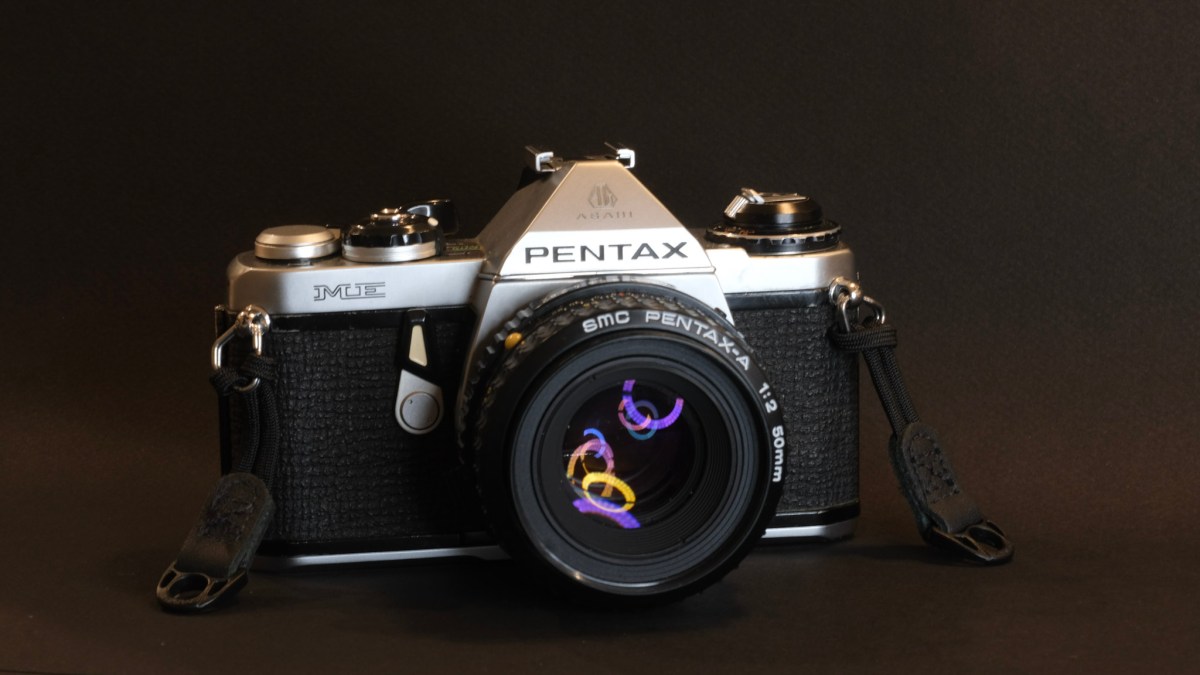
At the other end of the timescale, pre-dating the K1000 and the P3, the Pentax ME and all its derivatives – ME Super, MV, MG, Super Program, Program-A – were a sales success, and are still abundant on the second hand market. They are all built on the same very compact platform. So compact there was no room for a conventional shutter speed selector. That’s the series we’re going to explore today.
The ME generation
In 1975, Pentax finally abandoned the 42mm screw mount for the “K” bayonet, and launched a new line of K cameras (KM, KX, K2) which were – to a large extent – similar to their screw mount predecessors, except for the bayonet mount, of course. The K1000 was not part of the initial launch – its turn came a few years later – essentially a KM with a few minor features removed.
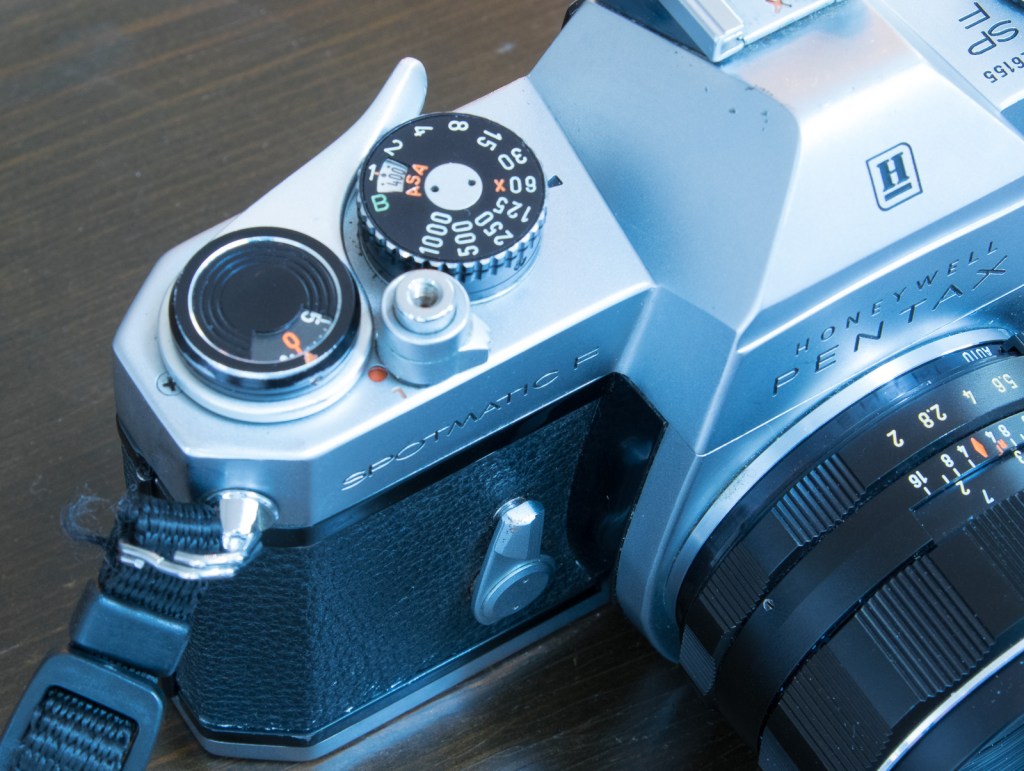
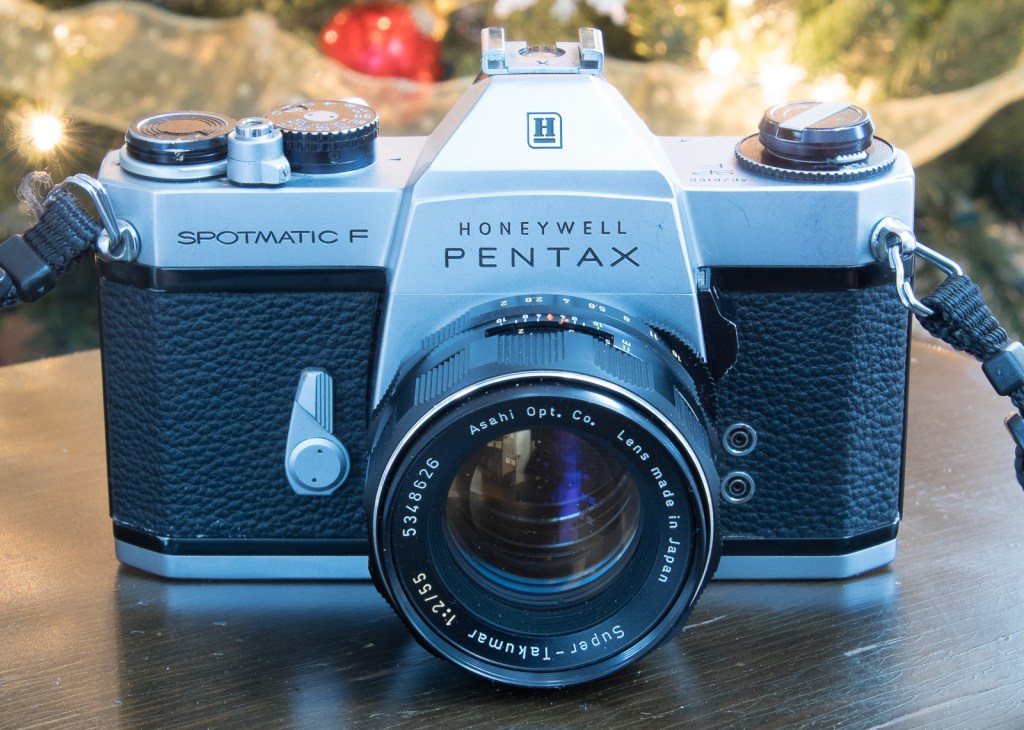
A Spotmatic F from 1973. From this angle it looks almost identical to a KM. The K1000 is a slightly decontented KM.
One year after the KM-KX-K2 cameras, Pentax launched two completely new models, the semi-auto MX, and the Aperture Priority Auto Exposure ME. Both were technically advanced, and really represented the state of the art in the heart of the market. Except for their small size, the two cameras had little in common (their winders and motor drives were physically different and not inter-compatible, for instance).
Pentax MX and ME – from the sales brochure (1976) – Courtsey of Pacific Rim Cameras
The Pentax MX is what an Olympus OM-1 Mark II could have been if Olympus had bothered updating the technology content of their camera. The MX is a super compact, semi auto SLR, with a huge viewfinder. It was my main camera in my younger days. Its electronics ultimately failed, otherwise I’d probably still be shooting film with it. But while it worked (a good 15 years) it was a great little camera.
The MX remained unchanged until Pentax sent it into retirement in 1985, with no direct successor. In the meantime, the buying public had shown it was more interested in cameras offering auto exposure modes, and it was the ME and its derivatives that brought the money to Pentax’s coffers.
When it was launched, the Pentax ME had a singular characteristic: contrarily to almost every single lens reflex before it, it did not have a shutter speed selector – just a rather difficult to move four position switch (off, auto, synchro flash and B). It could only operate in auto exposure mode (you set the aperture, the camera picks the shutter speed), and in totally manual mode at 1/100sec (no meter indication to guide the photographer).
A new category of SLRs without a shutter speed selector rapidly followed the formula inaugurated by the Pentax ME (Nikon EM, Olympus OM-10, Canon AV-1, for instance).
A simplified MV model was launched at a lower price point in 1979, followed one year later by the ME-Super, which offered the ability to select the shutter speed by pushing two small buttons on the top plate. Then came the MG (spec’d like the original ME), then the Super-Program and the Program-Plus [*], with the same tiny shutter speed push buttons already seen on the ME Super, and more automatic modes (Program mode for the Program-Plus, Program and Shutter priority modes for the Super-Program). All models were developed on the same technical platform, and could share accessories like winders and motor drives.
* [Like most Japanese camera companies, Pentax was selling its cameras under different models names in different geographies – the camera sold as the Super-Program in North America was sold as the Super-A in the rest of the world, and the Program-Plus was simply known as the Program-Aoutside of North America]
Pentax ME – a very nice detailing
Shooting with the ME
Shooting with a Pentax camera such as the ME is a pleasure. The camera is small, light, reactive, and provided you control from time to time that the shutter speed (determined automatically by the camera) is still the desired range, you’ll be fine. The viewfinder is extremely large, but I was surprised by how difficult it was to set the focus though – I know I’m getting older (aren’t we all) but I found the glass plane rather dark and the micro-prism telemeter difficult to use. I was shooting with a not very luminous zoom (and not very good if I judge by the results) Pentax A 35-70 f/3.5-4.5 zoom, on a camera that was originally designed and sold for more luminous prime lenses such as the 50mm f/1.7, so it could explain some of that.
A Pentax Program-Plus I was testing in parallel fared better in that regard – in the viewfinder the ring of micro-prisms offered more contrast and focusing was significantly easier.
Pentax ME – Top plate
The absence of a depth of field preview is not a problem for me (I seldom use it when a camera offers the option), and not having a conventional shutter speed knob at my disposal was not really a hindrance. But when the lighting of the scene becomes complex, and without an exposure memorization button and no semi-auto exposure mode, you have to play with the ISO settings dial for exposure compensation, which I’ve always found very difficult (I never know if I need to set the dial to +2 or -2). If only for that reason, I would not bring a ME with me if I knew in advance that the lighting conditions would be tricky.
Viewfinder of the Pentax ME – a shutter speed scale on the left, split image and microprism focusing aids at the center. The 0.97 magnification ratio was exceptional .
The camera is nicely finished with a few Pentax touches (red markers on the top plate, little indicator on the back of the camera to show that the film is correctly attached to the film spool). The film spool itself follows an original Pentax design (they called it “Magic Needles”) that makes loading film easier than with most contemporary competitors.
What about the reliability?
The ME and its derivatives are 40 to 45 year old, and as with any other camera of the same vintage, there are quite a few things that can go wrong: their electronics (in general), their exposure metering and their film advance mechanism to name the most obvious.
Pentax ME – the receiving spool is composed of white “Magic Needles” that make film loading very easy.
By very empirical means (counting the hits on Google for a question about film advance reliability) – I came to the conclusion that the ME Super definitely had an issue with the film advance as well. I’m on the fence for the ME, the MV and the Super-Program – there seem to be far fewer Google hits about reliability issues with those cameras, but they sold in smaller numbers than the ME Super. In any case, it’s highly preferable to buy a vintage Pentax SLR from a photographer who has actually used it to shoot film, as those film advance issues are often impossible to detect without having put a roll of film in the camera.
How much?
Film cameras are getting more expensive these days – but you can still find a nice ME for $50.00 on eBay, and probably for a bit less on various auction sites if you’re patient.
Of all major camera vendors, Pentax is the one that has maintained the inter-compatibility between new and old bodies and lenses for the longest time – anything – manual focus, autofocus – sold by Pentax until they launched their first digital SLRs in 2004 will work with the ME.
Pentax Super Program and ME – the former benefits from an electronic self timer, a depth of field preview, and a removable grip.
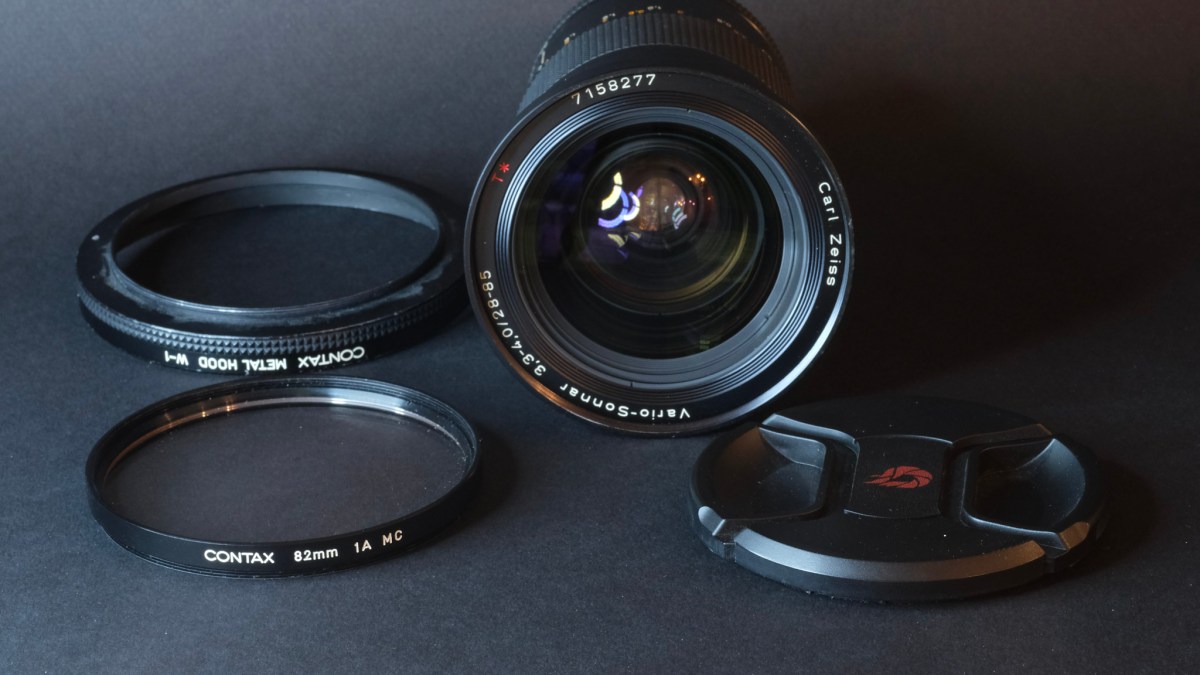
Pentax has been catering to amateurs more than pros, and it will be difficult to find on the second hand market the specialty lenses (ultra-wide angle, f/2.8 constant aperture zooms) that are relatively abundant in Nikon F or Canon EOS mounts. But as long as you look for lenses typically purchased by amateurs, the offer is plentiful and the prices reasonable.
As a conclusion
The Pentax ME was launched in 1976, at the beginning of a ten year period which saw a whole new generation of amateurs come to “serious” photography and buy their first SLR. Ultra compact, reactive, nicely finished, with a good (for the time) viewfinder and a simplified set of commands, the ME was the right camera at the right time, and sold in the millions.
But this new breed of photographers was demanding more convenience, program mode auto-exposure and zoom lenses, and as result the SLRs launched towards the end of the period of manual focus SLR supremacy (1983, 1984) are simpler to use and have more luminous viewfinders.
Prices on the second hand market do not necessarily follow a perfect logic – and cameras or lenses of the same family (in this case the ME, ME Super, Super Program and the Program Plus) can be had for roughly the same price – irrespective of the performance hierarchy between the different models.
So… the ME is a nice little camera, eminently likable, but if for the same $50.00 price you can find a Super Program or a Program Plus, I would recommend you pick the “Program” over the ME.
A few shots taken during the Inman Park festival a few weeks ago. The Pentax ME behaved – it’s very nice to use as a street photography camera, but the Pentax SMC A 35-70 lens disappointed me, again.
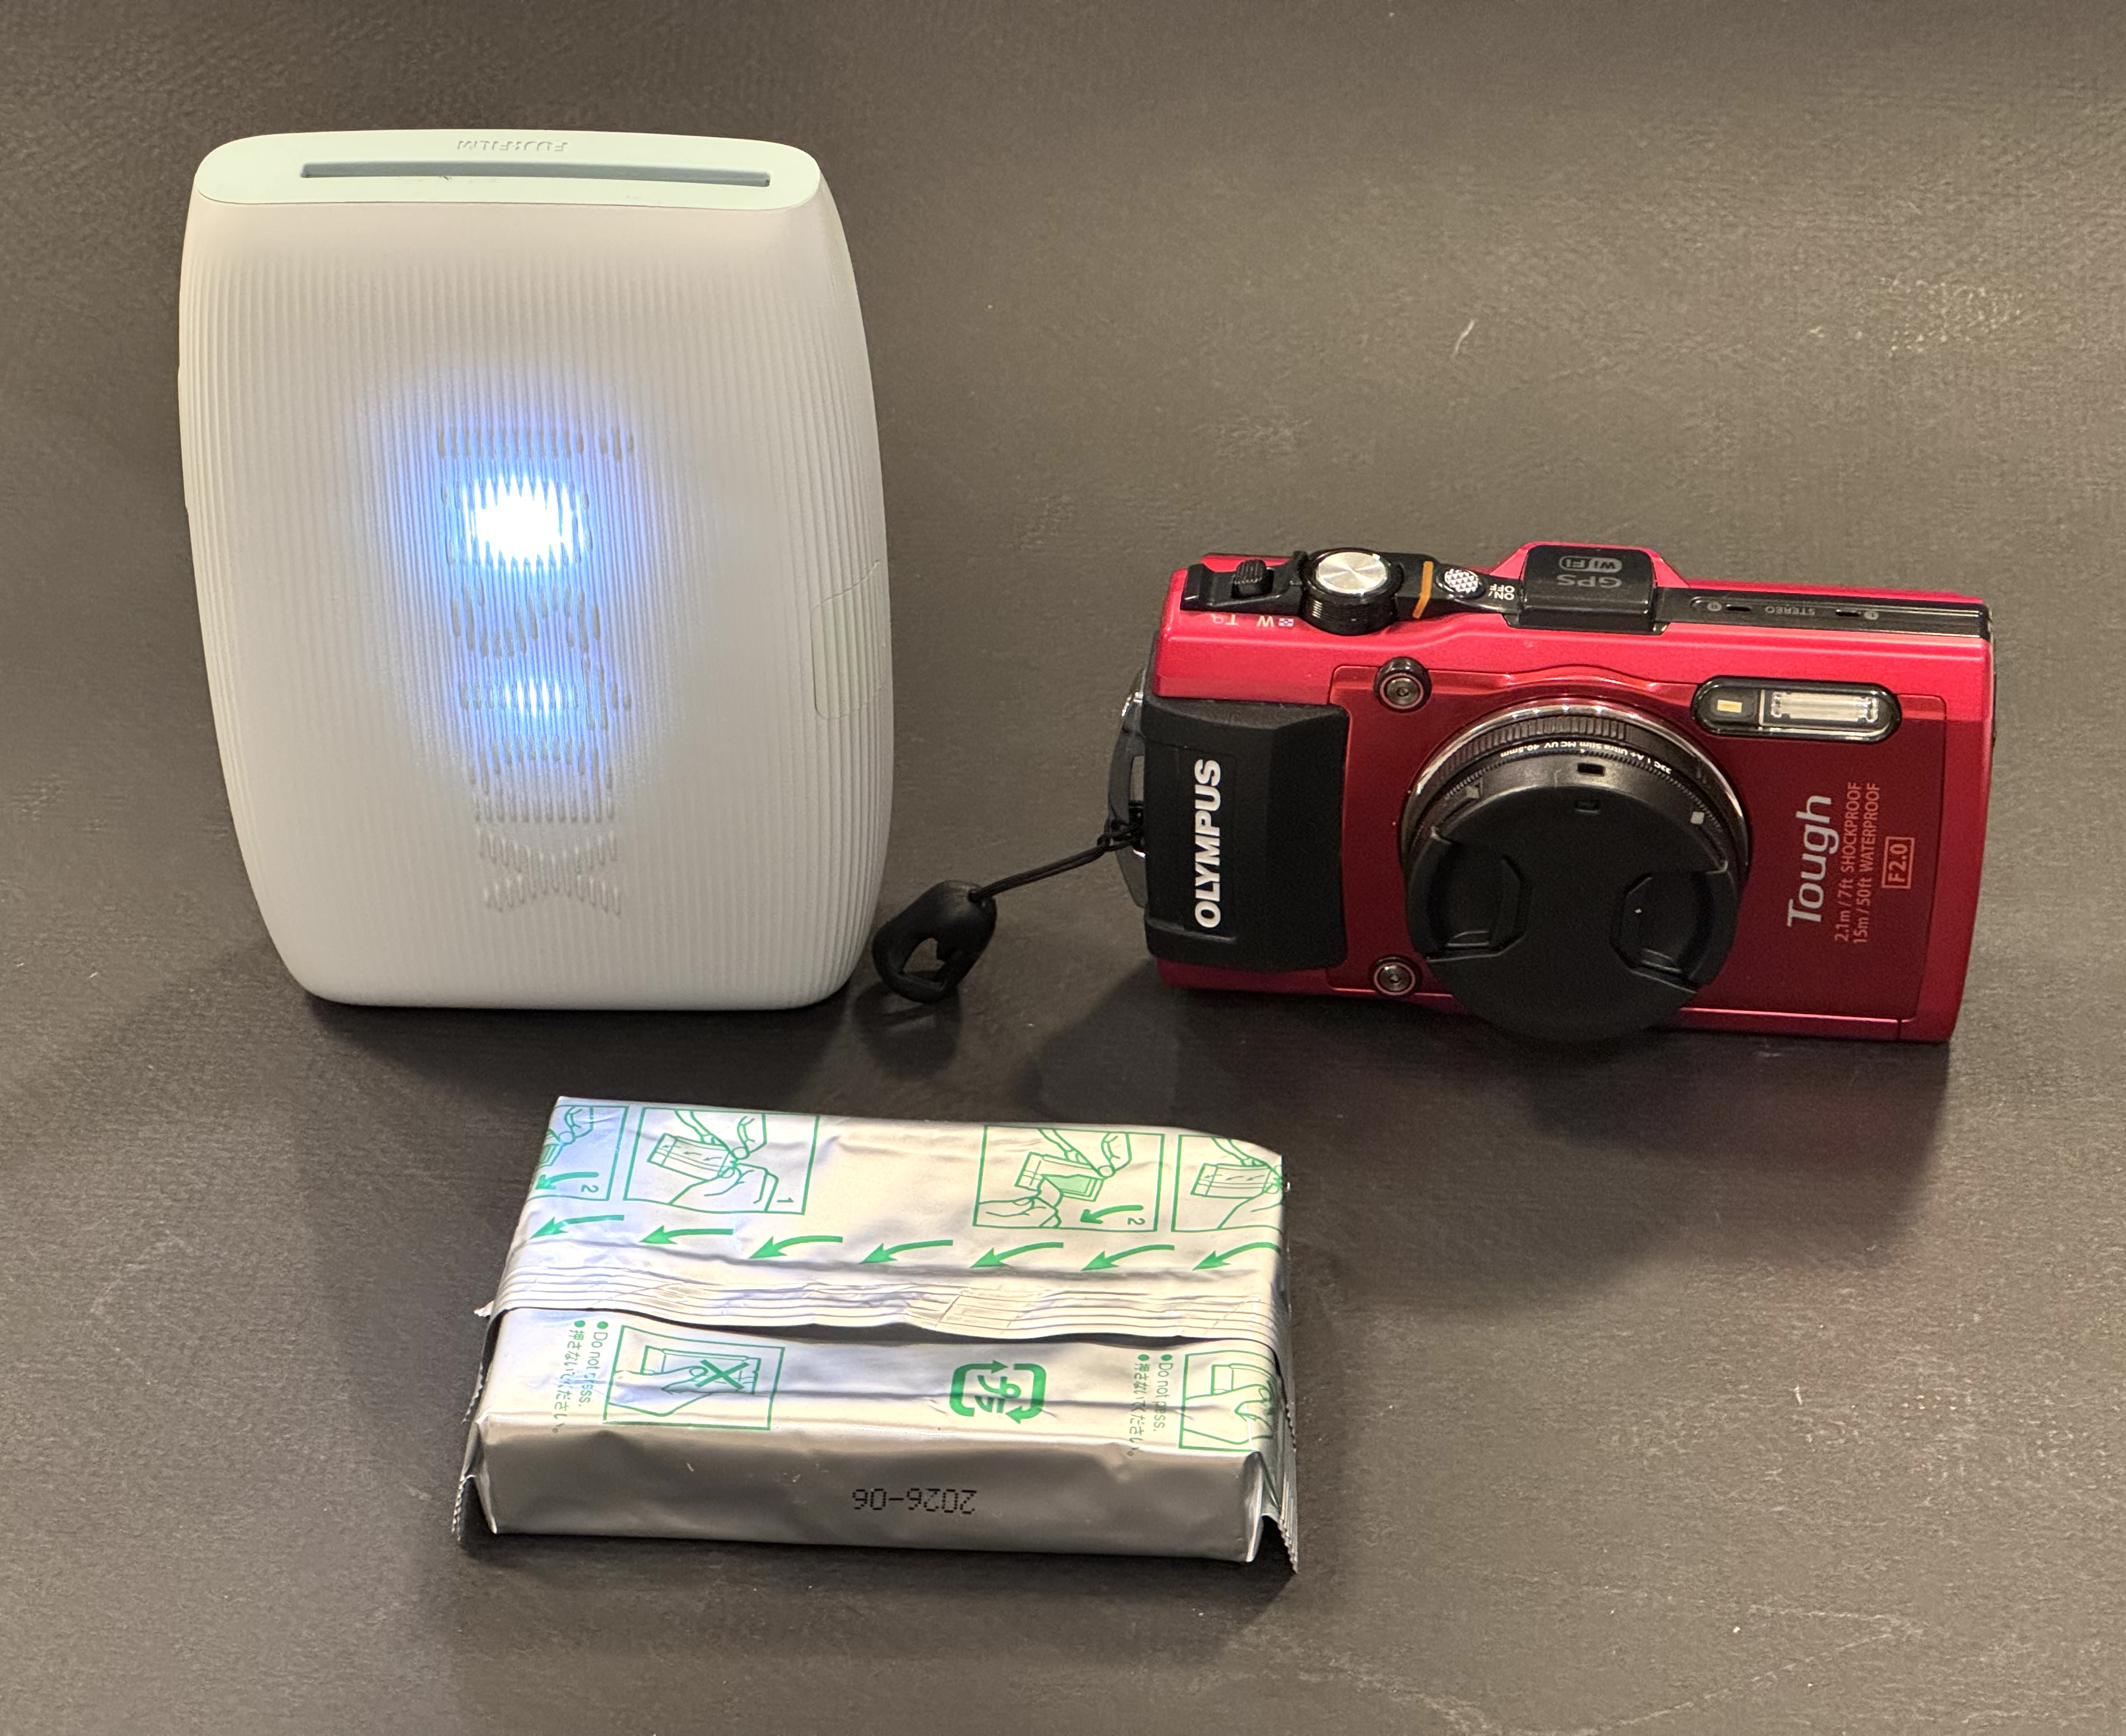
I had been tempted to start processing film again for a while, but I did not want to invest in dark room equipment or a dedicated film scanner. Two products launched recently, the Lomo Daylight Developing Tank and the JCC Film Digitizer, promise to make film processing at home easier than it has ever been, and made me take the plunge.
I ordered the “Lomo Daylight Developing Tank” a few weeks ago, and since I had just shot a few rolls of Ilford Black and White film, I put it to its paces.
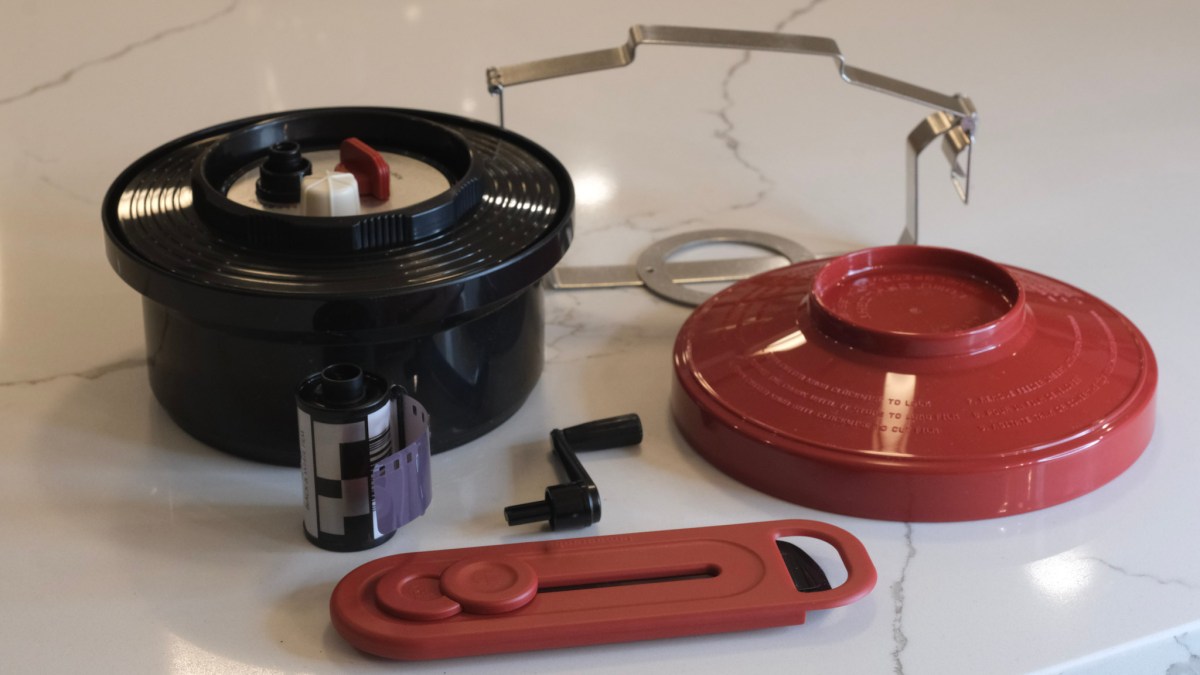
It’s probably best to watch the Youtube video posted by Lomo to see how it works. High level, the development tank contains a spiral reel (on the left in the picture below), and you will use the film loader (on the right) to move the film from the cassette to the spiral. In full daylight.
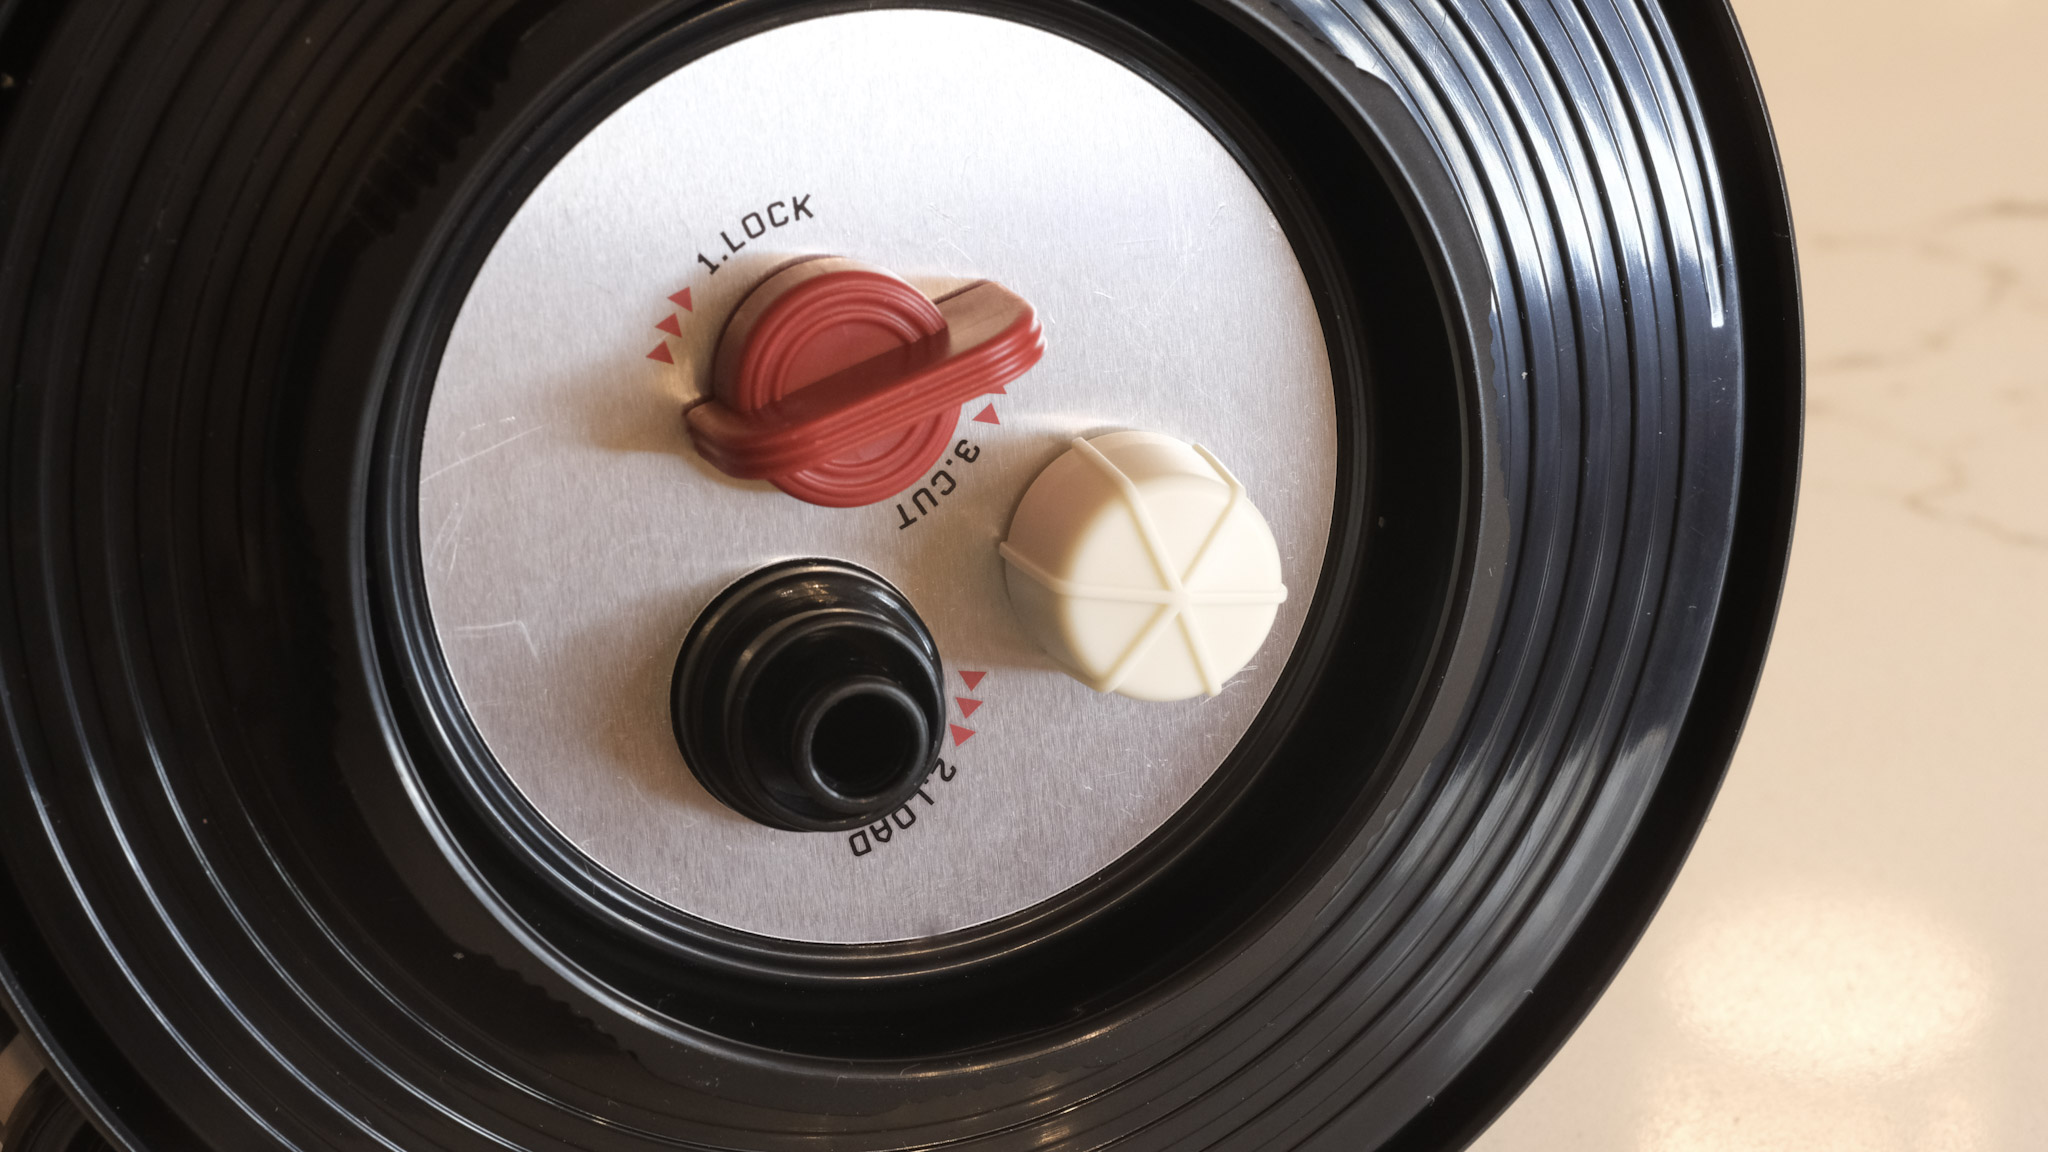
Where the magic happens: place the cassette of film in the loader and drop it in the development tank. Turn the crank to load the film on the spool inside the tank, remove the film loader, and process your film.
Let’s cut the chase: It works
The set (tank, spiral, loader, film extractor) is build of plastics of good quality and looks durable. It’s very cleverly designed, and it does the job:
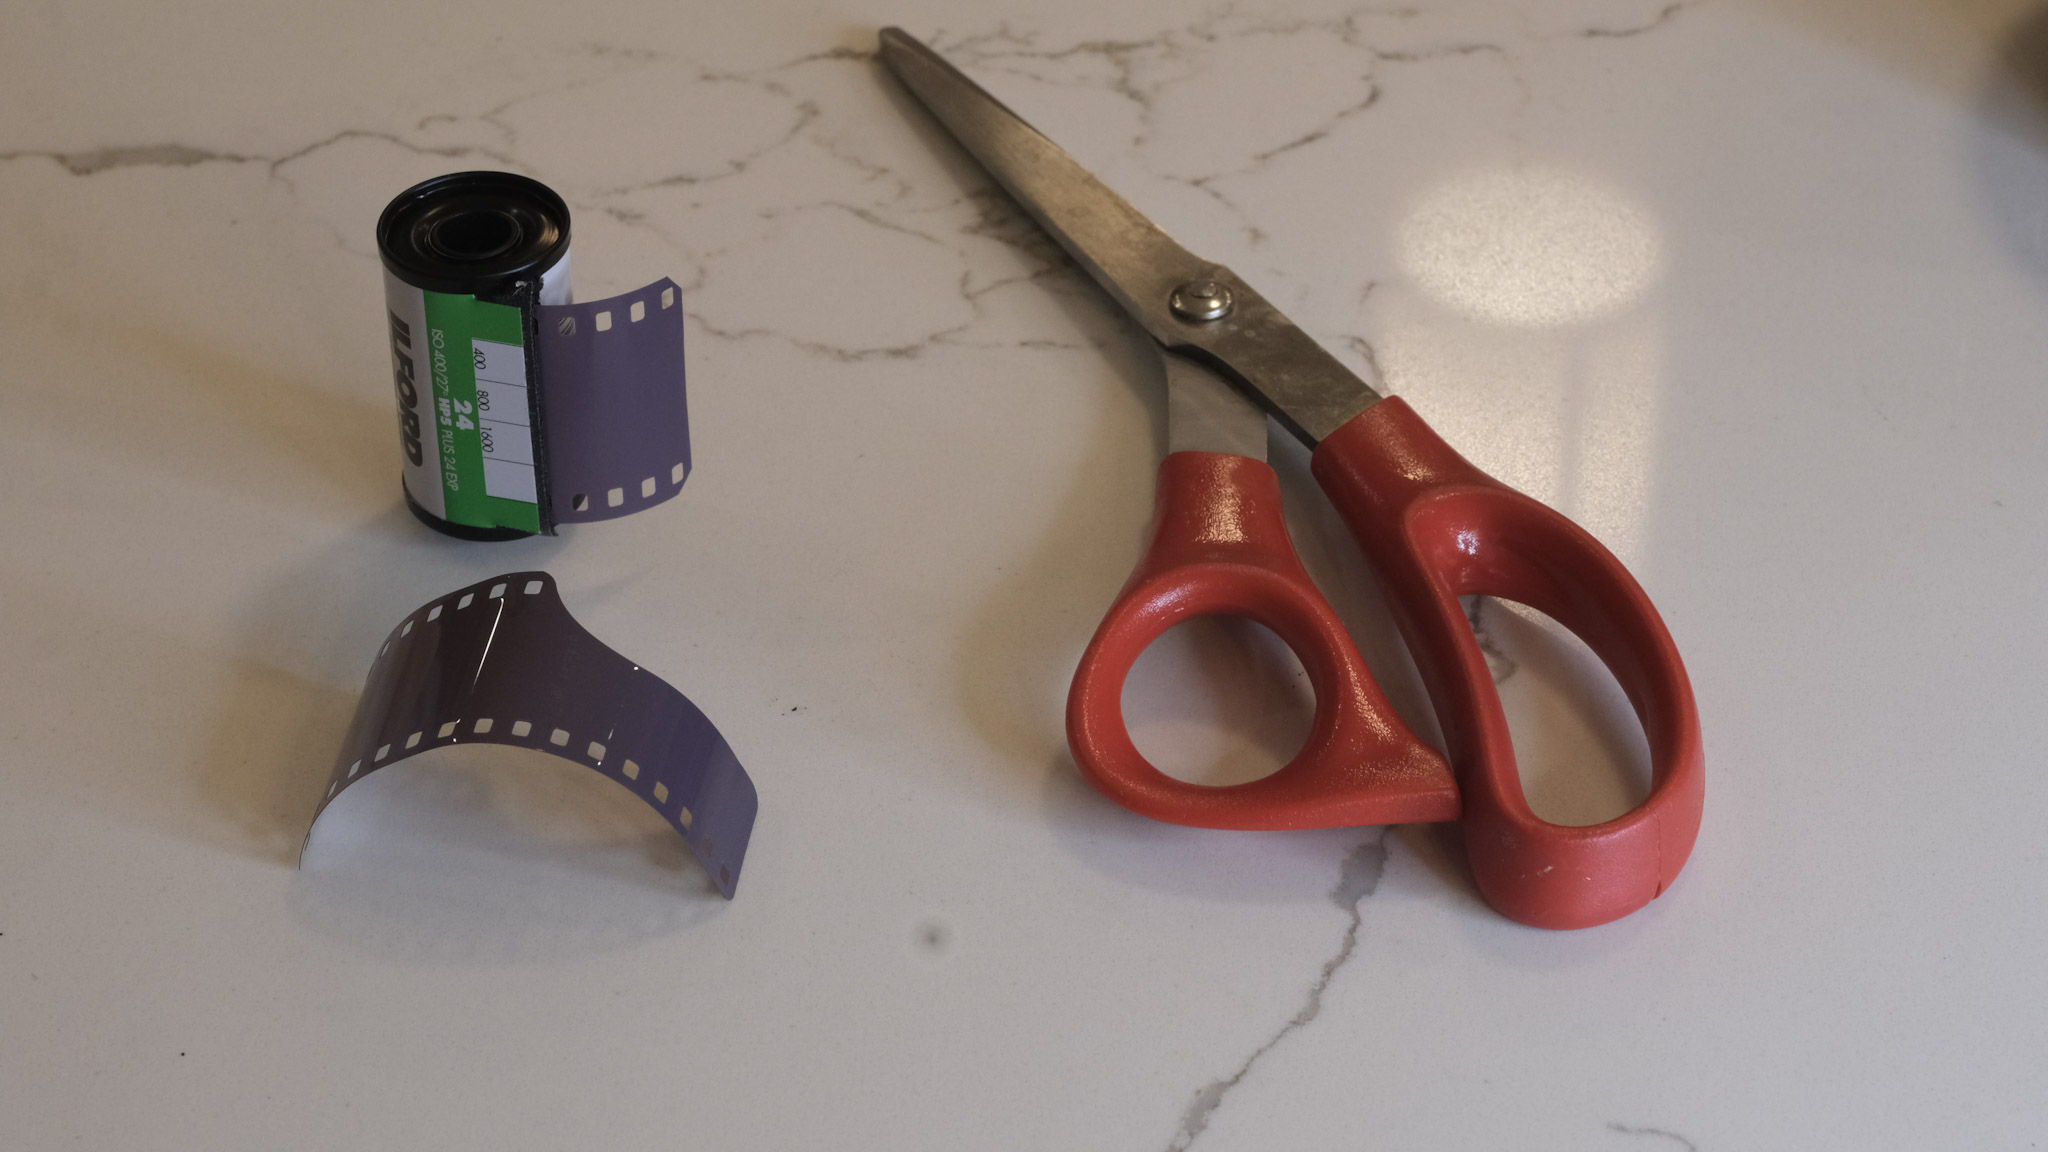
if you follow the instructions carefully (no user manual, watch the Youtube video at the bottom of this post), it works as promised, and in full daylight: cut the leader of the film, place the cassette in the loader, place the loader in the tank, turn the crank of the loader until all the film has been loaded on the spiral reel, turn a knob to activate a cutter that will separate the film from the cassette, remove the loader from the tank – and from then on, develop, agitate, stop, fix, agitate, rinse – as you would do with a conventional Paterson or Jobo tank.
the film is not damaged in the process, and when you open the tank at the end of the development process, you see the film perfectly rolled on the spool.
There is no light leaks, and no stain on the developed negatives – the system obviously respects your film.
It seems to be fool proof – while I was struggling with a piece of debris (user error, more about this below), I may have lost a few frames, but the rest of the film was never at risk and gave me negatives I can be proud of.
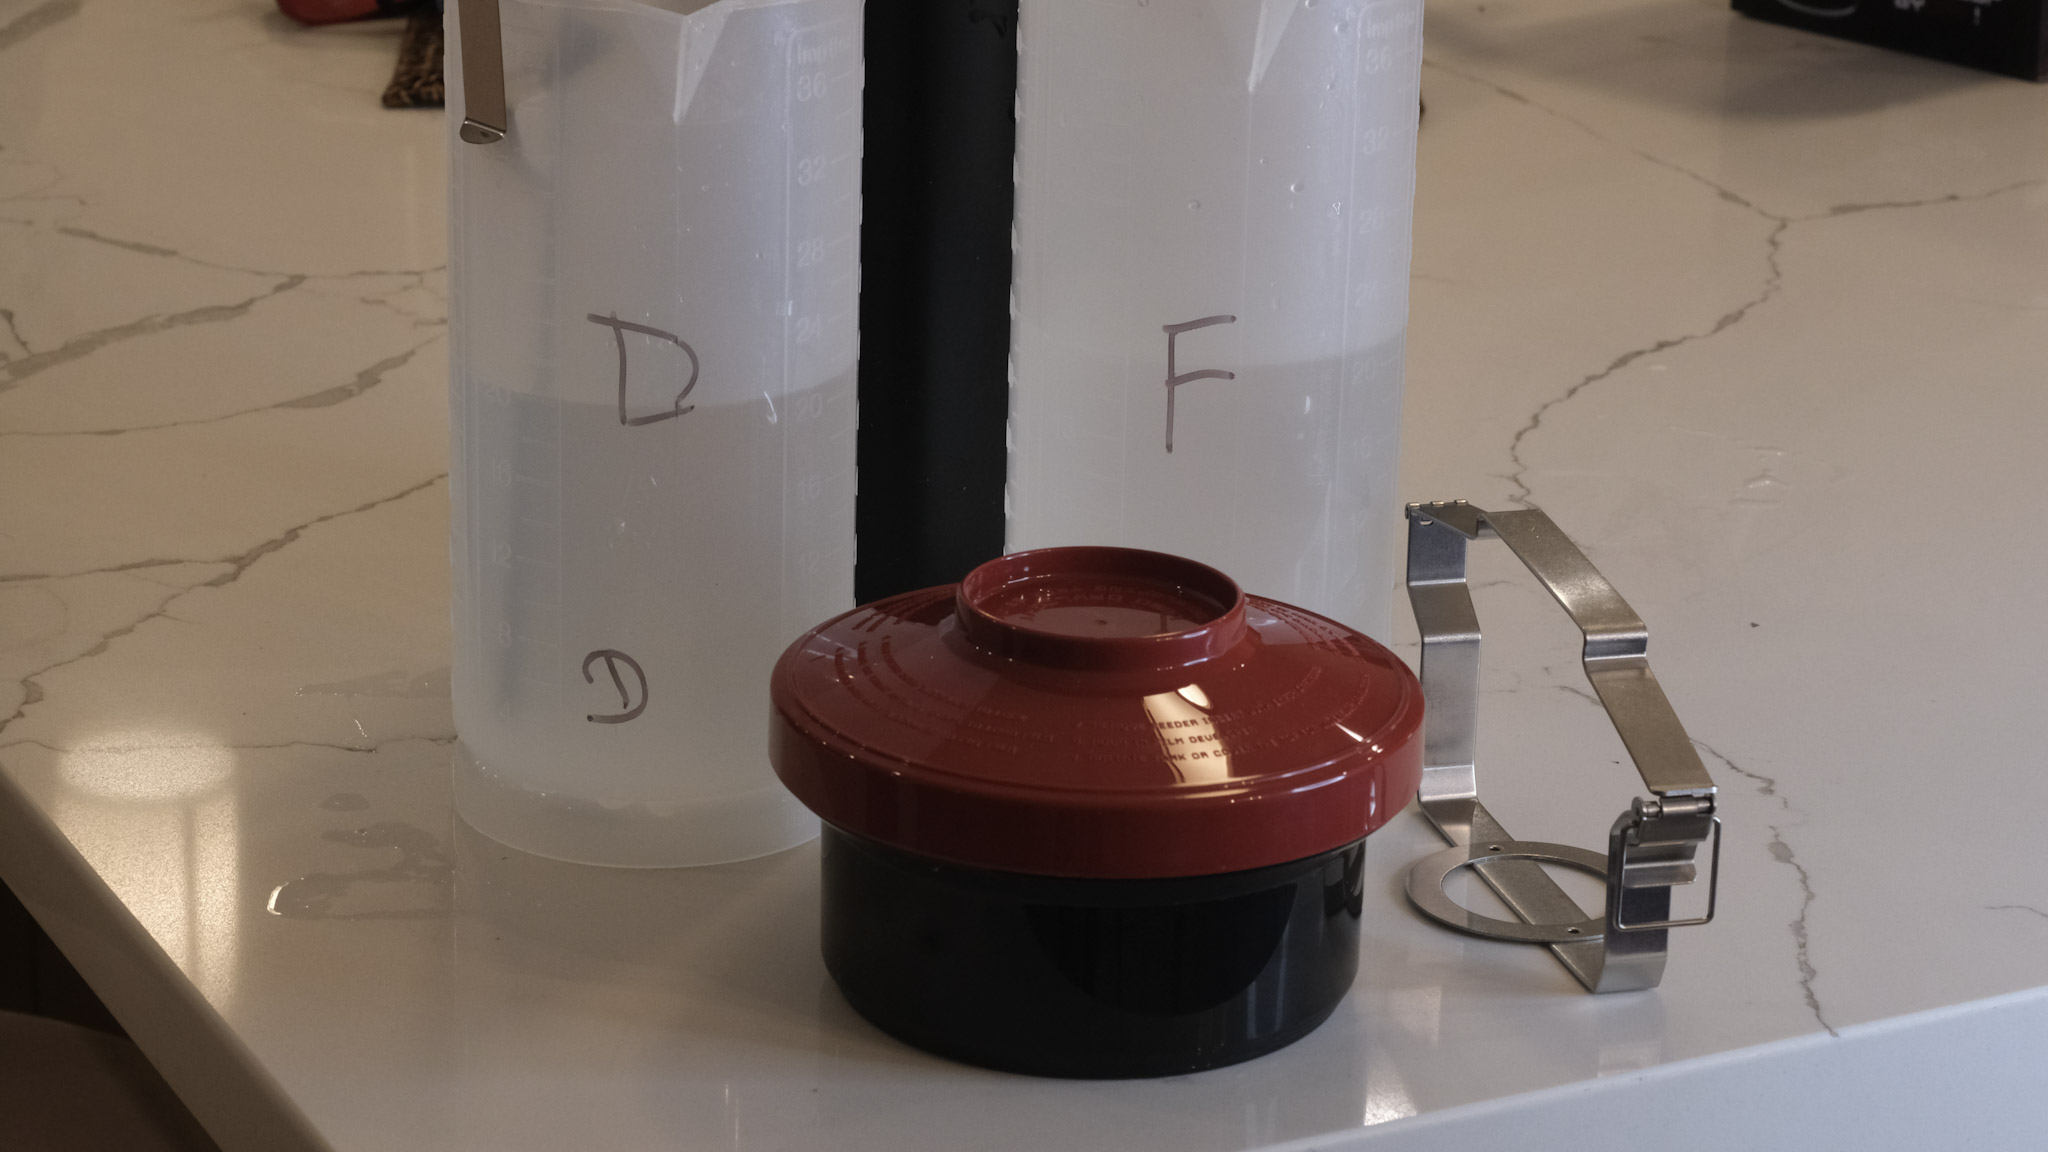
The whole kit (the film leader extractor was included in the kit I purchased).
So, is it the greatest invention since sliced bread, or a solution in search of a problem?
Well, somewhere in between – it’s a clever system, but there are couple of drawbacks.
First, you can only develop one roll of 135 film at a time, when the “market standard”, the Paterson Universal System 4 Development tank, has room for two rolls of 135 film. And because the capacity of a Paterson tank is 600ml, most single use processing kits are designed to be diluted to produce a 600ml solution.
The film loader (right) and the development tank (right).Capacity: 350ml
Unfortunately, the capacity of the cuve of the Lomo is 350ml – so you need to dilute a bit more if you want to process two rolls of film with one dose from a standard processing kit.
Secondly, the film should not be fully rewound, and the film leader should be accessible. If you use a darkroom bag and load your conventional Paterson cuve in the bag, it does not matter that the film leader is still accessible or fully rewound in the film cassette, since you’re going to use a cassette opener to access the film. It’s different with the Lomo.
The film leader as to be cut in a specific way before the cassette can be placed in the loader
The Lomo Developing Tank’s loading mechanism only works if the film leader is accessible – if the film has been fully rewound in the cassette, the photographer will have to use a film extractor to pull the leader from the cassette. There is one included in the kit, and it works reasonably well for a film extractor, but it’s an extra step that the user of a darkroom bag would not have to perform.
Extracting the film leader from the cassette – the tool provided by Lomo (top) and my old and trusted Hama extractor.The Lomo tool worked better.
Thirdly, when the loader is finished loading the film on the spool, the operator has to turn the red knob to the left to cut the last section of film and separate it from the cassette – so that the loader (and the now empty cassette) can be removed from the cuve. You have to fully, and decisively, turn that knob to the left.
Because it could happen (it happened to me) that if the cut is not perfect, a little tiny bit of film is kept prisoner in the cutting mechanism and obstructs the very narrow slot where the next (undeveloped) roll of film is supposed to pass to reach the spiral reel. It makes loading the film impossible, until you have found that tiny piece of film and removed it. Lessons learned, the hard way.
Processing my second roll of film, I had to fight to load the film because of a tiny piece of film of the first roll kept prisoner on the cutting mechanism – after I found it and removed it, everything worked fine.
Lastly, when you cut the film to separate the section which is reeled on the spiral from the cassette which still sits in the loader, a short length of film remains attached to the cassette (11 perforations, approximately two inches or 5cm), which (depending on the camera and how you loaded the film) may (or may not) mean that the very last frame of each roll of film will not be processed, and will be lost forever.
As a conclusion
The main benefit of the Lomo Daylight Developing Tank is that it makes film development at home less intimidating for the beginners.
They won’t have to use a darkroom bag, and won’t need to learn how to operate a cassette opener and load the film on a spiral reel just by touch, without seeing what they’re doing.
With the Lomo Daylight Developing system, everything takes place in full daylight, and does not require any particular skill, experience or muscle memory. If the equipment is clear of any film debris and you follow the instructions, it simply works.
Film Loader – detail
The system is intelligently designed, seems carefully built using components of quality, and should withstand the test of time.
At $89.00, it’s probably a bit more expensive than a good quality set composed of a universal tank, a darkroom bag and a cassette opener, but not by much. And as an easy introduction to film processing, it’s worth it.
But…
Does it save time? I doubt it.
First, unless your camera can be set not to fully rewind the film and leave the leader outside of the cassette (or you remember not to fully rewind it if you use a non motorized camera), you will have to extract the leader with a specialized tool before you can place the film cassette in the loader of the Lomo system.
Which is a step you don’t need to go through if you use a darkroom bag and a cassette opener.
Secondly, after you’ve developed your first roll of film of the day, you will have to carefully disassemble, rinse, dry and patiently reassemble the whole system, which takes definitely more time than simply rinsing the components of a Paterson tank.
And if you want to avoid the trouble I experienced with the second roll of film I processed, you will thoroughly check that there is no tiny piece of film obstructing the film insertion slot inside the cuve.
The film is now loaded on the spool – from there on it’s absolutely similar to what you would do with a Paterson tank.
If you are already equipped with a darkroom bag, a cassette opener and a conventional development tank , and know how to use them, I honestly don’t see any benefit in switching to the Lomo Daylight Developing Kit.
And I would not consider developing color film (whose chemistry is much more temperature sensitive) in a Lomo Daylight as well.
As for me? It’s been ages since I used a conventional development tank and a darkroom bag for the last time. I’m pretty sure I would still be able to use it, but I was not be able to locate my old kit – probably lost when moving from one place to another. I had to start afresh. So why not try something different?
The Lomo Daylight Developing Tank is not perfect. It will not be as efficient at processing large quantities of film as a conventional Paterson or Jobo development tank, but I’m not planning on processing a large volume of film (one or two rolls of black and white film per month at the most).
For my use case, the Lomo Daylight makes sense. And used in conjunction with the JJC Digitizing kit, it will give me access to my images a few hours after they have been shot, with a minimal hassle, and no darkroom.
Details – the tank, the spiral reel and the loader. You see the spiral reel for the first time when you open the tank to remove the developed film
More about the film processing at home in CamerAgX
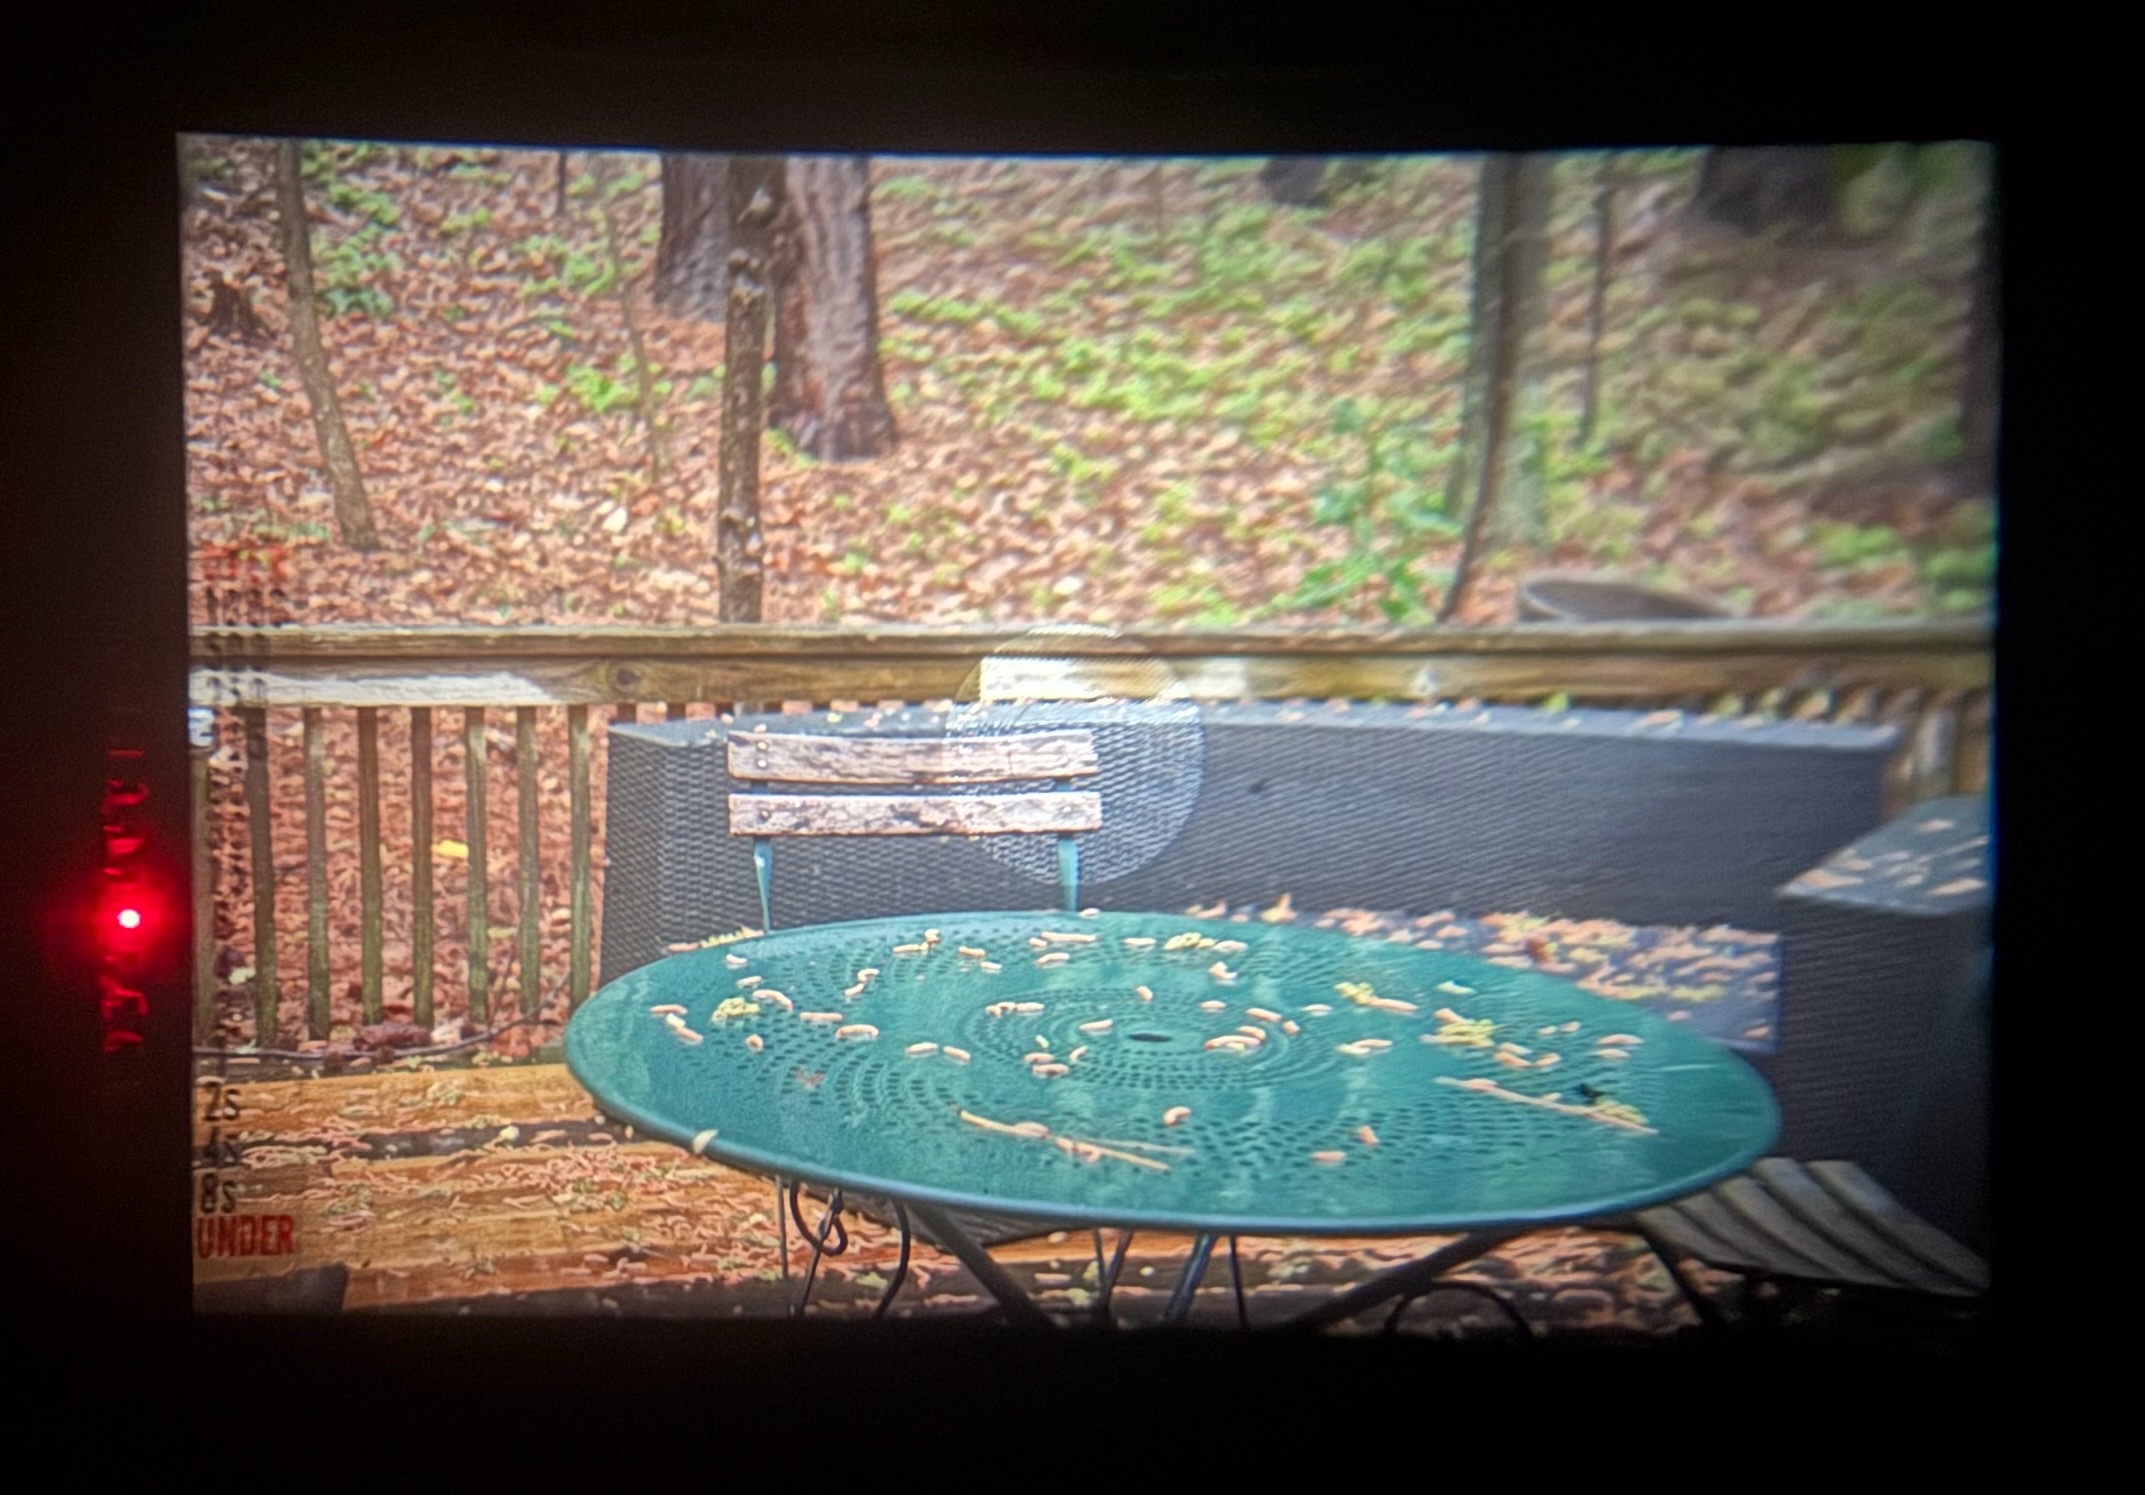
The first roll (HP5 Plus) was not a complete success – my bad – I did not configure the timer correctly, but I’m pleased with the second roll (Ilford FP4 Plus)
Atlanta – Beltline – Pentax ME – Ilford HP5 Plus
Atlanta – Centennial Park – Pentax Program-Plus – Ilford FP4 Plus
Atlanta – Centennial Park – Pentax Program-Plus – Ilford FP4 Plus
New entry level interchangeable lens cameras can not be had for much less than $800 nowadays in the US, and that’s before the new tariffs start showing their ugly face on the shelves of the resellers. Giving a new Life to Old Gear and buying used equipment is the best answer in the short term.
We’ve seen a few weeks ago that early mirrorless cameras like the Panasonic G1, G2 or G3 can be had for less than $150.00 – those cameras are modern and pleasant to use, and the lenses you would buy for them totally compatible with the current micro four third (m43) cameras from Panasonic and Olympus/OM-System. But the dynamic range of the sensor leaves a lot to be desired.
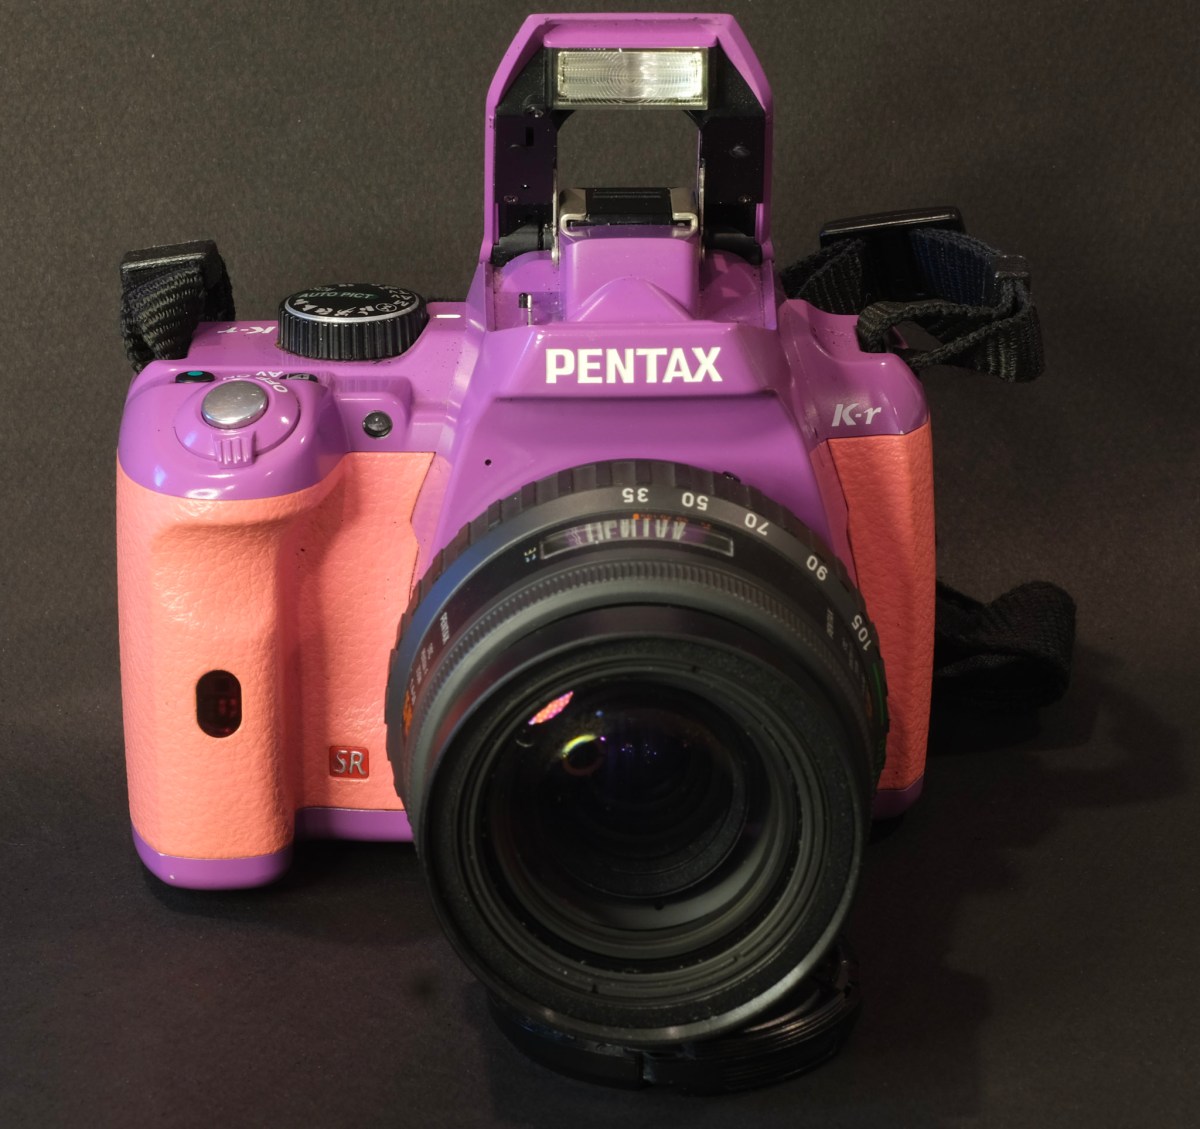
In the same price range, an alternative is to look for entry level APS-C dSLRs. In that category, Canon and Nikon cameras abound, but a better deal can be found with Pentax, whose entry level dSLRs were well spec’d, and often available in very interesting colors. I recently found a “Gundam” Pentax K-r body at a good price in a Japanese eBay store (for those who are not in the know, “Gundam” is a Japanese science fiction media franchise, featuring giant robots painted in shades of blue, purple and yellow).
a Gundam inspired toy
Launched in 2010 (like the Panasonic G2), the K-r is also a 12 Megapixel camera, but with a significantly larger sensor (APS-C) provided by Sony. Of course, and contrarily to the Panasonic G series, it’s a “conventional” digital SLR with a flipping mirror, and therefore the body and the lenses are larger and heavier than the Panasonic’s. The viewfinder is optical, and the autofocus of the “phase detection” type, as opposed to the electronic viewfinder and contrast detection autofocus of the Panasonics. Lastly, it accepts (with various limitations, of course) almost any lens graced with a variant of the Pentax K bayonet mount – even if it will give its best with Pentax DA, DA-L and DA Limited lenses, designed specifically for small sensor digital cameras.
Pentax K-r “Gundam”
Does the size of the sensor matter?
On today’s market, it will be difficult to find any interchangeable lens camera in the $100 to $150 price range with a resolution higher than 12 Megapixels. But 12 Megapixels is not that bad – it’s enough for a 8x10in (roughly A4) print at 300 dpi, and much higher than what is typically needed to share images on social media: most social media platforms downscale the imported images to bring them down to 2000×1200 points (approximately), when a camera like the Pentax K-r captures images of 4288 x 2848 pixels. Which leaves plenty of headroom.
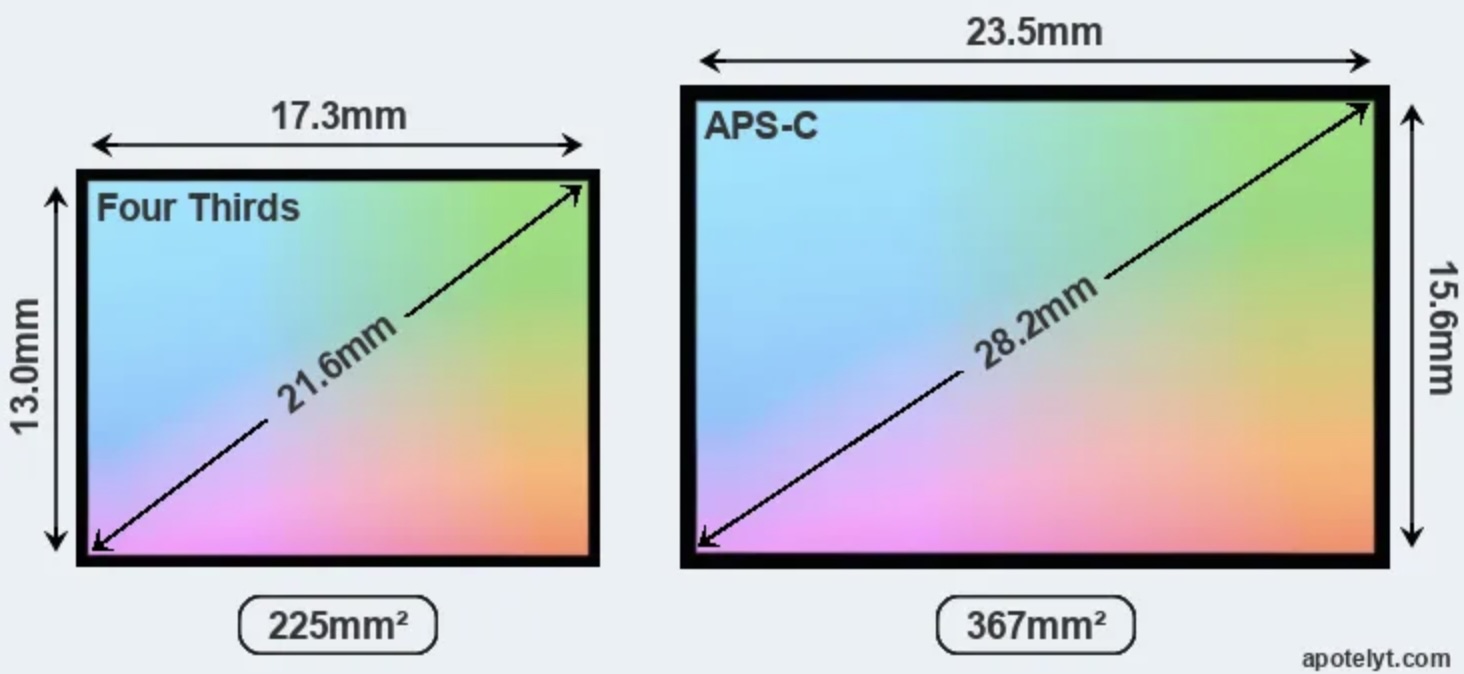
Comparison of the size of a micro four thirds (m43) sensor with an AS-C sensor (source: apotelyt.com)
There are more factors in the quality of an image than the resolution of the sensor: cameras of the K-r’s generation still needed a low-pass filter to control moire to the detriment of the resolution of small details, and the practical difference in image resolution between a K-r and a 16 Megapixel camera deprived of a low-pass filter will be higher than what a simple math would lead us to believe. The dynamic range of the sensor was also more limited, and the control of noise was more aggressive and not as efficient as what cameras launched a few years later offer.
Only one chance to give a first impression: the size of the camera with its kit zoom
For a dSLR with an APS-C sensor, the K-r is a small camera. And the body on its own is not that big. But mount a lens, any lens with the exception of a few Pentax pancake prime lenses, and it becomes a large object, that it will be impossible to store in the glove box of a car or a lady’s hand bag. If you stop at a bar or a restaurant, and you don’t carry a back pack, you will not know where to place the camera – on the table? hanging at the back of a chair? Nothing seems right. In that regard, it can not be compared to a compact digital camera or to a micro four thirds mirrorless camera like the Panasonic G2, that you can drop in the pocket of a coat.
That being said, the K-r is not heavy, its body is well designed with a big hand grip, the commands are logically placed, the LCD screen on the back of the body large enough, and it’s a very pleasant camera to shoot with. If only those lenses were not so large.
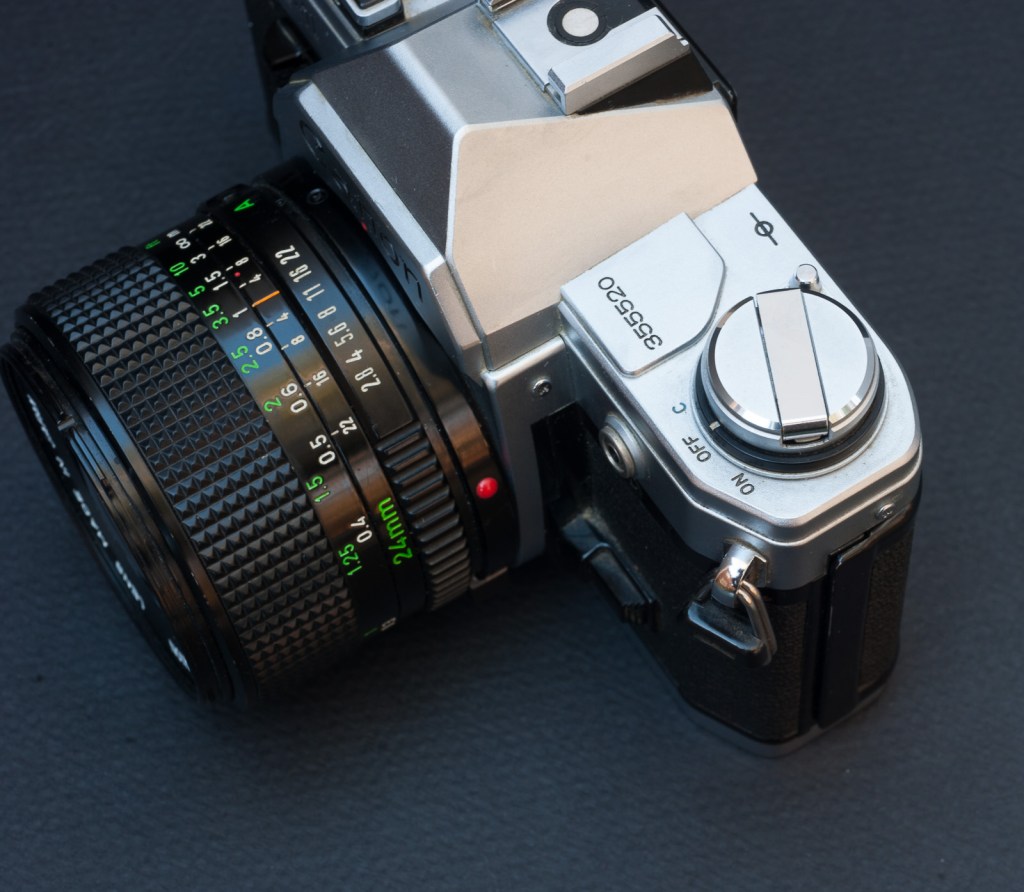
Pentax K-r – “SR” is for “Shake Reduction” (the brand’s image stabilization).
Only one chance to give a first impression: the viewfinder
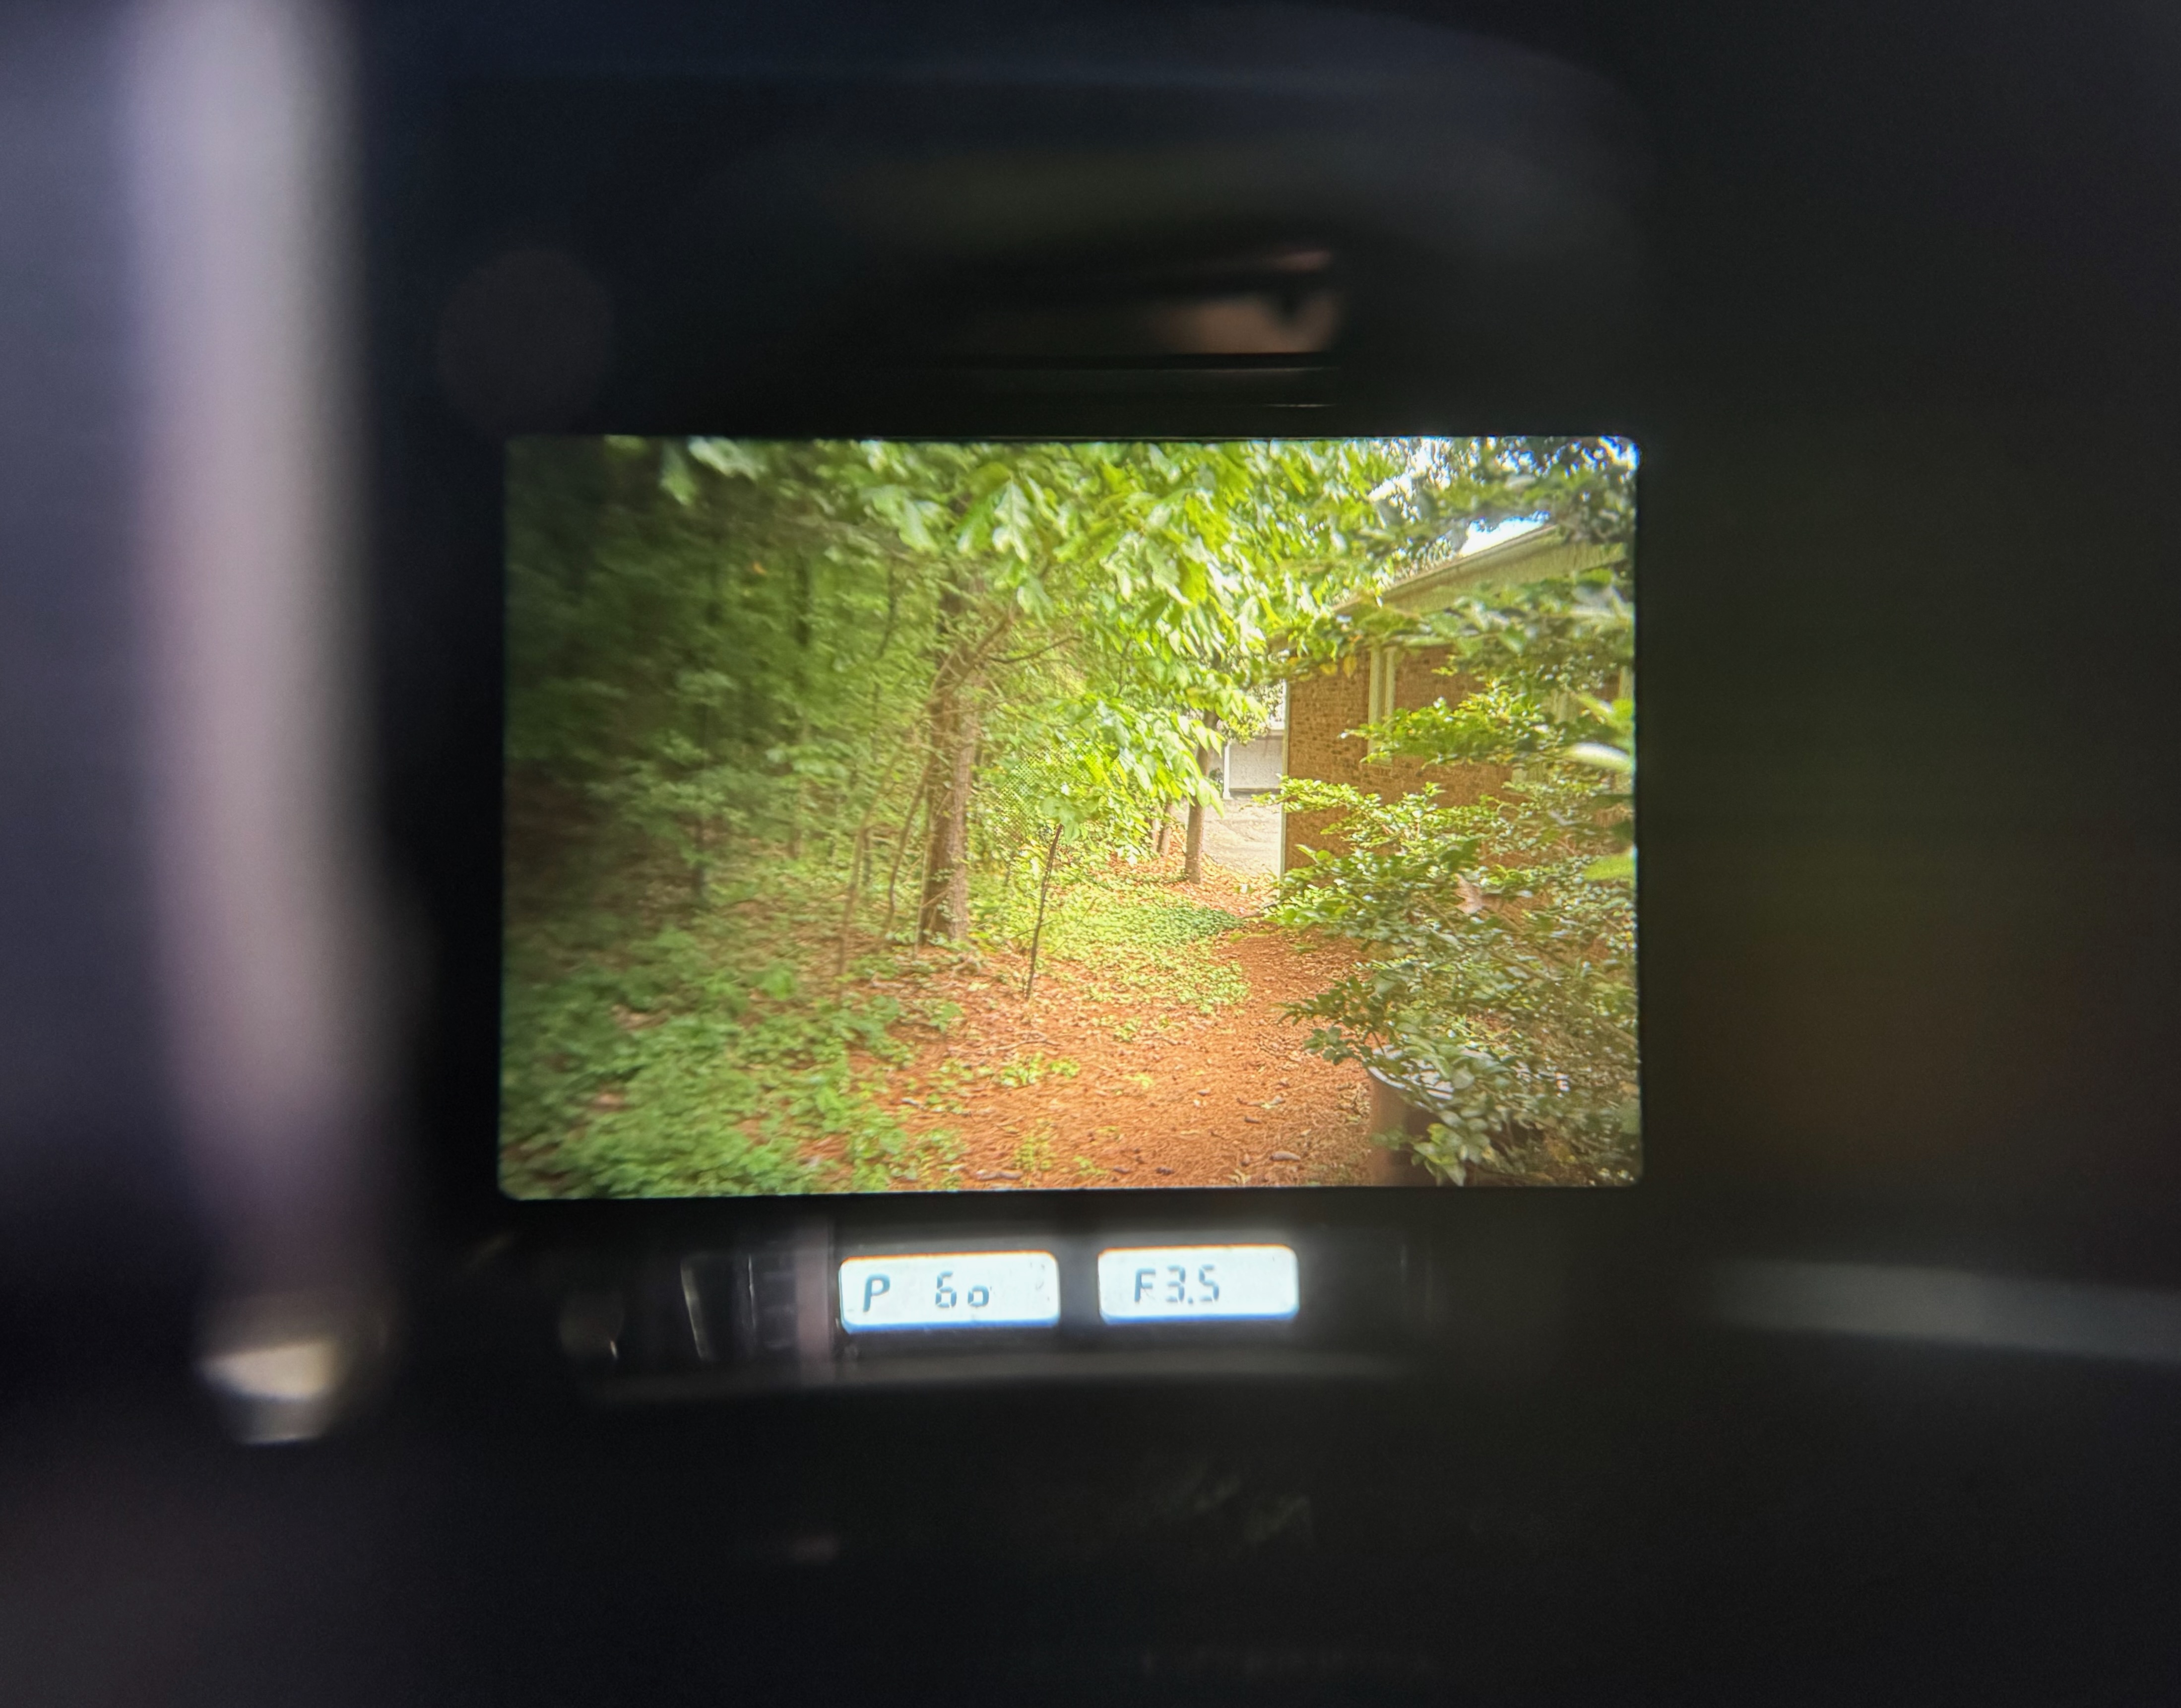
Besides the size, the second thing that strikes you is the viewfinder. Again, after you’ve spent a few hours with the camera, you’ll find it perfectly fine, but if you’re used to shooting with a 35mm reflex, a full frame dSLR or a recent mirrorless camera with a high resolution electronic viewfinder, you’re in for a shock. The optical viewfinder is small and relatively dark, good enough to compose but not always to be sure you’ve captured the “decisive moment”. You really need to check the image on the display at the back of the camera to be sure it’s any good.
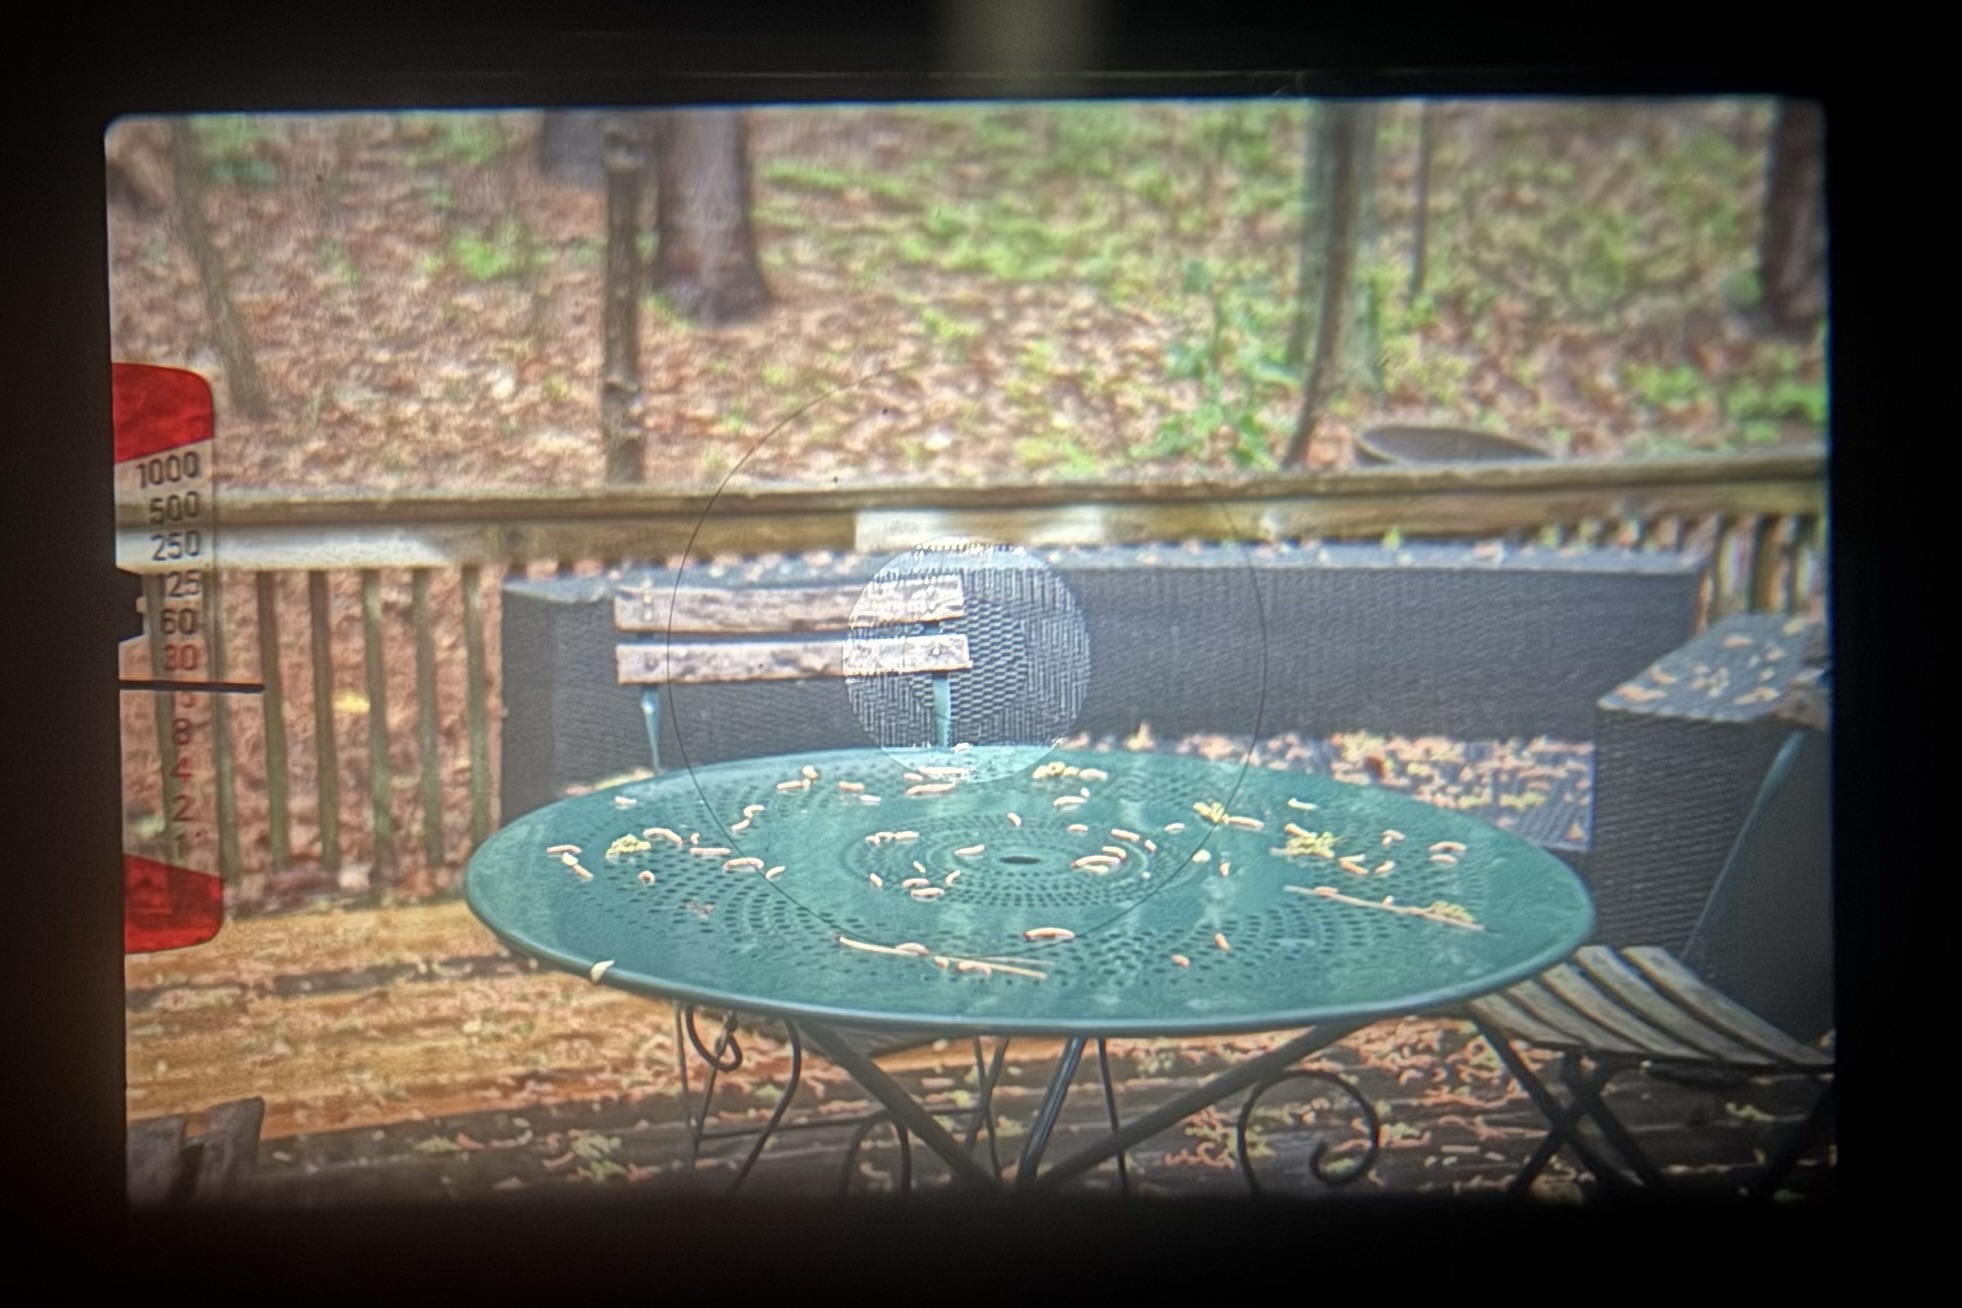
Through the viewfinder – Pentax K-rThrough the viewfinder – Pentax Program-Plus
To Pentax’s defense, the viewfinders of their dSLRs are generally better (larger, more luminous) than what you find on equivalent Canon or Nikon models. And entry level mirrorless cameras in a similar price range (Sony NEX3, Olympus Pen) don’t have a viewfinder at all and require the photographer to compose on the rear LCD, as if using a smartphone. But when mirrorless cameras have an electronic viewfinder (an EVF), it’s not constrained by the size of the sensor, of the mirror or of the penta-prism. Even the Panasonic G2 with its comparatively tiny sensor has a large viewfinder, and provides an experience not dissimilar to the EVF of a full frame camera. Admittedely the image in Panasonic’s EVF is relatively low resolution and its dynamic range is limited, but it’s definitely showing a larger view of the scene than the optical viewfinder of an entry level APS-C camera.
Videos
Not the K-r’s cup of tea obviously. dSLRs in general are not very good at shooting movies, and this one is probably worst than average at that exercise – it only records 720p and autofocus is not available while shooting videos.
The ergonomics
The physical commands are organized more or less the same way as on the Panasonic G2 – one control wheel under the thumb, a few buttons to control sensitivity (ISO), over/under exposure, as well as AF and AE lock. Easy to use if you’re familiar with the modal interface used by most film SLRs since the mid nineteen eighties.
Pentax K-r – the back LCD and the commands
The unique selling proposition: in body image stabilization
One of the oldest rules of photography is that (on a hand held 35mm film camera), the shutter speed should never be slower than the focal length of the lens – if you mount a 28mm lens on your camera, 1/30sec is the minimal shutter speed that will avoid the blur caused by camera (and operator) shake; for a 135mm lens, the minimum speed would be 1/125sec., and so on.
That is, unless some form of image stabilization system is involved. Some camera makers (Canon, Nikon, Panasonic) have elected to equip some of their lenses with optical components that move inside the lens when a picture is being shot to compensate for camera shake. Other camera makers (Olympus, Pentax, Sony) have elected to move the image sensor itself while the picture is being shot. And more recently, both in-lens and in-body image stabilization have been combined to push the performance of the system to a higher level.
Pentax dSLRs – including their entry level models – have been equipped with a “Shake Reduction” system since the K10D of 2006. Because it’s an in-body system, it works with any lens, including manual focus lenses from the early K and KA mount era.
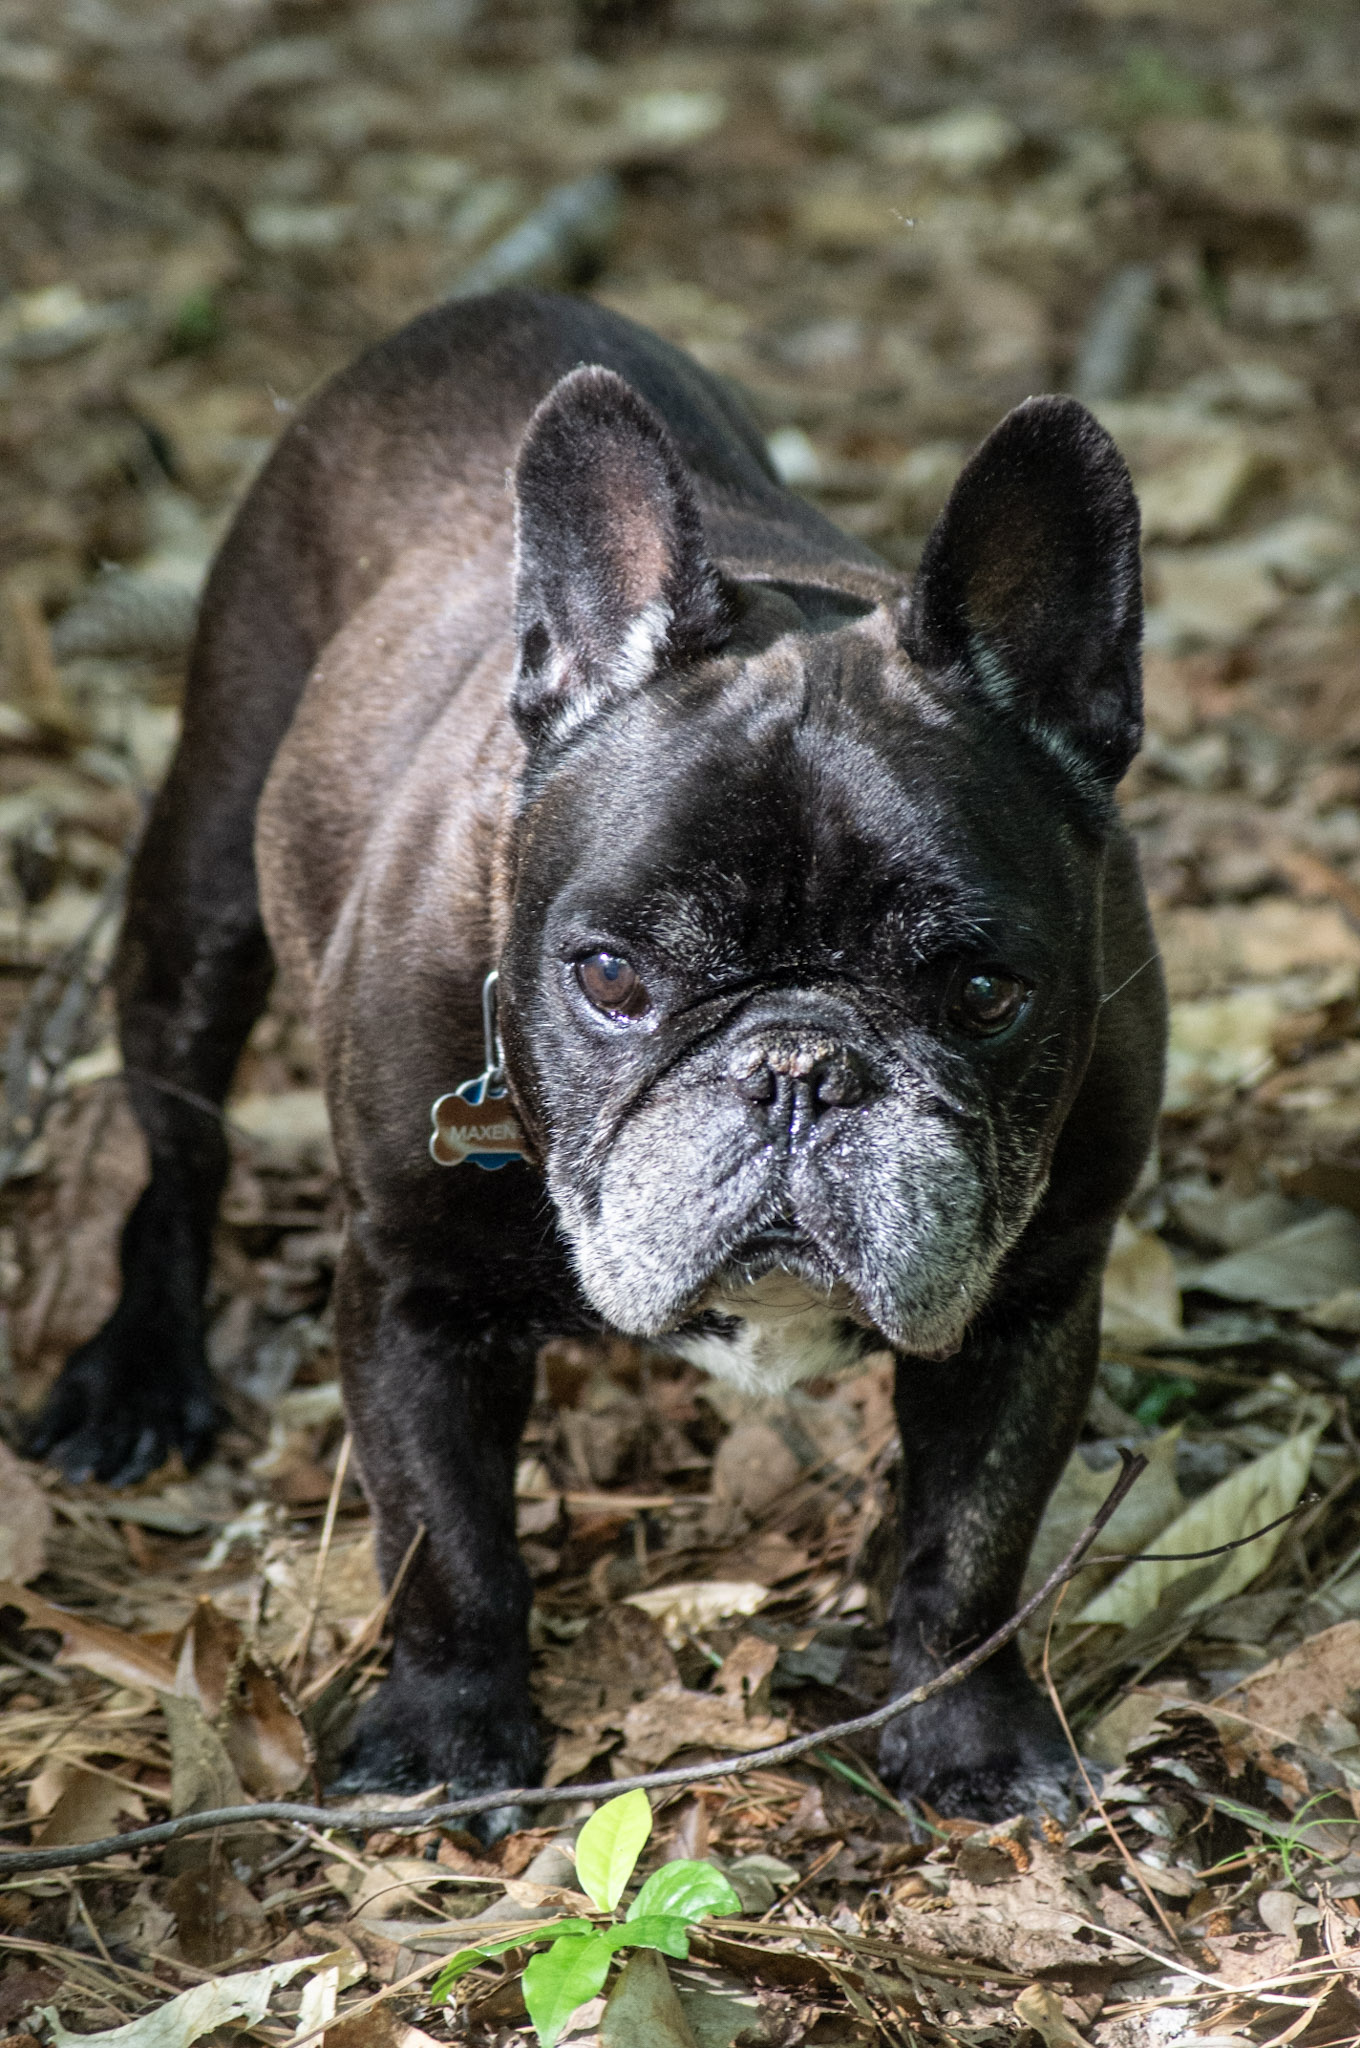
Maxence – Pentax K-r – Pentax lens KAF 35-105 f/4-5.6 – from .dng (RAW) file; processed in Lightroom
Performance
Pentax is a brand for money conscious traditionalists. Across the years, they have preserved the compatibility of their bodies with any lens they’ve made better than any other camera maker, including Nikon. It has its good sides, and its bad sides.
The autofocus is definitely old school. Even today Pentax bodies come with a DC motor to drive the focusing mechanism of lens – something that ensures compatibility with any Pentax Autofocus lens made since 1986. Nikon stopped offering this type of compatibility with the D3000, D5000 series and on the newest of the D7000 series, the D7500.
Pentax K-r – the commands
On the K-r, the autofocus system is generally accurate, but rather slow and definitely loud.
Image quality is very good for a 12 Megapixel camera, but the K-r is one of those old-school cameras that produce significantly nicer RAW files than JPGs. In the absence of Wi-Fi or Bluetooth connectivity (remember, this is a camera launched in 2010), the photographer will have to upload the pictures from the SD card to a photo management software (on a smartphone, a tablet or a personal computer) and will have the ability to process the RAW files before sharing the resulting JPEGs on social media.
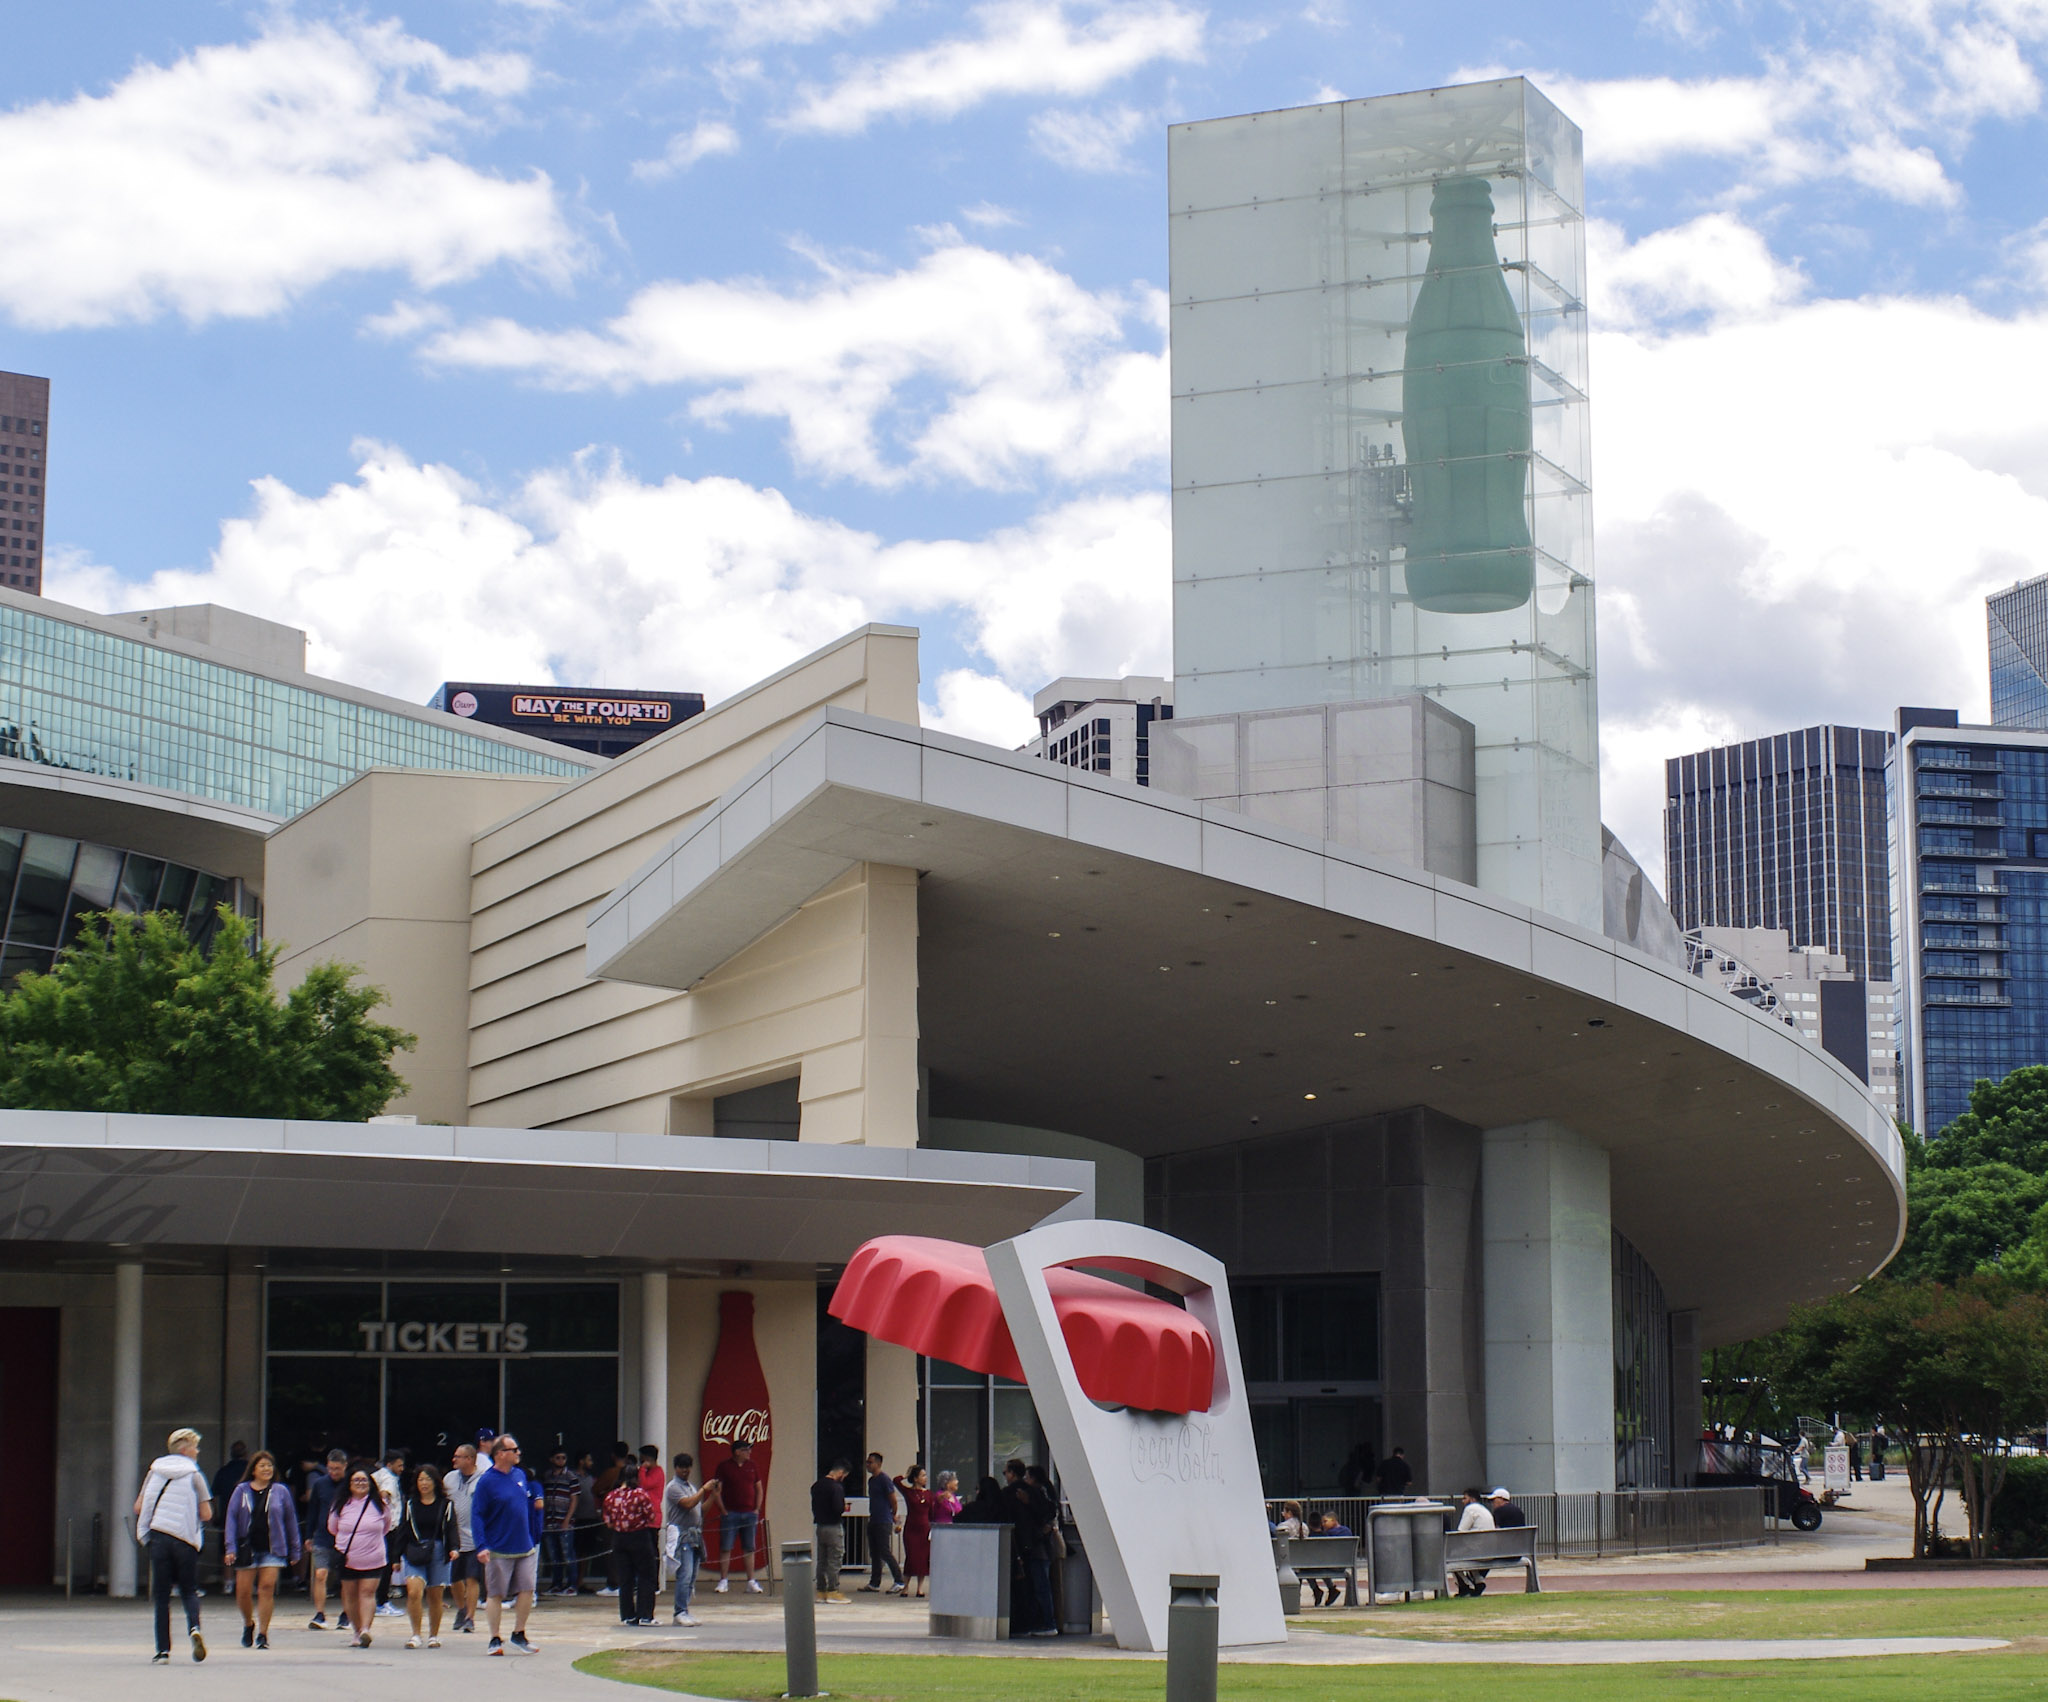
Atlanta – the entrance of the “World of Coca-Cola”
Reliability
It’s now a 15 year old model, but nothing really bad has been reported in the Interwebs regarding the reliability of the K-r. As usual buy a camera with a battery and a charger, that the seller has personally tested: “I could not test the camera because it came without a battery or a charger” is a major red flag for me.
A reason I chose a K-r rather than a much better spec’d 16 Megapixels K-30 and K-50 is that those models are known for an “aperture control mechanism” issue, that renders the camera virtually unusable. A small part accessible through the lens mount (an easy to procure solenoid) is the apparent culprit, and DIYers confident enough in their dexterity with a soldering iron can attempt a repair and replace it. Definitely not for me.
Pentax K-r and Panasonic G2 – an APS-C dSLR is definitely larger once a lens in mounted on the body
Lens availability
The K-r is compatible to some level with almost any 35mm lens manufactured by Pentax since 1975, when they launched the Pentax K mount. Lenses released before 1985 won’t offer autofocus, of course, and won’t support certain exposure control modes. With a 42mm to K adapter, pre-1975 Pentax Takumar lenses can even be mounted.
You also have to remember that the K-r’s image sensor is smaller than a 35mm frame, and an old 28mm lens will have the viewing angle of a 42mm lens once mounted on the K-r. In the recent Pentax lens range, the DA lenses are designed for “cropped sensor” (aka APS) cameras like the K-r, and the FA lenses for the full-frame K1.
In order to address the issue of the size of the lens of dSLR cameras, Pentax has developed a line of very compact prime lenses, and (like almost every other camera manufacturer), a retractable standard zoom to make carrying and storing the camera less of a concern.
Atlanta-Centennial Park – one advantage of an optical viewfinder is that there is no lag – you see in the viewfinder the action as it’s happening
How much
As long as you’re ready to go for a black or white body, the Pentax k-r can be found at less than $100.00. The Japanese public could order almost any color combination for the body and the grip, and some models are really unique – but command prices up to $500.00, like this pink camo model below.
Because they’re abundant on the second hand market, Pentax lenses tend to be on the cheap side compared to the lens of other major camera makers. A 18-55 kit zoom can be obtained for less than $15.00 on Shopgoodwill.
Another Pentax K-r: listing on eBay (from a Japanese store, of course)
As a conclusion: early mirrorless or mature dSLR?
For less than $150.00 for a body and its 18-55mm lens (if you’re patient and bid wisely), the Pentax K-r is a combination difficult to beat. Even the cheapest EVF-less 12 megapixel mirrorless cameras from Olympus or Panasonic will cost you more once you’ll have added a small trans standard zoom.
The image quality of the K-r is significantly better than what a Panasonic G1, G2 or G3 offers, and there is a wide choice of lenses available at comparatively low prices. The camera is pleasant to use and will be a good learning platform for photographers looking for their first interchangeable less camera.
But, like the Nikon D3000 series or the equivalent entry level Canon cameras, the K-r is also a representent of a dying category: the single lens reflex camera. All major camera manufacturers – except for Pentax – have moved on and launched mirrorless cameras and a new range of lenses, which offer much better video performance and are – for some of them at least – very significantly smaller and lighter than a conventional dSLR like the K-r.
Unless you’re sure you don’t want to shoot videos, you don’t mind the size, and you love the experience of composing your images through the optical viewfinder of a reflex camera, you have to wonder whether you would not be better off spending more (let’s be honest: at least twice as much) for an early 16 megapixel mirrorless camera from Panasonic, Olympus or Sony and its kit lens [*]. To a large extent, 16 Mpix represent the current sweet spot on the used market nowadays: images captured by a Panasonic GH3, an Olympus OM-5 or a Sony NEX-3 will be visibly better than pictures shot with the K-r’s, and your “investment” will be future proof. And yes, the early NEX-3 cameras were also available in interesting shades of pink, if that’s your thing.
[*] I did not mention Canon and Nikon’s early mirrorless cameras as a viable option in this price range. Canon and Nikon had both created and later abandoned a line of small mirrorless cameras (the Nikon Series One and the Canon EOS M). The early models (that can compete today on price with a Pentax K-r or a Panasonic G2 on the second hand market) were half hearted efforts not devoid of issues and I would not recommend them.Fujifilm mirrorless cameras came later than Panasonic, Olympus or Sony’s, and Fujifilm bodies and lenses are all in another price category. The image quality (out of camera) is outstanding, but the early models are handicapped by a really slow autofocus (X-Pro1, X-M1, X-A1). Later models that addressed those issues (X-Pro2, X-T1, X-E2, X-A5 and above) are also much more expensive, in the same price range as recent mirrorless models of the big three (Canon, Sony and Nikon).
I’m afraid most people rush to share the pictures they take, attaching them to emails, text messages, or publishing them on various forms of social media. Images – or more precisely the interest of their family, friends and followers for those images – tend to be ephemeral. Shot, shared, forgotten.
If you visit these blog pages, I’ll assume that you’re interested in photography. And I will bet that when you shoot pictures, they’re important to you, and you take time to reference and archive them. If you still shoot film, you probably store the negatives and slides in binders with their contact sheet, and if you shoot digital, you certainly rely – at a minimum, on Apple or Google’s photo management services – or, more likely, use more specialized software to catalog, process and archive your images.
Of course, beyond the few Gigabytes of free storage you get with your smartphone (5 GB with Apple, 15 GB with Google), you need to pay a monthly suscription fee – $3.00 /month for 200 GB with Apple, $2.00 for 100 GB with Google. It’s not much to store 10,000 to 20,000 images (assuming 10 Mbytes /image) – but I’m surprised by the number of people I know who go regularly through their Photo apps and delete images they like (and might be happy to look at again five years from now) just for the sake of saving two or three dollars a month.
Sunset at the beach. Near St Anne, Guadeloupe
And when, for an happy event (wedding, graduation, big life milestone …) they’re being asked to send a few of their images to contribute to a family slide show or to a shared photo-album, they can’t find any – or so few.
At the risk of being provocative, I’ll say that in photography, Archival and Retrieval are at least as important as taking the pictures in the first place. So, what are the options?
The Photo Management Service provided by the OS vendor of your phone, tablet or personal computer.
We’re talking of Apple Photos, Google Photos, and Microsoft… Photos, of course. The “App” is the front end of a set of cloud based services, that provide photo storage, editing, cataloging and sharing capabilities, increasingly with the help of AI.
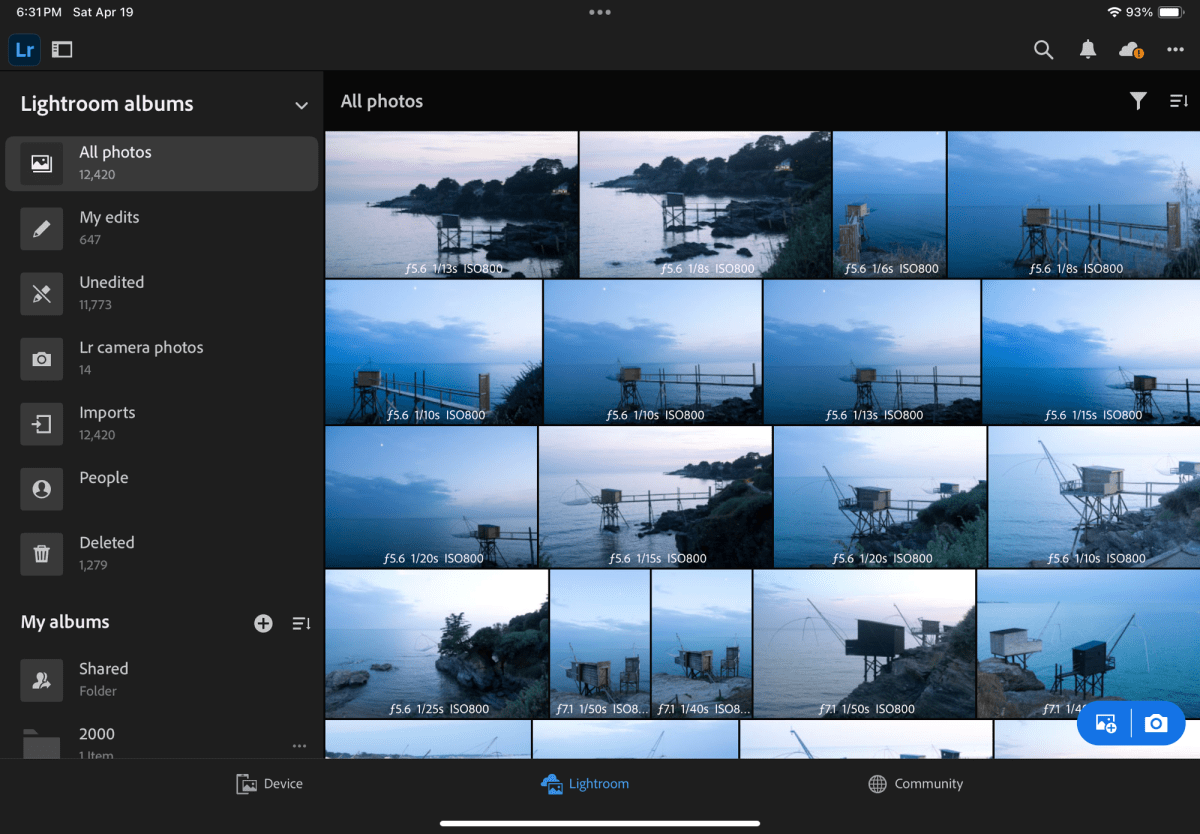
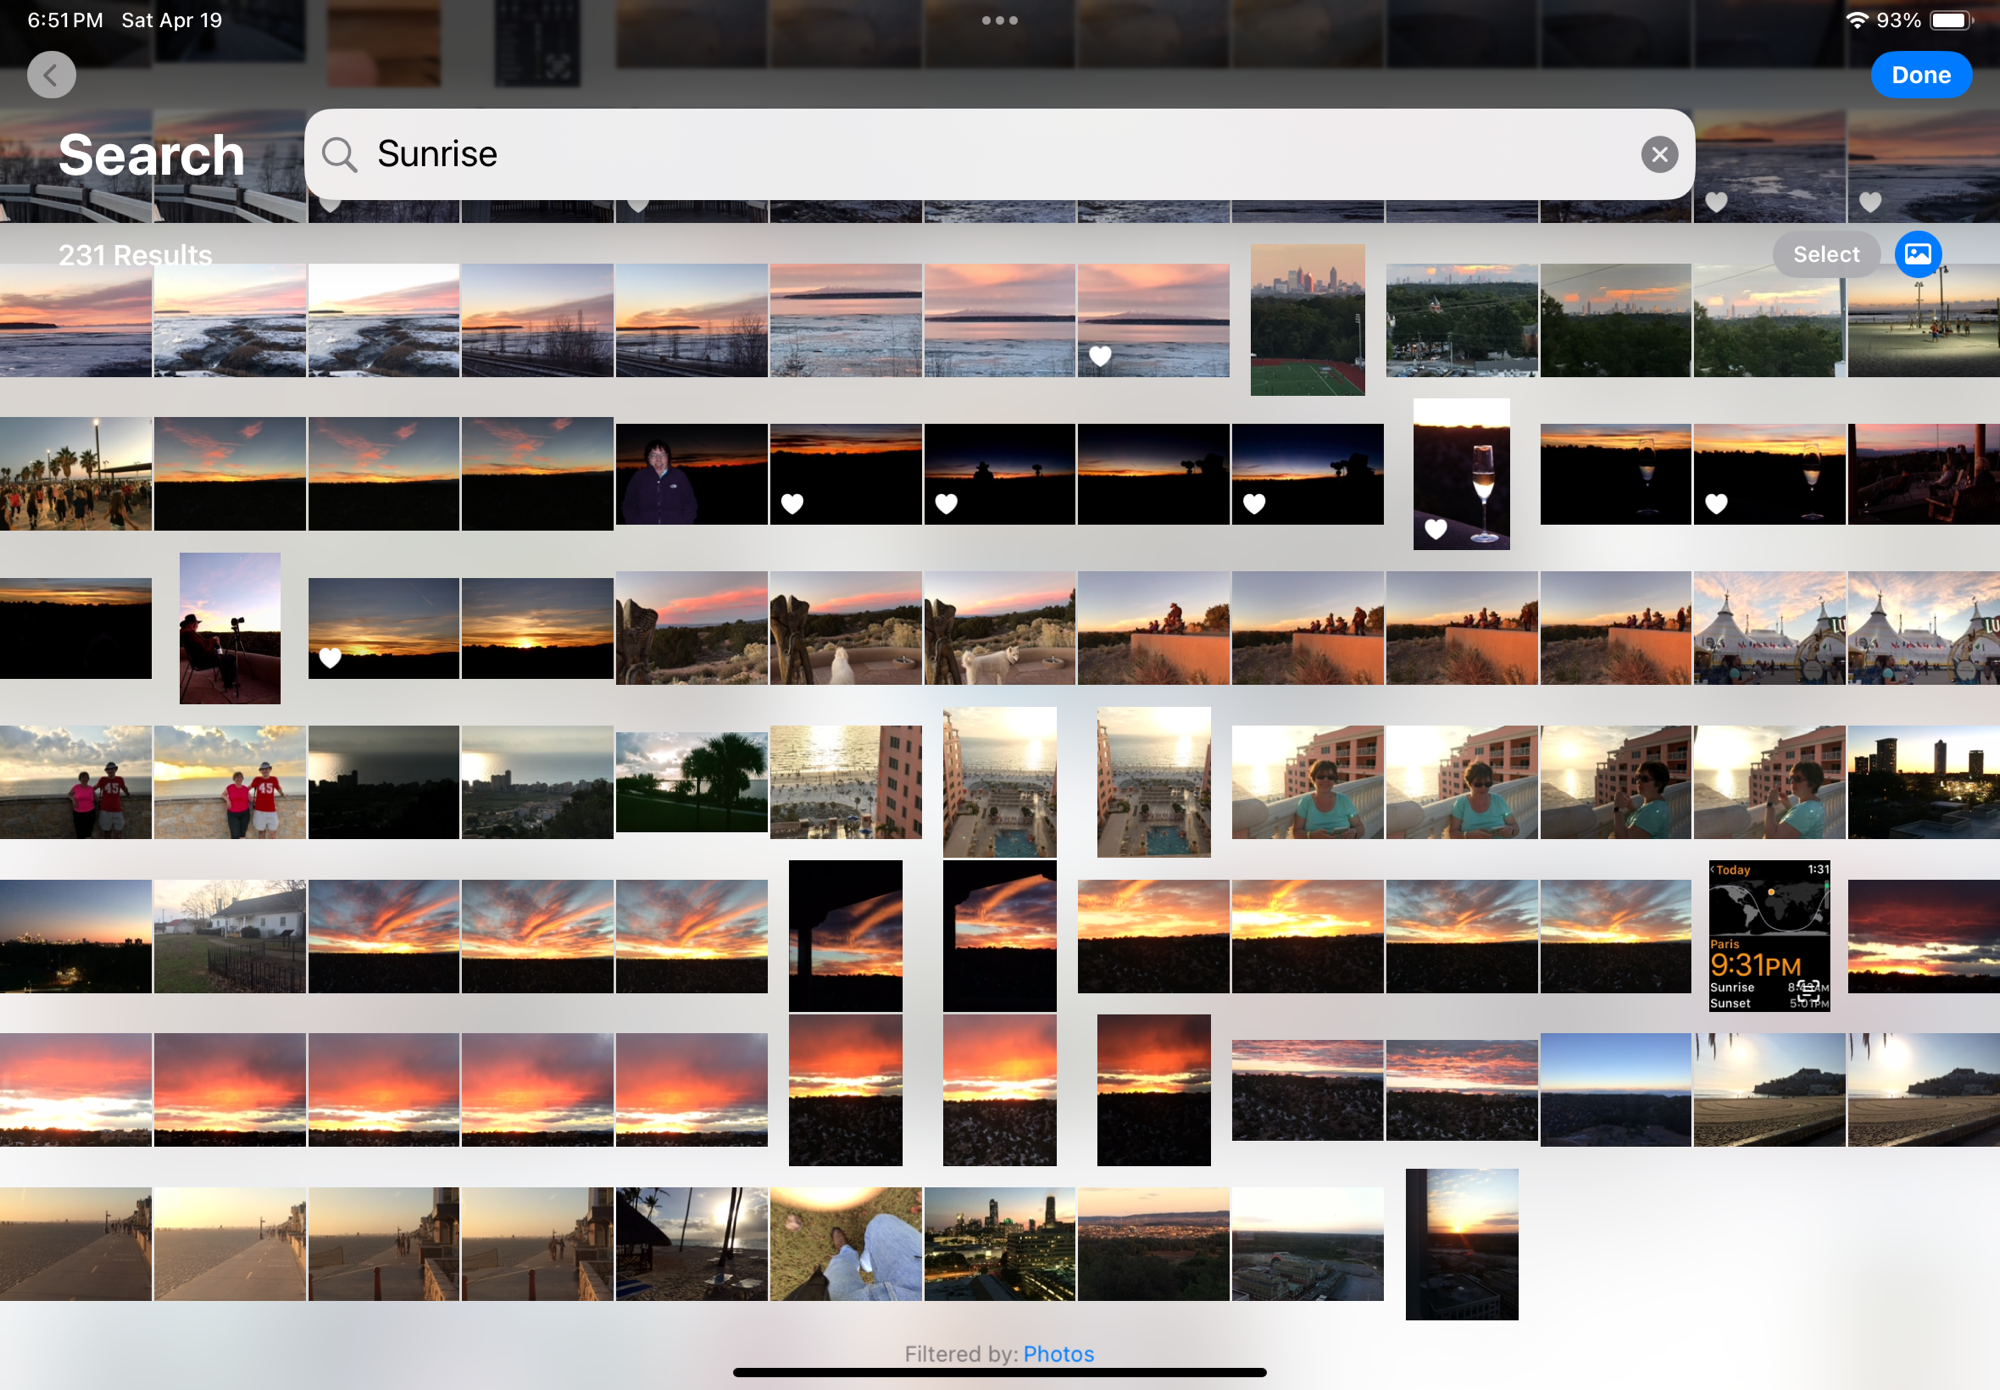
Apple Photos on iPad – search for “sunrise”– “sunset” returns almost identical results
Even without being passionate about photography, it’s easy to accumulate a few tens of thousands of pictures in a few years. The challenge is to organize them, and to retrieve the one you need without having to spend hours browsing galleries.
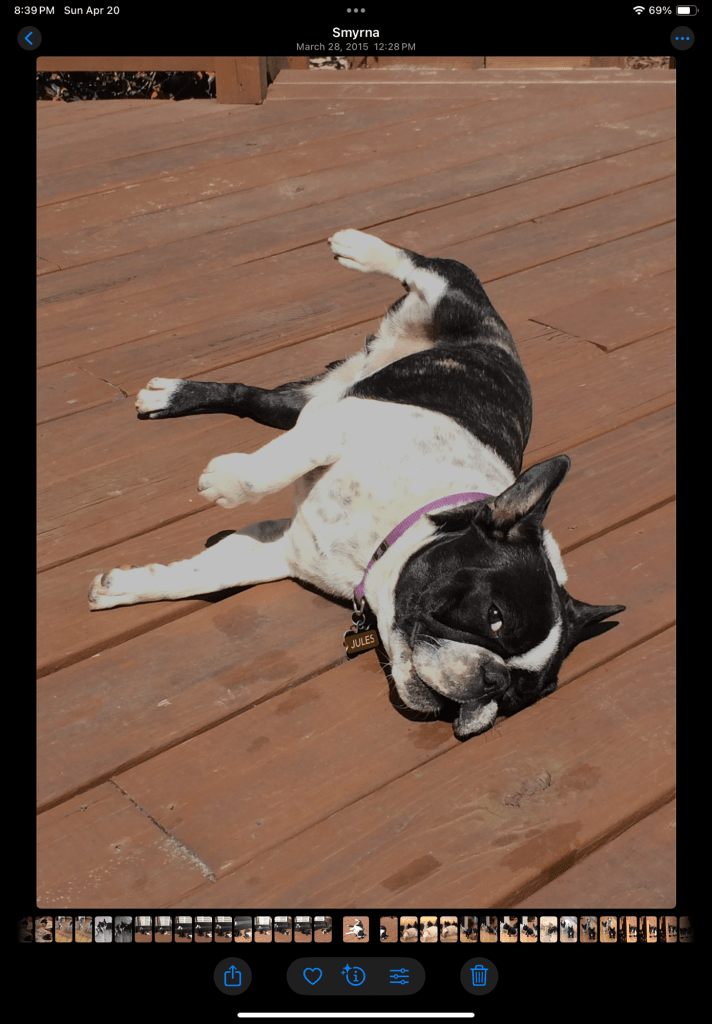
The photo management apps try and organize your photo library by date (easy), by theme, by trip, but what’s particularly impressive are the search capabilities – the app is using information it reads in the images (like the name tag of a dog), combining that with what it knows for sure (like the date and the GPS coordinates stored in the picture file) and what it has learned about you and your entourage to help you retrieve images. Without requiring you have entered captions or keywords to identify your subject. If Jules is a dog, it will answer questions such as “Jules in Chattanooga in 2014”. It even works with objects: “My Jeep in Destin” returns pictures of my Jeep in Destin, FL, “pictures of a ball pen” returns… ball pens, and searching for the word “dawn” will return all the pictures taken at sunrise (and sunset – the search algorithm is not perfect).
Searching for “Jules in Smyrna” – Apple Photos has read the name tag of the dog.
If the picture has been taken with a smartphone, it will be managed “natively” by the app. If it has been taken with a dedicated camera, the image will first need to be imported – most cameras vendors provide their own app that will transfer selected images from the camera to the Photo app of the device over a WiFi connection.
For Apple and Google, what matters the most is their ability to retain their client in their eco-system in the long run, from phone to phone to phone (they call that the stickiness). Once you’ve stored 10,000 photos in their Photo app, you’ve put yourself in a very sticky situation, and you will think twice before switching to the other side. Of course, transferring your images from Apple to Google or Google to Apple is always possible, but it won’t be immediate or straightforward and you may lose some information in the process (some metadata, and proprietary features like Apple’s Live Photos and RAW files, for instance).
Sunset, Tarpon Bay, FL
Photo cataloging / photo editing tools from specialized software vendors
If Apple or Google’s photo apps don’t give you enough, or if you don’t want your images to be stored in a cloud, or you don’t want to pay a monthly subscription fee and would rather buy conventional perpetual licenses, there is certainly a specialized photo management software that meets your needs.
Generally speaking, dedicated photo management software will offer more options for tagging the pictures, and more powerful photo editing tools, but, if the example of Adobe is representative of the industry, will not be as good as Apple and Google at automatically organizing and easily retrieving your images: they still rely predominantly on captions and keywords to identify an image.
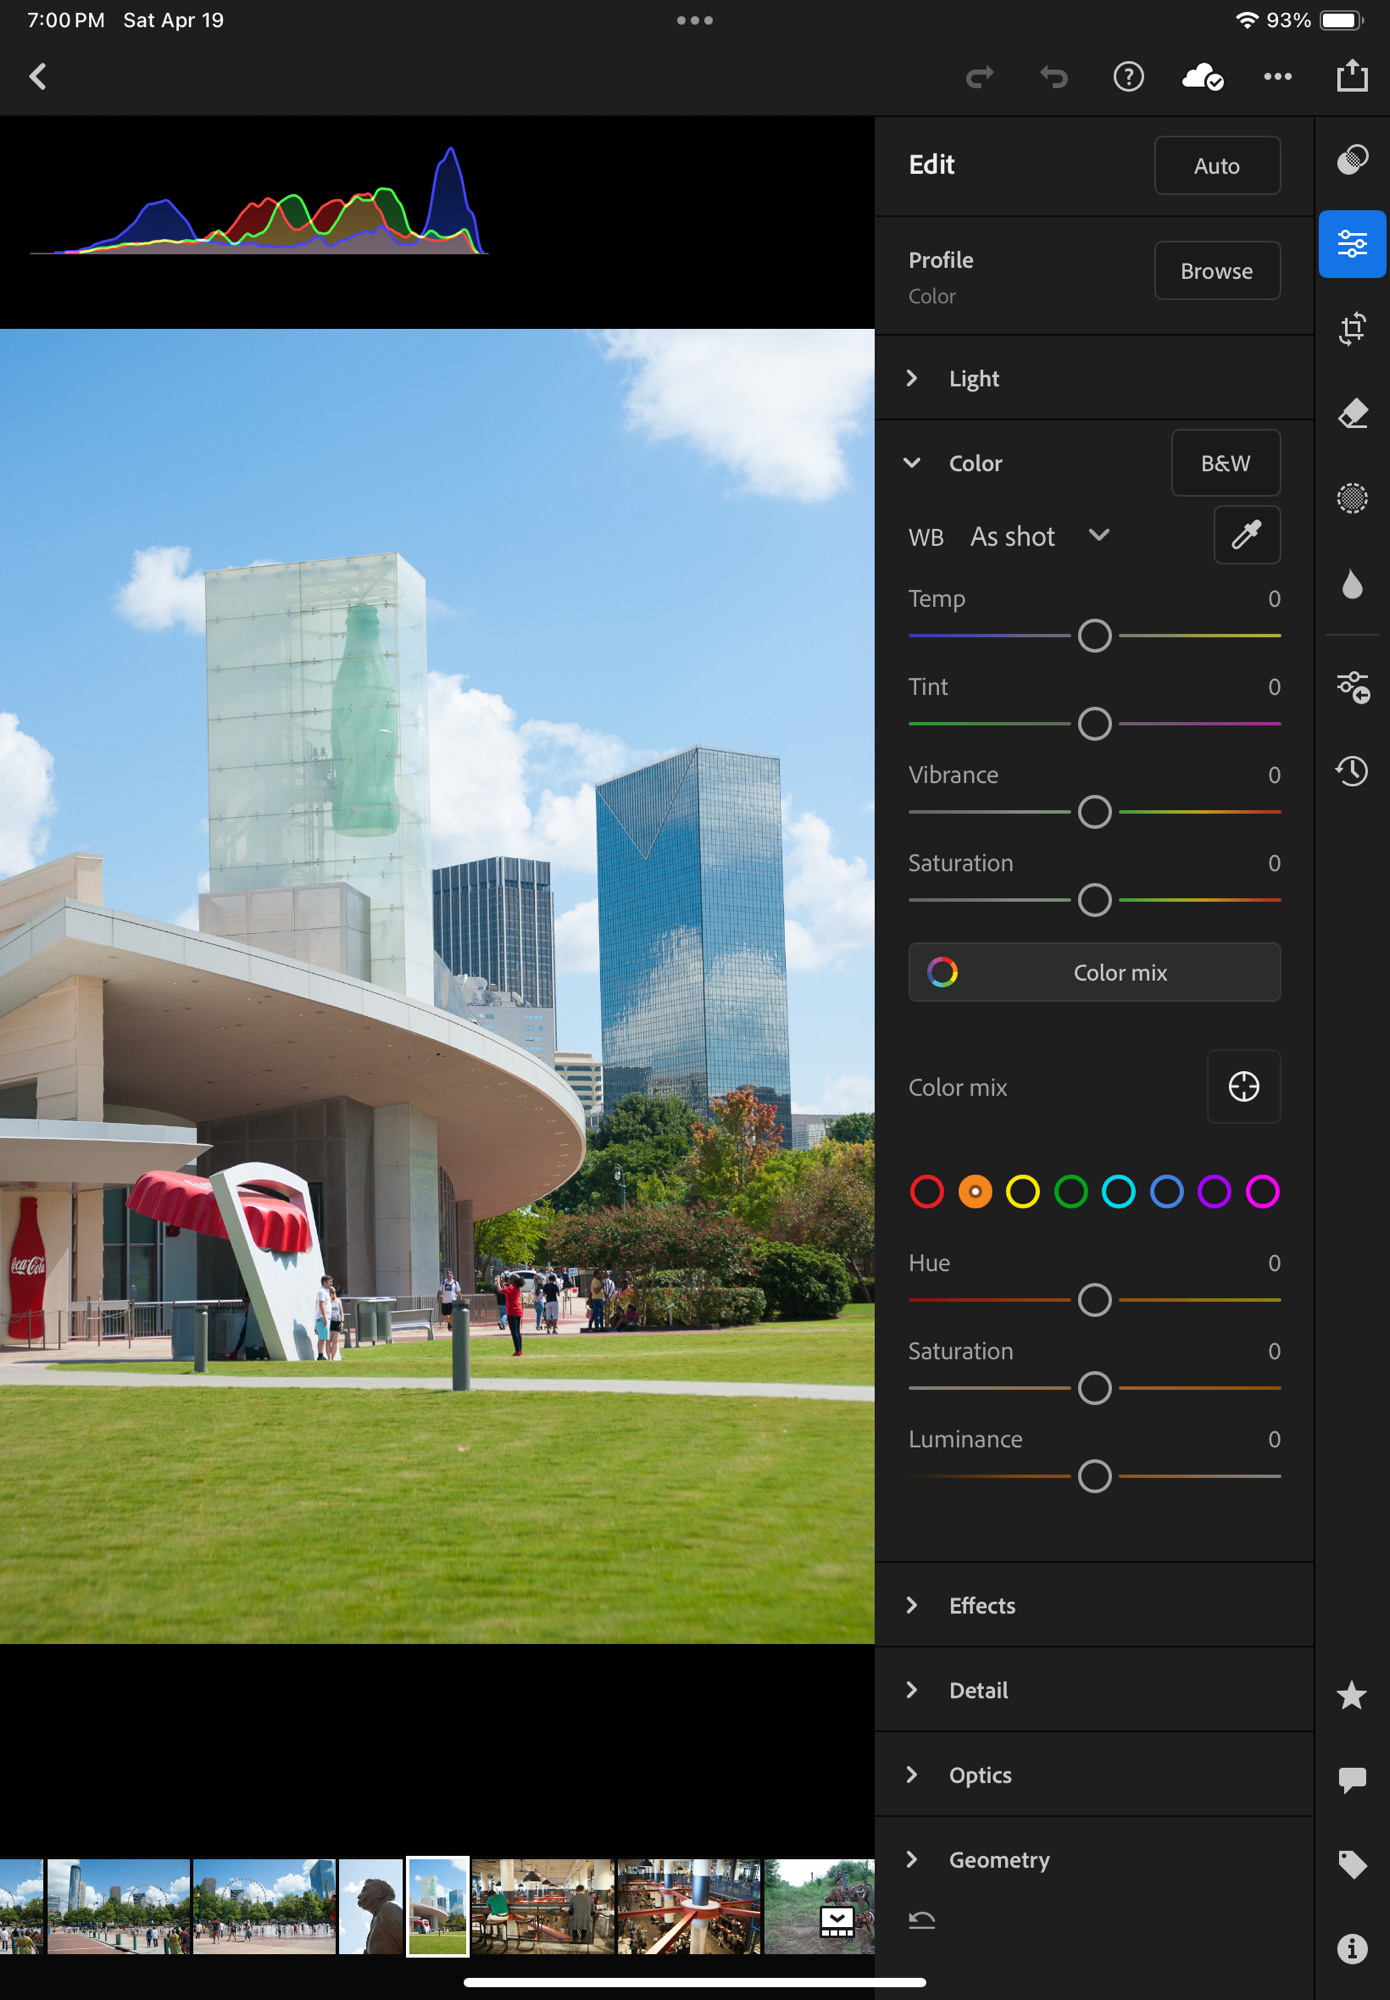
Specialized photo management tools offer more image editing options…
If you opt for local storage, you will have to invest in physical storage (directly attached drives or NAS) and you will need to protect your images with a good backup system (preferably off site, if you want it to protect your images from disasters). And off site backup plans have a cost.
… but the search is still heavily based on keywords and captions that have to be entered when the image is uploaded.
Cloud storage options are very broad – going from general purpose storage services like iDrive or Dropbox to more specialized offerings like Adobe’s Lightroom “Photography Plan” – but once you’ve exhausted the limited time promotional offers, the prices are relatively similar – around $10.00 /month for 2TB for most of them. iDrive seems to be the cheapest, Dropbox is in the same ballpark as Apple and Google ($9.99 /mo for up to 2TB). As of this morning, Adobe’s “Photography Plan” includes 1TB of storage for $11.99 /month, but in all fairness the cost also includes the Lightroom Mobile, Web and Classic subscription fees, so it’s not that bad of a deal.
What are the alternatives? Placing prints in a photo album?
A physical photo album is not a substitute for an electronic catalog, but it’s a mostly forgotten way to keep the images you love together, and return to them when you feel like it. You can even scan the prints if you can’t find the negatives or the original digital files (I’ve done it, shame on me), so it’s also a form of backup.
I lost the negatives a long time ago – but I had a photo album and scanned the print
The ability to create photo books used to be integrated in the photo cataloging apps: the option existed in Apple’s iPhoto – you picked the images, worked the layout and (of course) paid a hefty fee, and Apple would send you a printed photo album with a little Apple logo on the back. I’ve not used a recent version of Adobe Lightroom Classic but I believe the option to create photo books still exists (in conjunction with the Blurb photo book printing service). It does not exist on the “non-classic” versions of Lightroom.
Photo albums of all types and sizes (printed by Mixbook, ifolor, Apple, and self printed Fujifilm Instax)
Maybe the combination of Lightroom Classic and Blurb is still the reference to beat – but I’ve not been impressed with the alternatives – I tested Mixbook – and while the quality of the printed books was satisfactory, I found the solution difficult to use and also very expensive.
If you need multiple copies of a photo album, creating a photo book with one of those services makes sense, although it will cost you, but if you only need one copy, it may be simpler, faster and cheaper to print the pictures at home, and place them in a good old (physical) photo album.
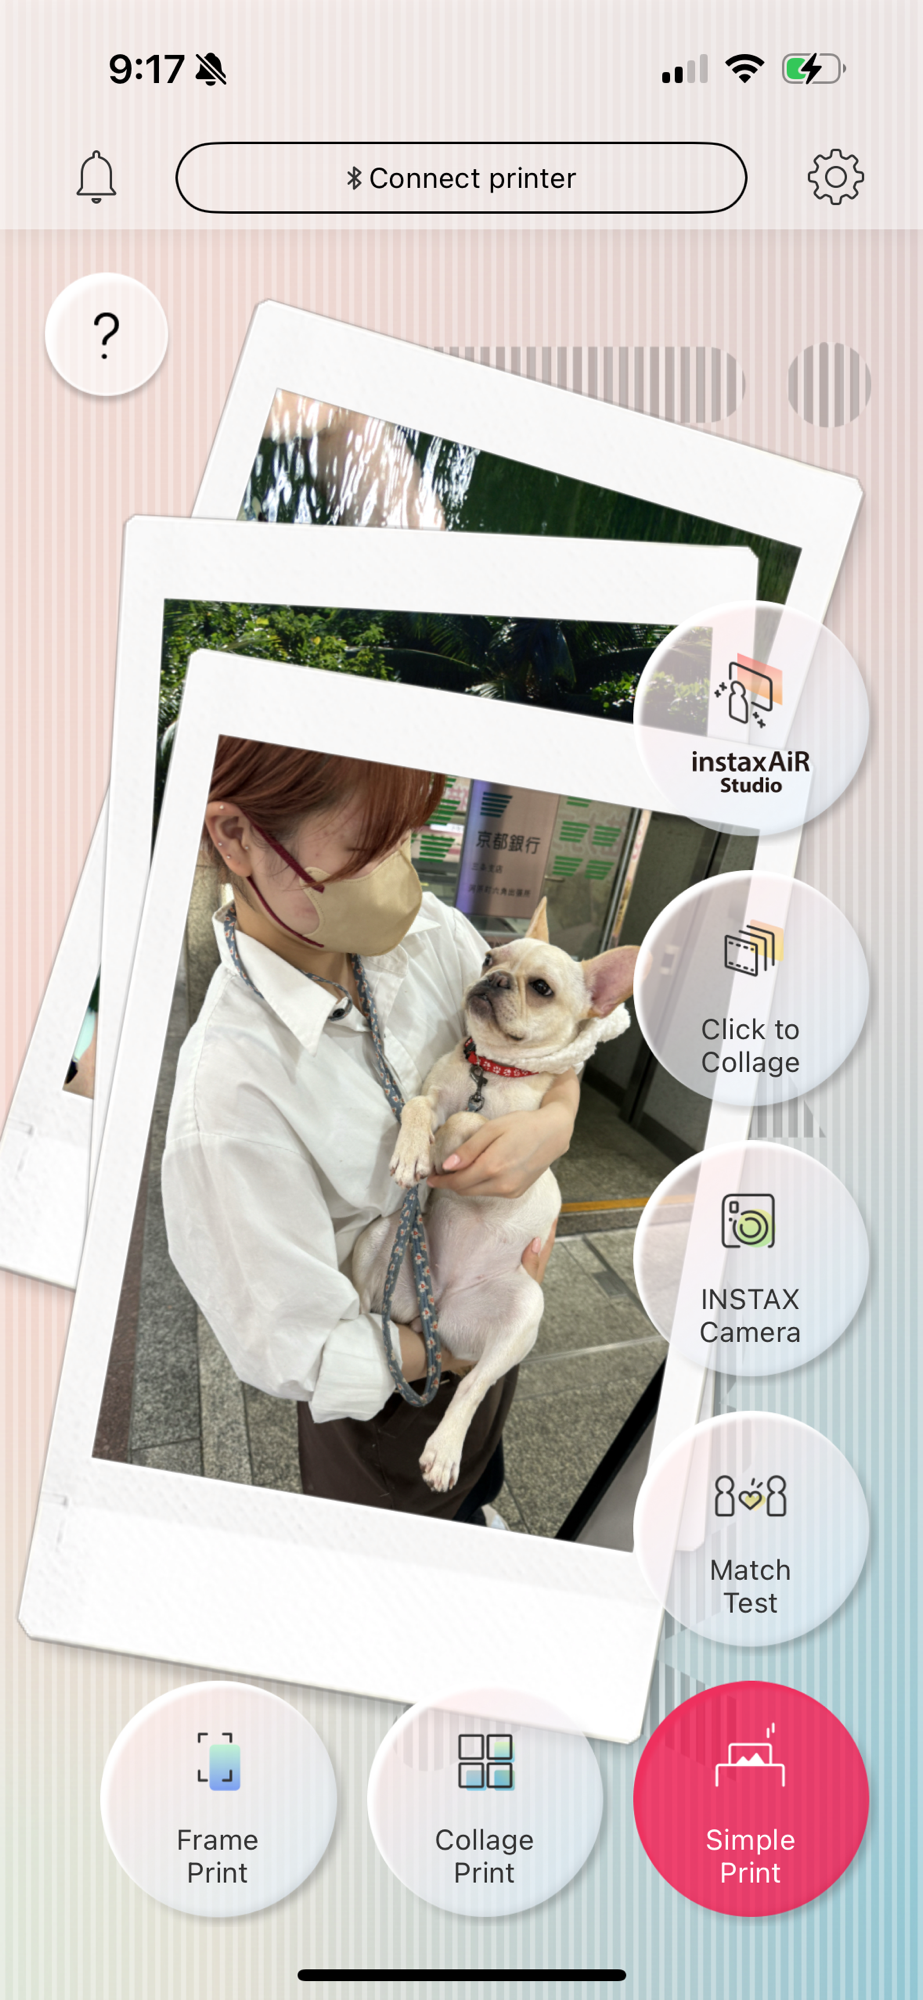
Fujifilm’s Instax film is available in three sizes, so are the Instax Printers.
Last by not least, Canon, Fujifilm, HP, Kodak and Polaroid (in alphabetical order) all propose easy to use ultra-portable printers, that will let you print images from a smartphone or a tablet – and place them in small photo albums that they can also provide. Fujifilm and Polaroid printers use instant film packs, Canon, HP and Kodak use a technology named “zero ink” (a sophisticated thermal paper). In my personal experience, assembling a mini photo album of 20 pictures is quick, easy, and ultimately cheaper than configuring a photo book from Blurb, Mixbook and dozens of their competitors.
More about Lightroom Mobile and Instant Film printers:
What camera to pick when you’re new to film photography and want to shoot with something a bit better than a point and shoot camera? The question is still bugging would-be film photographers in 2025. In the late nineteen seventies, Japanese camera manufacturers were trying to attract new categories of users to their single lens reflex systems, and started launching small, light and cute SLRs, easier to use and less intimidating than the big, heavy, complex and expensive best sellers of the time.
In order to make those cameras easy to use, they embraced the KISS principle (keep it simple, stupid) and deprived those entry level cameras from features and controls that seasoned photographers were taking for granted – they only operated in automatic mode, and generally did not even have a shutter speed dial.
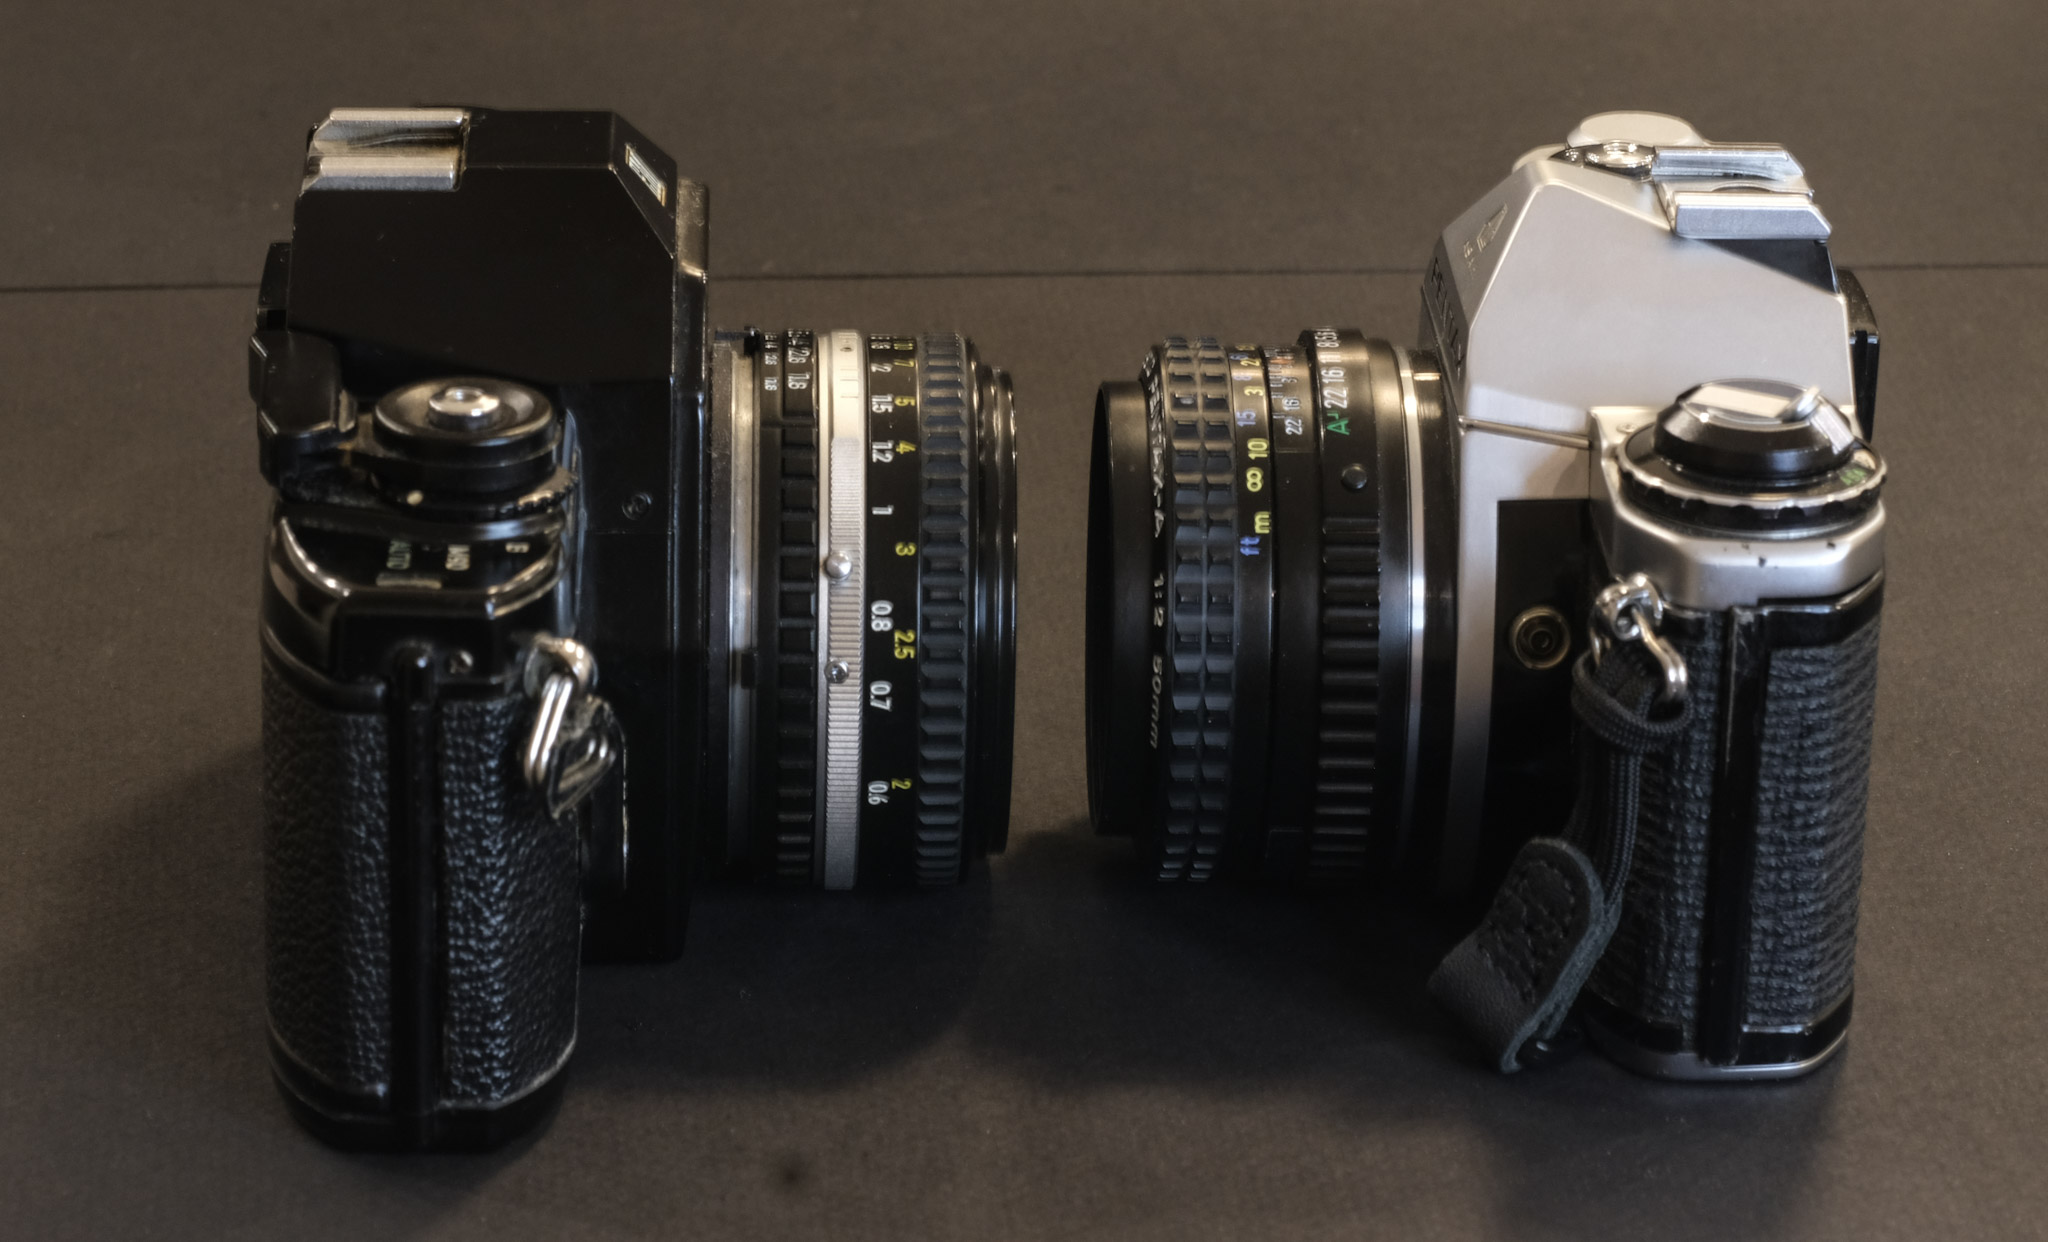
Nikon EM and Pentax ME – very similar specs
Pentax opened the way with the ME in 1976, followed (in no specific order) by Olympus (with the OM-10), Canon (with the AV-1), Fujica with the AX-1, and least but not least, Nikon. Until that point, Nikon had always tried to convey the image of a manufacturer of high quality products, sold at a premium over the models of its competitors. The Nikon EM from 1979 was a big shift – the privilege of shooting with a Nikon SLR was being made available in a simple camera, at a price point in line with the competition.
Almost 50 years later, cameras like the Nikon EM or the Pentax ME are among the cheapest SLRs manufactured by a first tier brand. Good copies typically sell between $50 and $100, when cameras generally recommended for beginners, like the Pentax K1000 or the Canon AE-1, can command prices above $100, and really nice cameras of the same vintage like the Nikon FE2 routinely reach prices in excess of $300.
Pentax ME – the viewfinder Nikon EM – the viewfinder
The Nikon EM
Like the Pentax ME, the EM is an ultra-compact camera, operating only in aperture priority mode, and deprived from a shutter speed dial and from a depth of field preview lever. Besides the logo on the front of the prism and the bayonet mount, the biggest difference betwen the two is that the shutter speed selected automatically by the camera is indicated by a needle moving on a scale at the left of the viewfinder on the EM, while the ME relies on red LEDs.
Following the example of Pentax with their M series lenses, Nikon developed a line of more compact and lighter lenses for this model (the E series lenses). The 50mm is almost a pancake lens – with an excellent image quality in spite of its really small size (the E series 35mm f/2.5 is also one of my favorites).
Pentax had launched the ME Super and the Super-Program for the photographers who expected more controls on a SLR. Similarly Nikon derived the FG from the EM, with a shutter speed dial and a program auto exposure mode.
The lineage of the ME stopped with the Super-Program and Program-A , the EM’s with the FG20.
The Nikon FG offers a semi-automatic exposure control mode, and a switch to disable the “beep”
Comparing the EM with the ME
The ME and the EM have 4 things going for them today:
they’re incredibly small, in particular with an “almost” pancake lens like the Nikon Series E 50mm or the Pentax M 28mm lens.
they’re nicely finished, – the EM was only available with a black finish, and although the external shell is made of polycarbonate, it still looks cool today, while the ME – still built entirely in metal, has a few clever details (such as the film advance indicator) and a nice detailing.
Almost any lens made by Nikon or Pentax between (roughly) 1975 and the first years of this century can be mounted, including autofocus lenses.
Above all, they’re simple – you set the aperture, place the subject in the frame, adjust the focus, and shoot. Even simplified, they’re still real cameras – with a good viewfinder with precise focusing aids, a direct control of the aperture and an indirect control of the shutter speed.
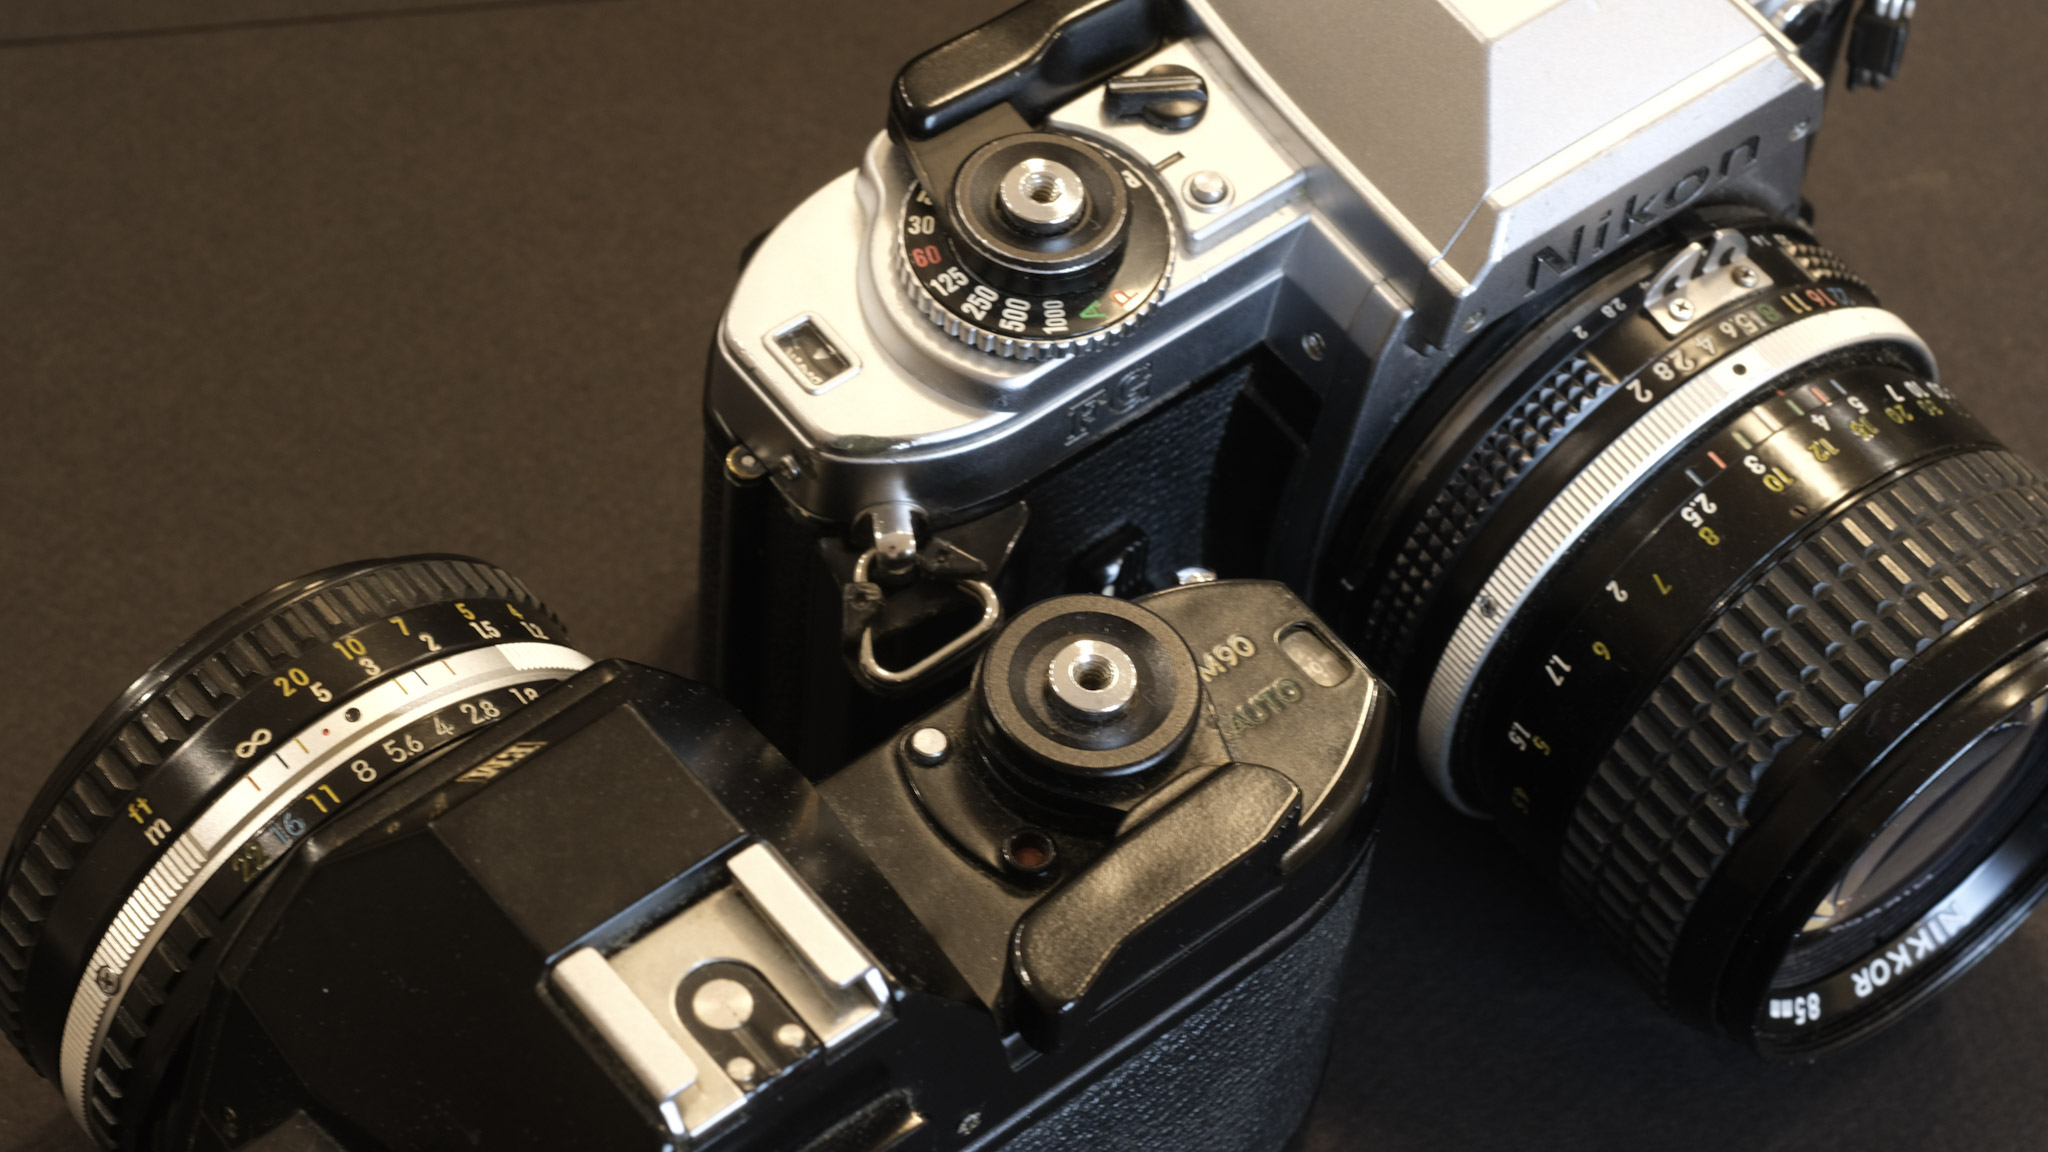
Nikon EM with 50mm E series lens, Pentax ME with a 50mm f/2 A series lens.
They have a few things going against them as well:
Because they’re somehow over simplified, they are more difficult to bring to do exactly what you want than a semi-auto camera or a camera with multi-mode automatism. An experienced photographer will be able to work around it, but beginners will be limited in their progression:
the control of shutter speed is indirect only (you have to adjust the aperture so that the automatism reacts by adjusting the shutter speed – there is no shutter speed dial and therefore no semi auto mode).
there is no exposure memorization either, only primitive exposure compensation systems. The exposure compensation for backlit subjects is either too simple (-2 EV at the push of a button is the only option on the EM) or too complex for beginners (expo compensation dial on the film sensitivity dial for the ME).
there are some irritating quirks – the EM beeps all the time (every time it believes the exposure is going to be under 1/30sec or reach 1/1000 sec). On the ME (and all the ME derivatives up to the Super Program), the control knob around the shutter release button is difficult to use unless you have the fingers of a garden fairy.
The real issue with those two cameras is that in the same price range you can buy the follow up models (Nikon FG, Pentax Program-A and Super Program) that keep most of the good points (small size, beautiful finish, choice of lenses) but are even simpler to use (there is a program mode) and simpler to over-ride (there is also a semi-auto mode).
Pentax Super Program – in some exposure control modes, the shutter speed is selected with the two push buttons and shown in the viewfinder and in the small LCD at the right of the prism
In summary
The EM does not cut it for me. It may be marginally more capable than the Pentax ME (the exposure compensation button is convenient), but the beeps are too irritating. On the FG there is a switch to silence the beeper, but not on the EM. The EM and the FG also seem more fragile than their bigger brothers in the Nikon range. The real problem with the EM (and the FG to a lesser extent) is that they were stepping stones in a range of cameras which included real gems. In the Nikon line-up of the late seventies/early eighties, the FM and the FE offer more flexibility, and a more robust built. Admittedly these two are a tad more expensive and a bit heavier than the EM, but not much larger and nicer to use. As for the FM2 and the FE2, they’re in another league altogether.
On the other hand, the Pentax ME and its descendants were not a low cost point of entry in the Pentax family, they were all that Pentax had to propose if you wanted to use Pentax SMC lenses. I like the Pentax ME – it’s nicely built and refreshingly simple – I even prefer it to the Super-Program, which is more capable but also more complicated to use, and requires even smaller fingers to change the settings. In the Pentax family, I still have to put my hands on the Program-A – it’s a slightly decontented Super-Program (no shutter speed priority mode) and it may be marginally simpler and easier to operate than its “Super” brother.
Nikon EM and Pentax ME – Both deprived of a shutter speed selector
As a conclusion – which one is the best for a beginner?
For a beginner, what makes the difference between two cameras should be the availability of good lenses, and any Nikon and Pentax SLR of that vintage will accept an extremely broad selection of very good prime and zoom lenses, manual focus as well as autofocus.
As cute, easy to use and cheap as they are, the EM and the ME will not be as flexible as a Nikon FG or a Super Program, and the cost difference between those cameras and a Nikon FE amounts to the cost a few lattes at Starbucks.
If you choose Camp Nikon, my recommendation will be to brew your coffee at home for a few days and use the cash you save for the FE. And if you still want your coffee at the drive-thru window, buy a FG rather than an EM. It will let you grow higher as a photographer than the EM.
For Pentaxists, it’s not as clear cut. There is no visible difference in build quality between a ME and a Super Program, and some features present in a Nikon FE and important for an enthusiast photographer (exposure memorization) are still absent from the Super Program. Simply avoid the models with a bad reliability record (ME Super?) and only buy cameras thoroughly tested by their seller.
As a final note, if you’re looking for the absolute bargain in the Nikon world, I suggest you also look at successor of the FG, the Nikon N2000 (F301 in the rest of the world). It’s the twin brother of the better known autofocus N2020 (aka F501), but without the autofocus mechanism, and with a ground glass designed for manual focus operations. With the N2020, it shares the motorized film advance, the semi-auto, program and aperture priority modes, an AE lock button and a great viewfinder. It’s a bit larger than cameras like the EM or the ME (and not as cute for sure), but it runs on AAA batteries that you can find anywhere, and it’s so cheap….one of my preferred $20.00 cameras.
Pentax Super Program and ME – the former benefits from an electronic self timer, a depth of field preview, and a removable grip.
More about cameras I recommend for beginners to film in CamerAgX:
In addition to some of the cameras mentioned above, there are a two other cameras I would recommend for beginners, and if you need more information, the full list of cameras reviewed in this blog since the beginning.
I’ve not had time to finish (and process) the rolls of films I loaded in the ME and the EM. So far, I tend to prefer the ME, because it does not beep like crazy, and also probably because it’s in a better shape than the EM, which is a bit scruffy. I find the LEDs indicating the shutter speed in the viewfinder of the ME easier to read than the needle of the EM, whose movements tend to be erratic – but again it may be a reflection of the better state of conservation of the ME.
Two pictures shot with cameras of the same family – the Super Program and the FG.
San Antonio – the Japanese Tea Garden. Shot with a Pentax Super Program and the Pentax SMC A 35-70 f/3.5-4.5. The zoom did not age well, or a previous owner had covered the front lens with vaseline, but it gives an eerie look to the picture.
from my archives – a photo taken with a Nikon FG on the trails of Kennesaw Mtn.
There are benefits to software subscriptions – obviously the initial cash outlay is minimal, and, if the software vendor reinvests the money it receives every month into useful product improvements, the subscriber (I mean “You”) will always work with a state of art software solution.
Of course, the problem with software subscriptions is that once you’ve started using the product you’re at the mercy of the software editor, who can elect to change their terms and conditions and raise their prices as often and as much as they like. There is a price point not to exceed obviously, but the subscriber is captive, and the cost to switch to another product (in hours of training and hours of labor to transfer the images and convert the workflows) far exceeds the few extra dollars that the software editor will be tempted to extract from its subscribers every now and then. So the captive audience elects to remain… captive.
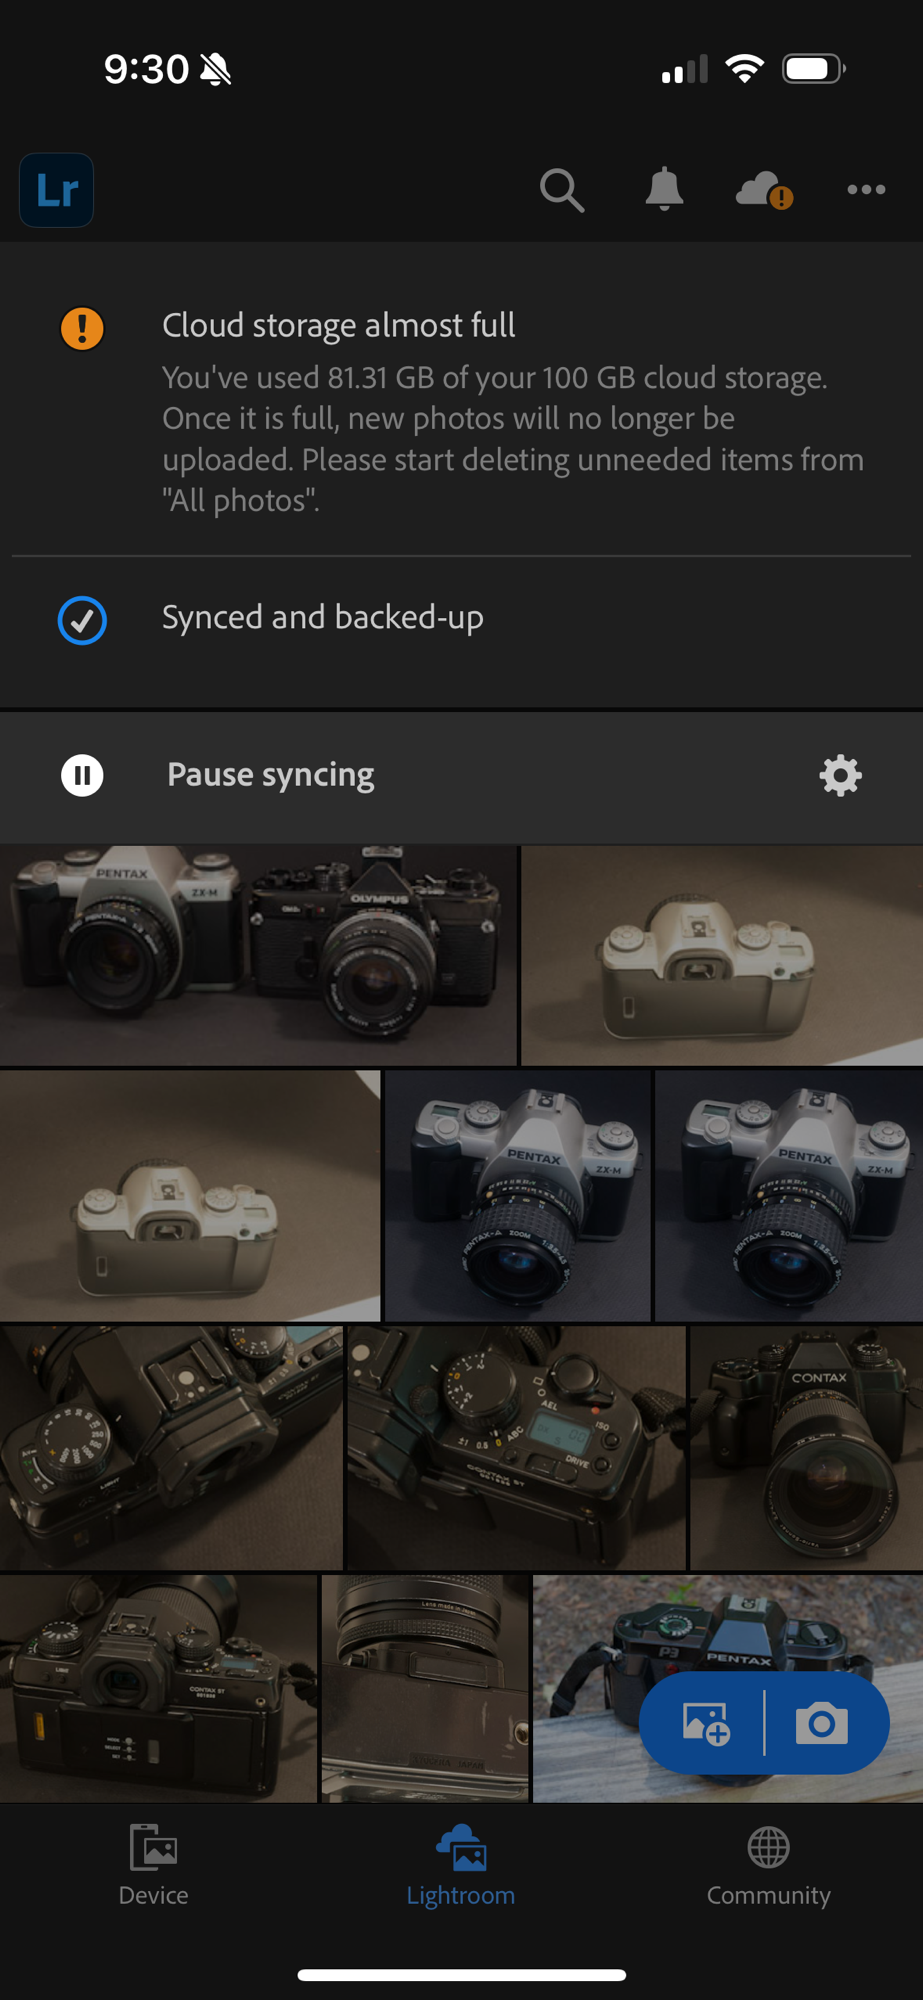
At the end of last year, after I had published three posts about the Lightroom Mobile Premium, Adobe tested the tolerance to pain of its clients again, and announced a price increase of its Lightroom subscriptions.
Along this post, I will stress multiple times that the information I’m providing has been verified and is believed to be accurate as of the end of March 2025. Some Adobe Lightroom plans or upgrade options have been removed from Adobe’s store front and from the apps themselves during the last three months, and more changes could take place in the future.
The recent changes (and a simplification of the catalog) make very clear that Adobe’s preference is for the photographer to subscribe to the Adobe Lightroom Plan with 1 TB Cloud Storage. Under this plan, the ubiquity of the Lightroom platform is maximized: a photographer can, with the same license, enjoy Lightroom as a light weight application available on smartphones, tablets, PC/Mac and in a Web browser app (all with Cloud storage), or as a heavier PC/Mac conventional application with as much local storage as necessary.
The mobile-only versions of Lightroom increasingly look like minor products packaged to push the photographers to step up to the “real” Lightroom, the one they buy directly from Adobe.
Lightroom Mobile on the iPhone – “please start deleting unneeded items” – not much of an upgrade path. The reality is not that dire – there is an upgrade path – but not through Apple’s App Store.
High level – the product hierarchy and the upgrade path
Lightroom is available as a mobile app for smartphone or tablet in the two main app stores (Apple and Google’s).
The gateway drug is a free version, which does not process RAW images and does not offer cloud storage. It’s a simple photo editor, and it’s easy to argue that Apple and Google’s native photo apps are at least as good and should be preferred.
Once you enable the Premium features, Lightroom Mobile for smartphone or tablet “with Premium features enabled” makes sense for a relatively light use – with its 100 GB of included cloud storage, you will store something between 10,000 and 15,000 images in Adobe’s library. Mobile Premium supports RAW files, and offers most of the benefits of the Adobe ecosystem, including credits to use Adobe’s AI. A sporadic use from a PC or a Mac is also possible (the cloud hosted library is accessible from a Web version of Lightroom).
If you need more than 100 GB of cloud storage, the only option (in March 2025) is to switch to an Adobe Lightroom Plan purchased through Adobe.com. The Adobe Lightroom Plan (with 1 TB of cloud storage) offers all the benefits of “Mobile with Premium features”, and adds Lightroom for PC/Mac (a lightweight client with Cloud storage) and Lightroom Classic (the fat client with local storage), plus 450 extra Creative Cloud monthly credits for less than $10.00/month (assuming you pay for one year of subscription upfront).
Lightroom for Web – available to Mobile Premium users – the “upgrade” option brings you to Adobe’s store where you can only subscribe to Adobe’s Lightroom and Photography Plans.
There is a catch, though. The Lightroom Mobile plan (sold on the app stores of Google and Apple) and Adobe’s Lightroom Plans (available on Adobe’s store front) are two distinct commercial offers made by two totally different organizations.
Lightroom Mobile and Adobe Lightroom are two products of the same family (and the library of images will follow you to Adobe Lightroom), but an upgrade from Lightroom Mobile to an Adobe managed Lightroom subscription is not commercially possible – you have to subscribe to Adobe’s Lightroom Plan as if you were new to Lightroom, and will receive no credit from Adobe if you had prepaid for one year of Mobile Premium on Apple’s or Google’s App Store.
Las Vegas – Sony WX350 – in full daylight the camera does a nice job
Will I receive credit for the remaining months of Apple subscription?
No, Adobe typically does not offer a direct credit for the remaining months of your Apple App Store subscription if you switch to an Adobe Lightroom plan. When you switch to a different plan through Adobe, you will likely need to cancel your Apple subscription, and the billing on Apple’s platform will continue until the next renewal date.
Apple doesn’t usually allow third-party services like Adobe to manage credits or refunds for their App Store subscriptions. You might want to check with Apple Support to see if they can offer any credit for the unused months of your subscription, but that would be separate from Adobe’s policies.
To avoid being double-charged, it’s essential to cancel your Apple subscription before subscribing to an Adobe plan. [from a ChatGPT dialog on March 26, 2025]
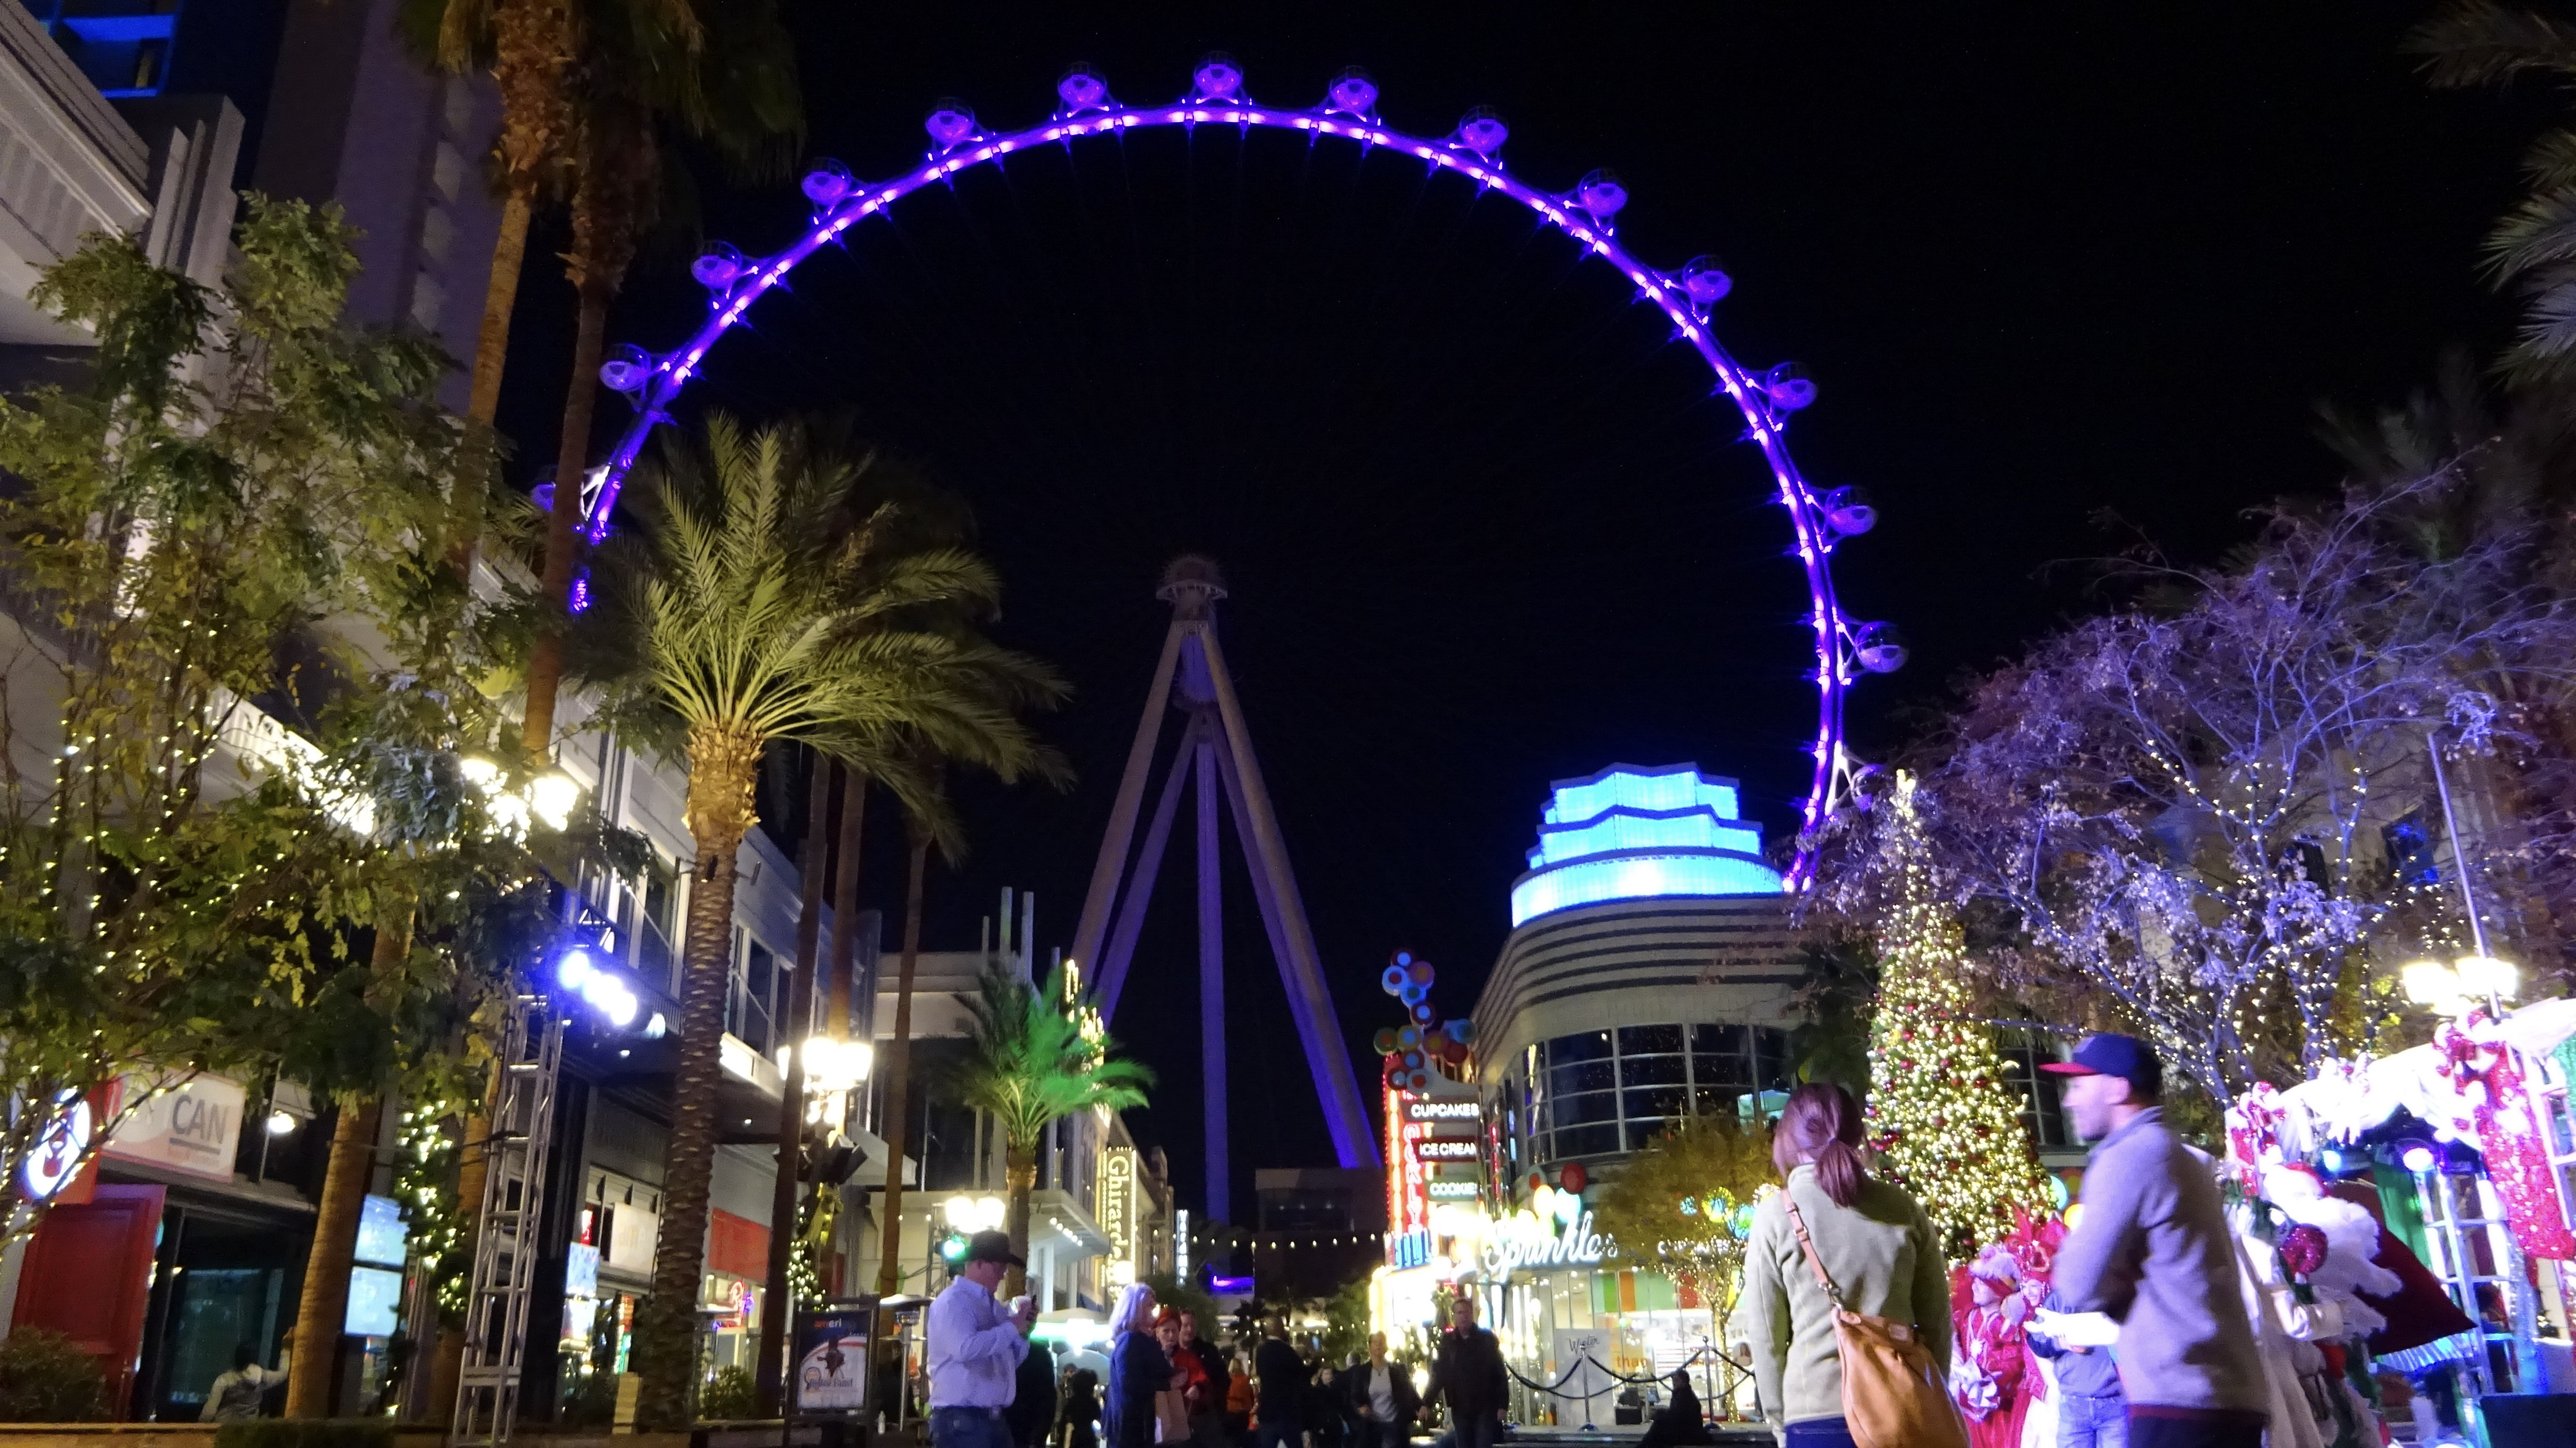
Las Vegas – night shot with a Sony WX350. This is the last evolution of the Exmor 18Mpix sensor.
The two tables below summarize the different ways to subscribe to Lightroom, as of March 2025.
Lightroom for Mobile – purchased through an App Store:
Using the Apple App Store as a reference – Lightroom’s offerings on the Google Play App Store are roughly similar.
Adobe Lightroom for iPhone
Adobe Lightroom for iPad
Adobe Lightroom for iPhone with Premium Features enabled
Adobe Lightroom for iPad with Premium Features enabled
iOS
iPadOS
iOS
iPadOS
Available through Apple Store
Available through Apple Store
Licensed through Apple Store
Licensed trough Apple Store
Annual Cost (US$)
free in Apple Store
free in Apple Store
49.99
49.99
Included Adobe Creative Cloud storage
No
No
100 GB
100 GB
Storage upgrade tiers
No direct upgrade option
No direct upgrade option
RAW Files Supported
No
No
Yes
Yes
AI enchancer
No
No
Yes
Yes
AI Generative Credits included
50 /month
50 /month
Lightroom Web
No
No
Included
Included
Lightroom for PC/Mac
No
No
No
No
Lightroom Classic
No
No
No
No
Photoshop
No
No
No
No
Las Vegas – Sony WX350 – the limits of the 2/3in sensor are very visible in night shots.
Subscribing to Adobe Lightroom through the Adobe.com storefront
Adobe Lightroom Plan
Adobe Photography Plan
Annual Cost (if paid upfront)
$ 119.88
$ 239.88
Included Adobe Creative Cloud storage
1 TB
1 TB
Storage update tiers
1 TB
1 TB
Annual cost of storage tier
$119.99
$119.99
How to procure
Adobe.com
Adobe.com
RAW Files Supported
Yes
Yes
AI enchancer
Yes
Yes
AI Generative Credits included
500/month
500/month
Lightroom Mobile Premium for iOS
Included
Included
Lightroom Mobile Premium for iPadOS
Included
Included
Lightroom Web
Included
Included
Lightroom for PC/Mac
Included
Included
Lightroom Classic
Included
Included
Adobe Porfolio
Included
Included
Photoshop for iPad
No
Included
Photoshop for Web
No
Included
Photoshop for PC/Mac
No
Included
Alternatives?
For those who don’t want to pay the “Adobe Tax”, and prefer products distributed under an Open Source license or following a conventional perpetual licensing model, there are quite a few options, some free, some cheap. Some of those products even offer a mobile version and integrated cloud storage. A selection, listed in alphabetical order: Capture One, Darktable, On1 Photo Raw, Raw Therapy, Skylum Luminar. I’ve not tested them but there are interesting reviews in Youtube. One of them below.
More about alternatives to Lightroom:
Why Las Vegas? Because in Las Vegas, the Casino always wins.
Las Vegas in 2015 – Sony Cybershot WX350 – I returned the camera after one week – even if it was equipped with the best 2/3in sensor on the market at the time, I did not like the image quality and the ergonomics.
[The Web standards are constantly evolving, and backwards compatibility does not seem to sit very high in the list of priorities. One day, you find out that your good old laptop can’t render Adobe.com or Apple.com pages anymore, or that modern browsers are making a mess of your old blog entries. Because it had become unreadable I moved the content of this old blog post to my current “Isola” theme in WordPress and I’m republishing it. I did not alter the text – just added comments between brackets when necessary.]
When your good friends learn that you still shoot film, and write about it, they understand they have a unique opportunity to get rid of all the – let’s be polite – worthless photo equipment they don’t use anymore and you end up with Kodak Brownies or Instamatics by the bucketload. And if your brother in law is really facetious, he brings you a brand new Holga from one of his trips in China, and since it’s a Christmas present and everybody in the family is intrigued, you buy film and start using it.
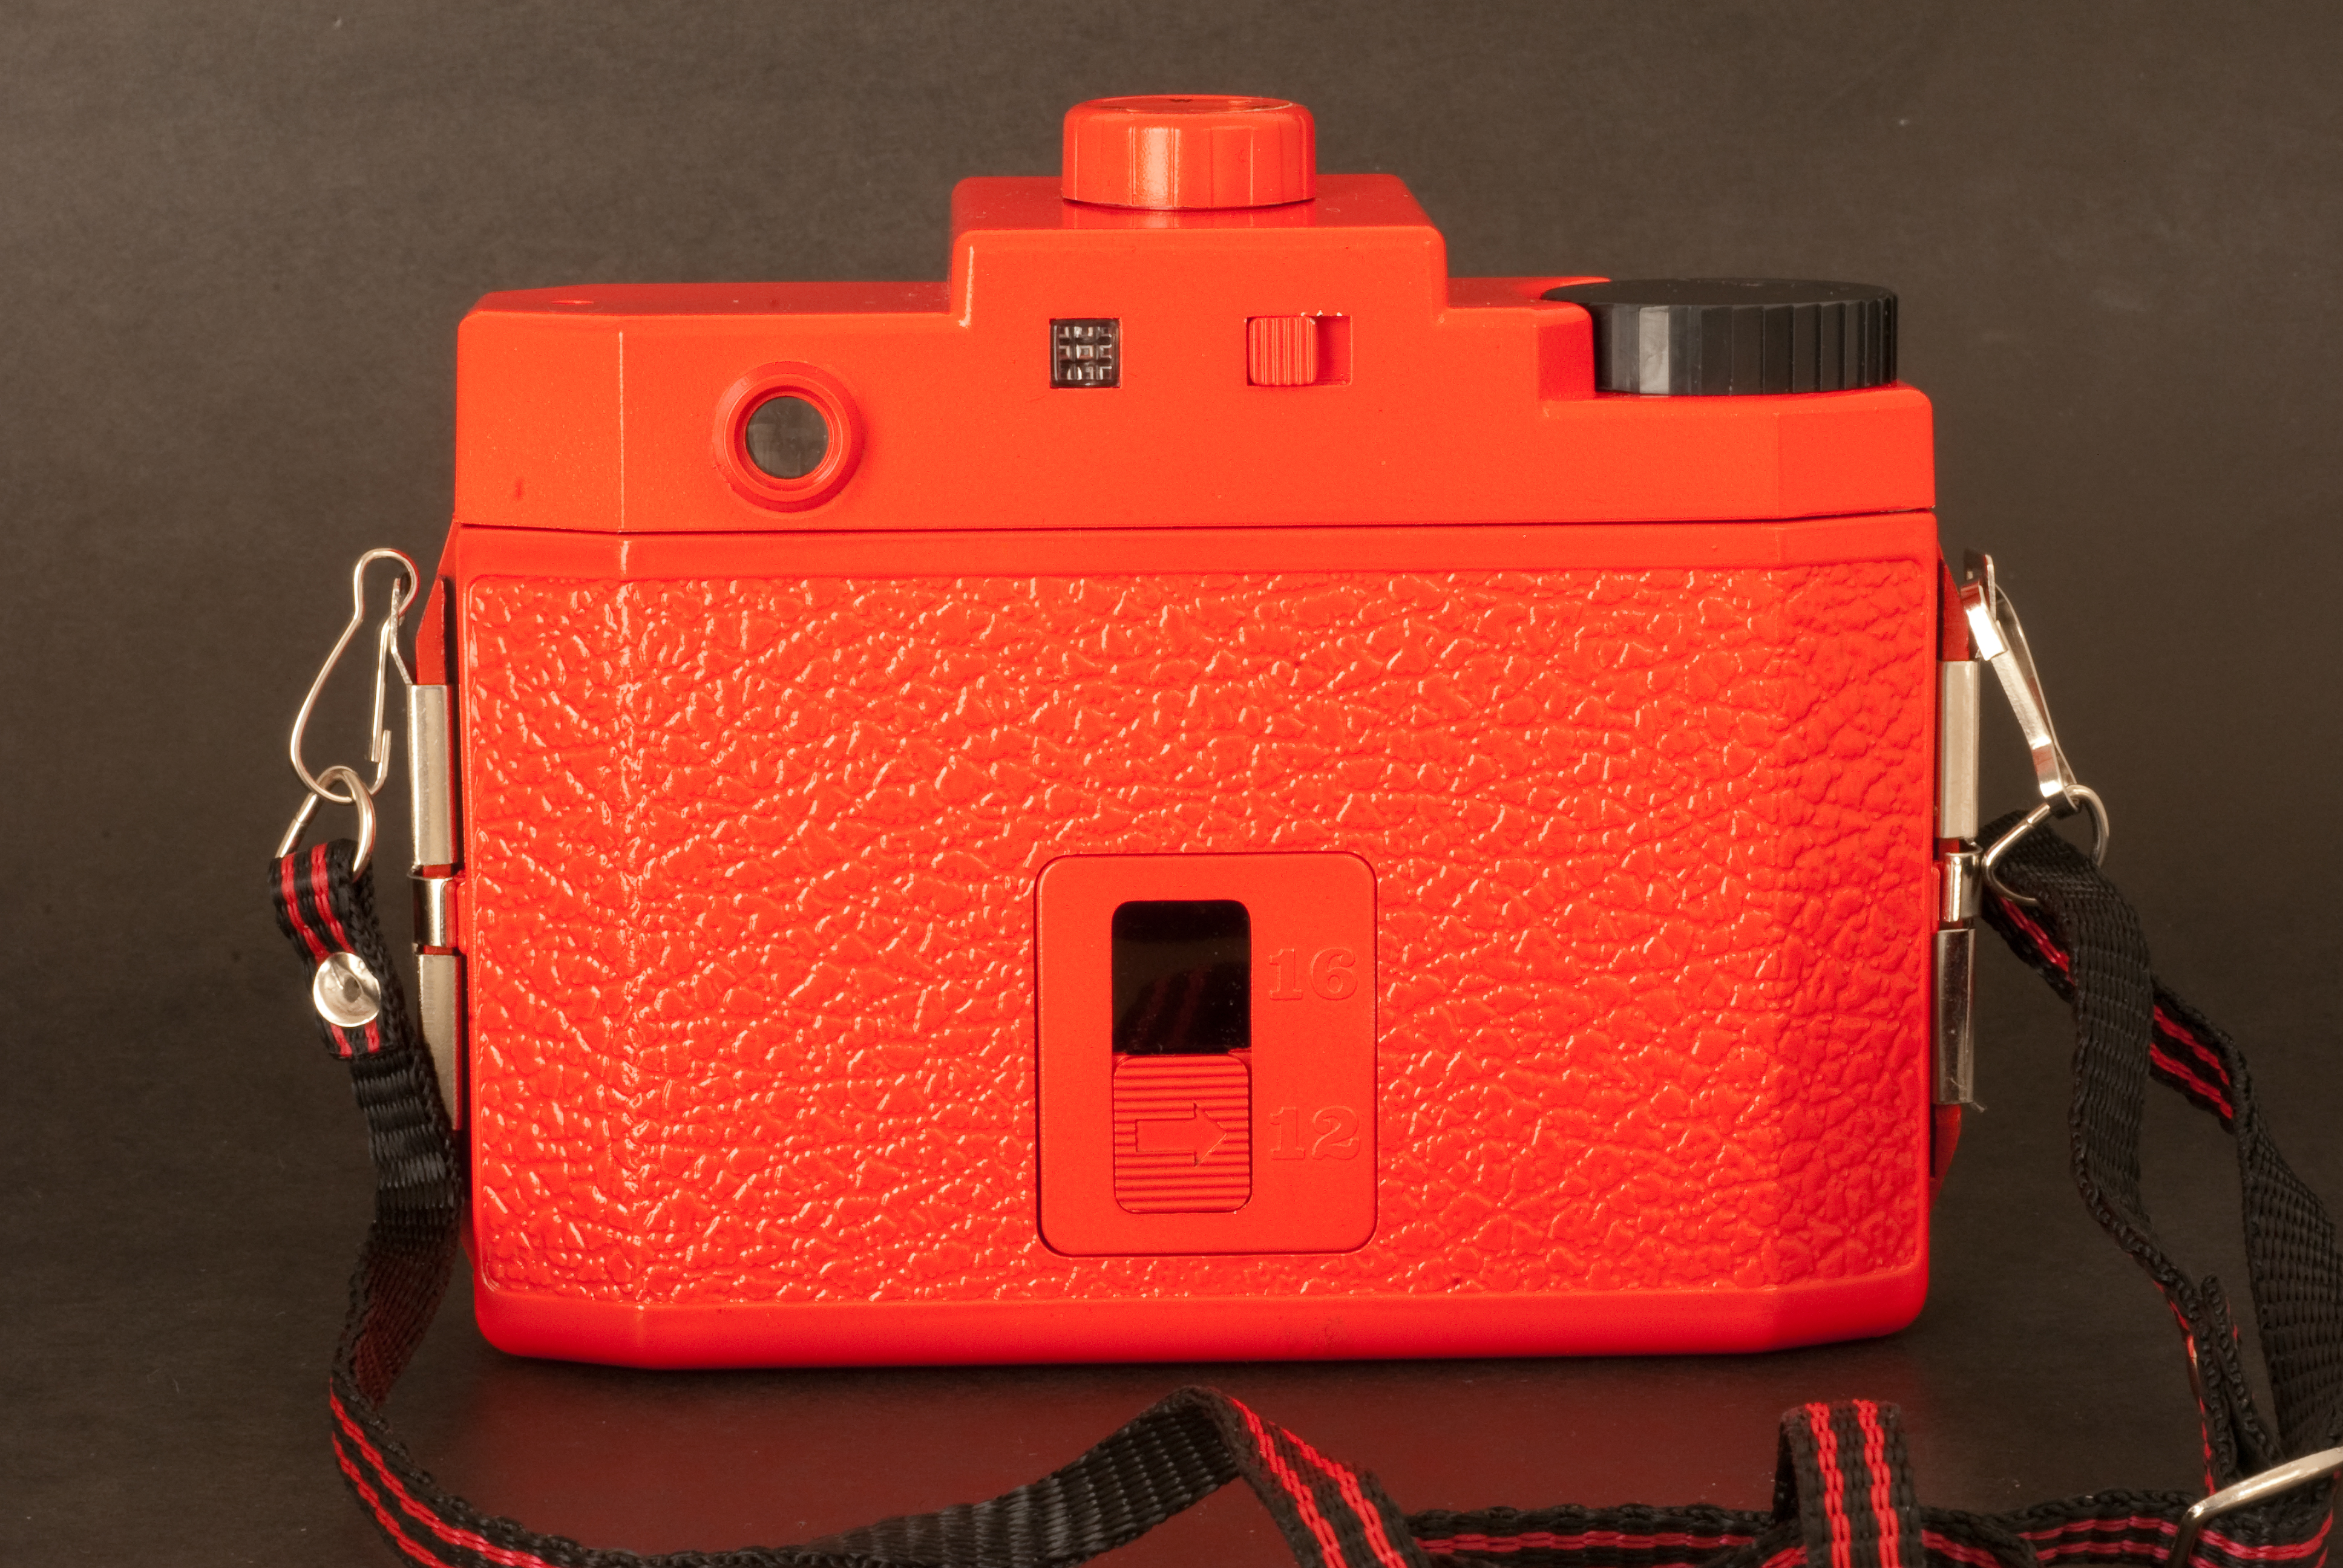
Holga 120 CNF
That particular camera comes in a big orange box with the rest of the “Starter Kit”. Reading the user manual, you get confirmation that the camera is “extremely low tech, and will eventually wear out”. Major design flaws are presented as unique features – the dreaded manual mentions “leaks of light, unvoluntary multiple exposures, loose connection between the film and the take up spool” among the desirable characteristics of the product. Looking for some comfort, you check a little square format book at the bottom of the box. It’s a nice paperback of 192 pages, showing 300 images taken with Holga cameras. Not something Leica or Nikon would be proud of, but interesting pictures nonetheless.
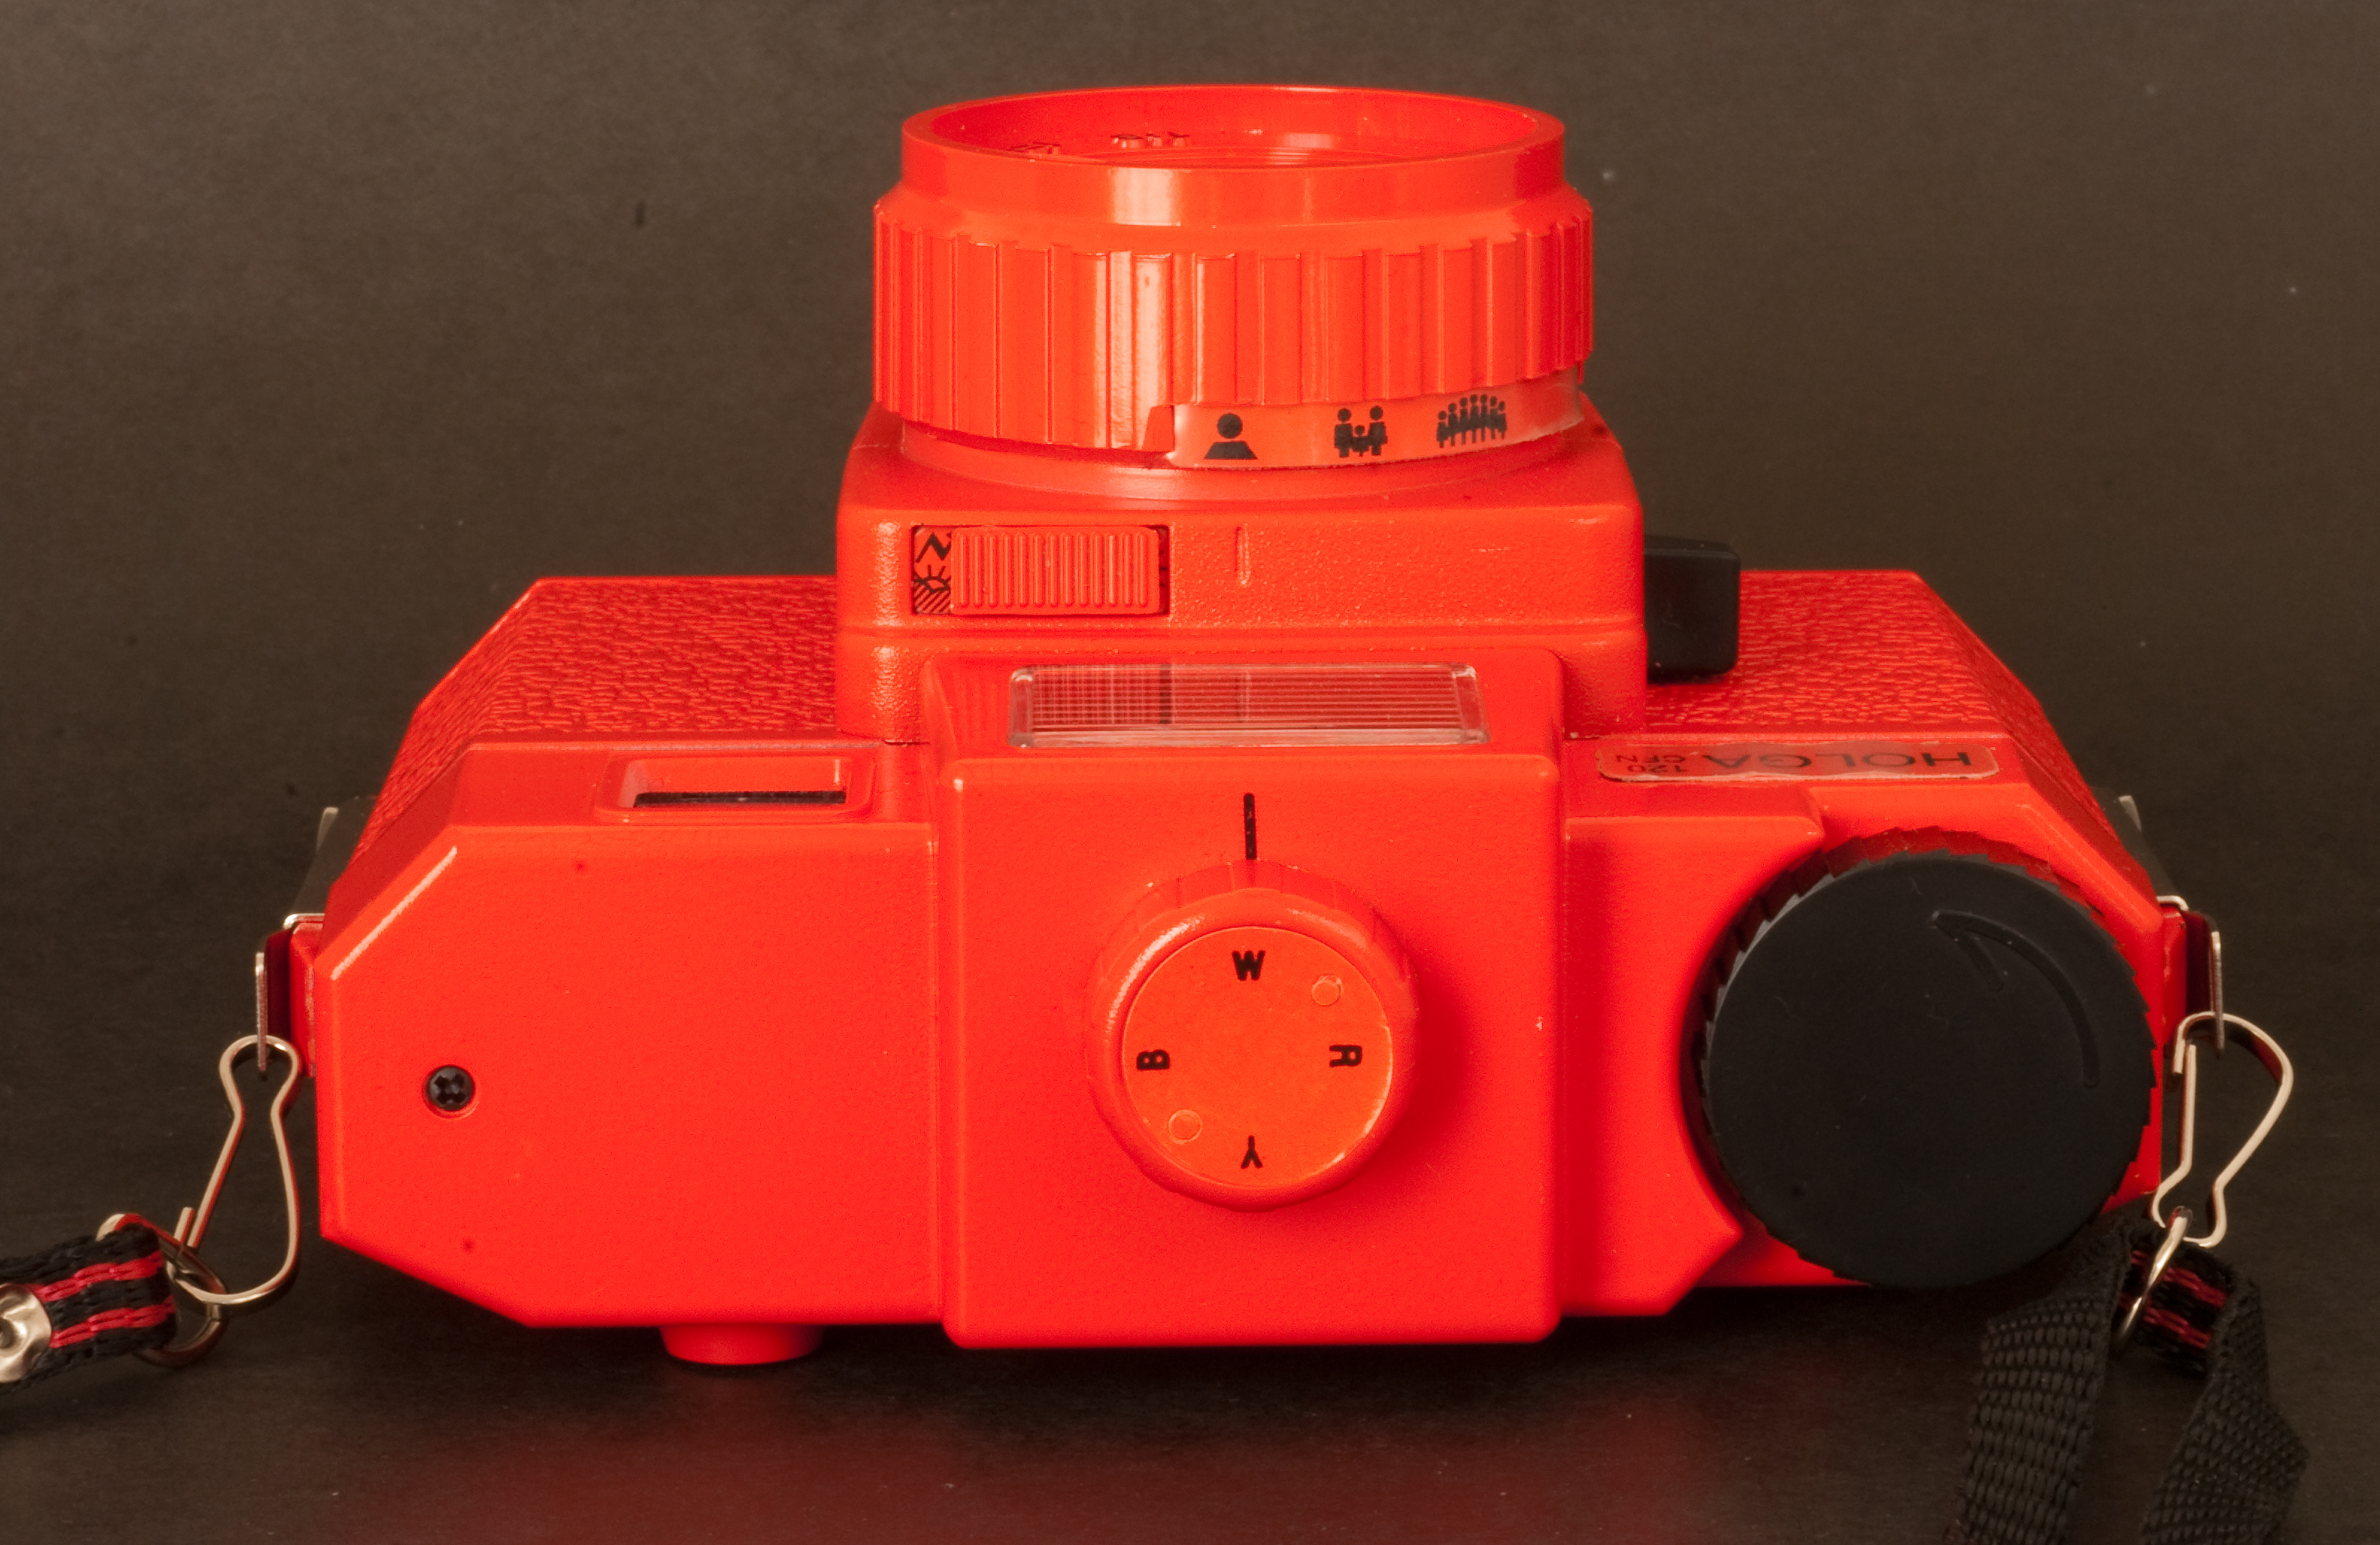
The camera’s design is very basic. It accepts 120 format roll film, has a plastic wide angle lens (60mm, F:8 or F:11) with 4 possible focus settings, and a shutter which offers a unique and unspecified speed. The camera comes with 2 user interchangeable back plates, one will give you 6×6 cm negatives with some vignetting, the other one 6×4.5cm negatives, probably with less vignetting (I don’t know, I only shot with the 6×6 plate). The “CFN” Holgas also come with an electronic flash, equipped with a turret of 4 filters (Red, Blue, Yellow and transparent) for special effects.
Shooting with Holga
The Holga 120 CFN needs 120 film – of course – and since Holgas are supposed to be enjoyed for their shortcomings, color film should be preferred (the plastic lens is prone to chromatic aberrations which would not be visible with black and white film).
Finding color film in 120 rolls proved very difficult. If 35mm film is still easy to find (even in supermarkets or in the little stores attached to many hotels), the same can not be said for 120 roll film. Only stores dedicated to professional photographers still have a few references. I bought a few rolls of Kodak’s Portra 400 NC film. Loading the camera is a difficult task, but in all honesty I’m not used to roll film and I would also have suffered with a more high end camera. [this blog entry was originally written in 2010 – 35mm film is not that easy to find anymore]
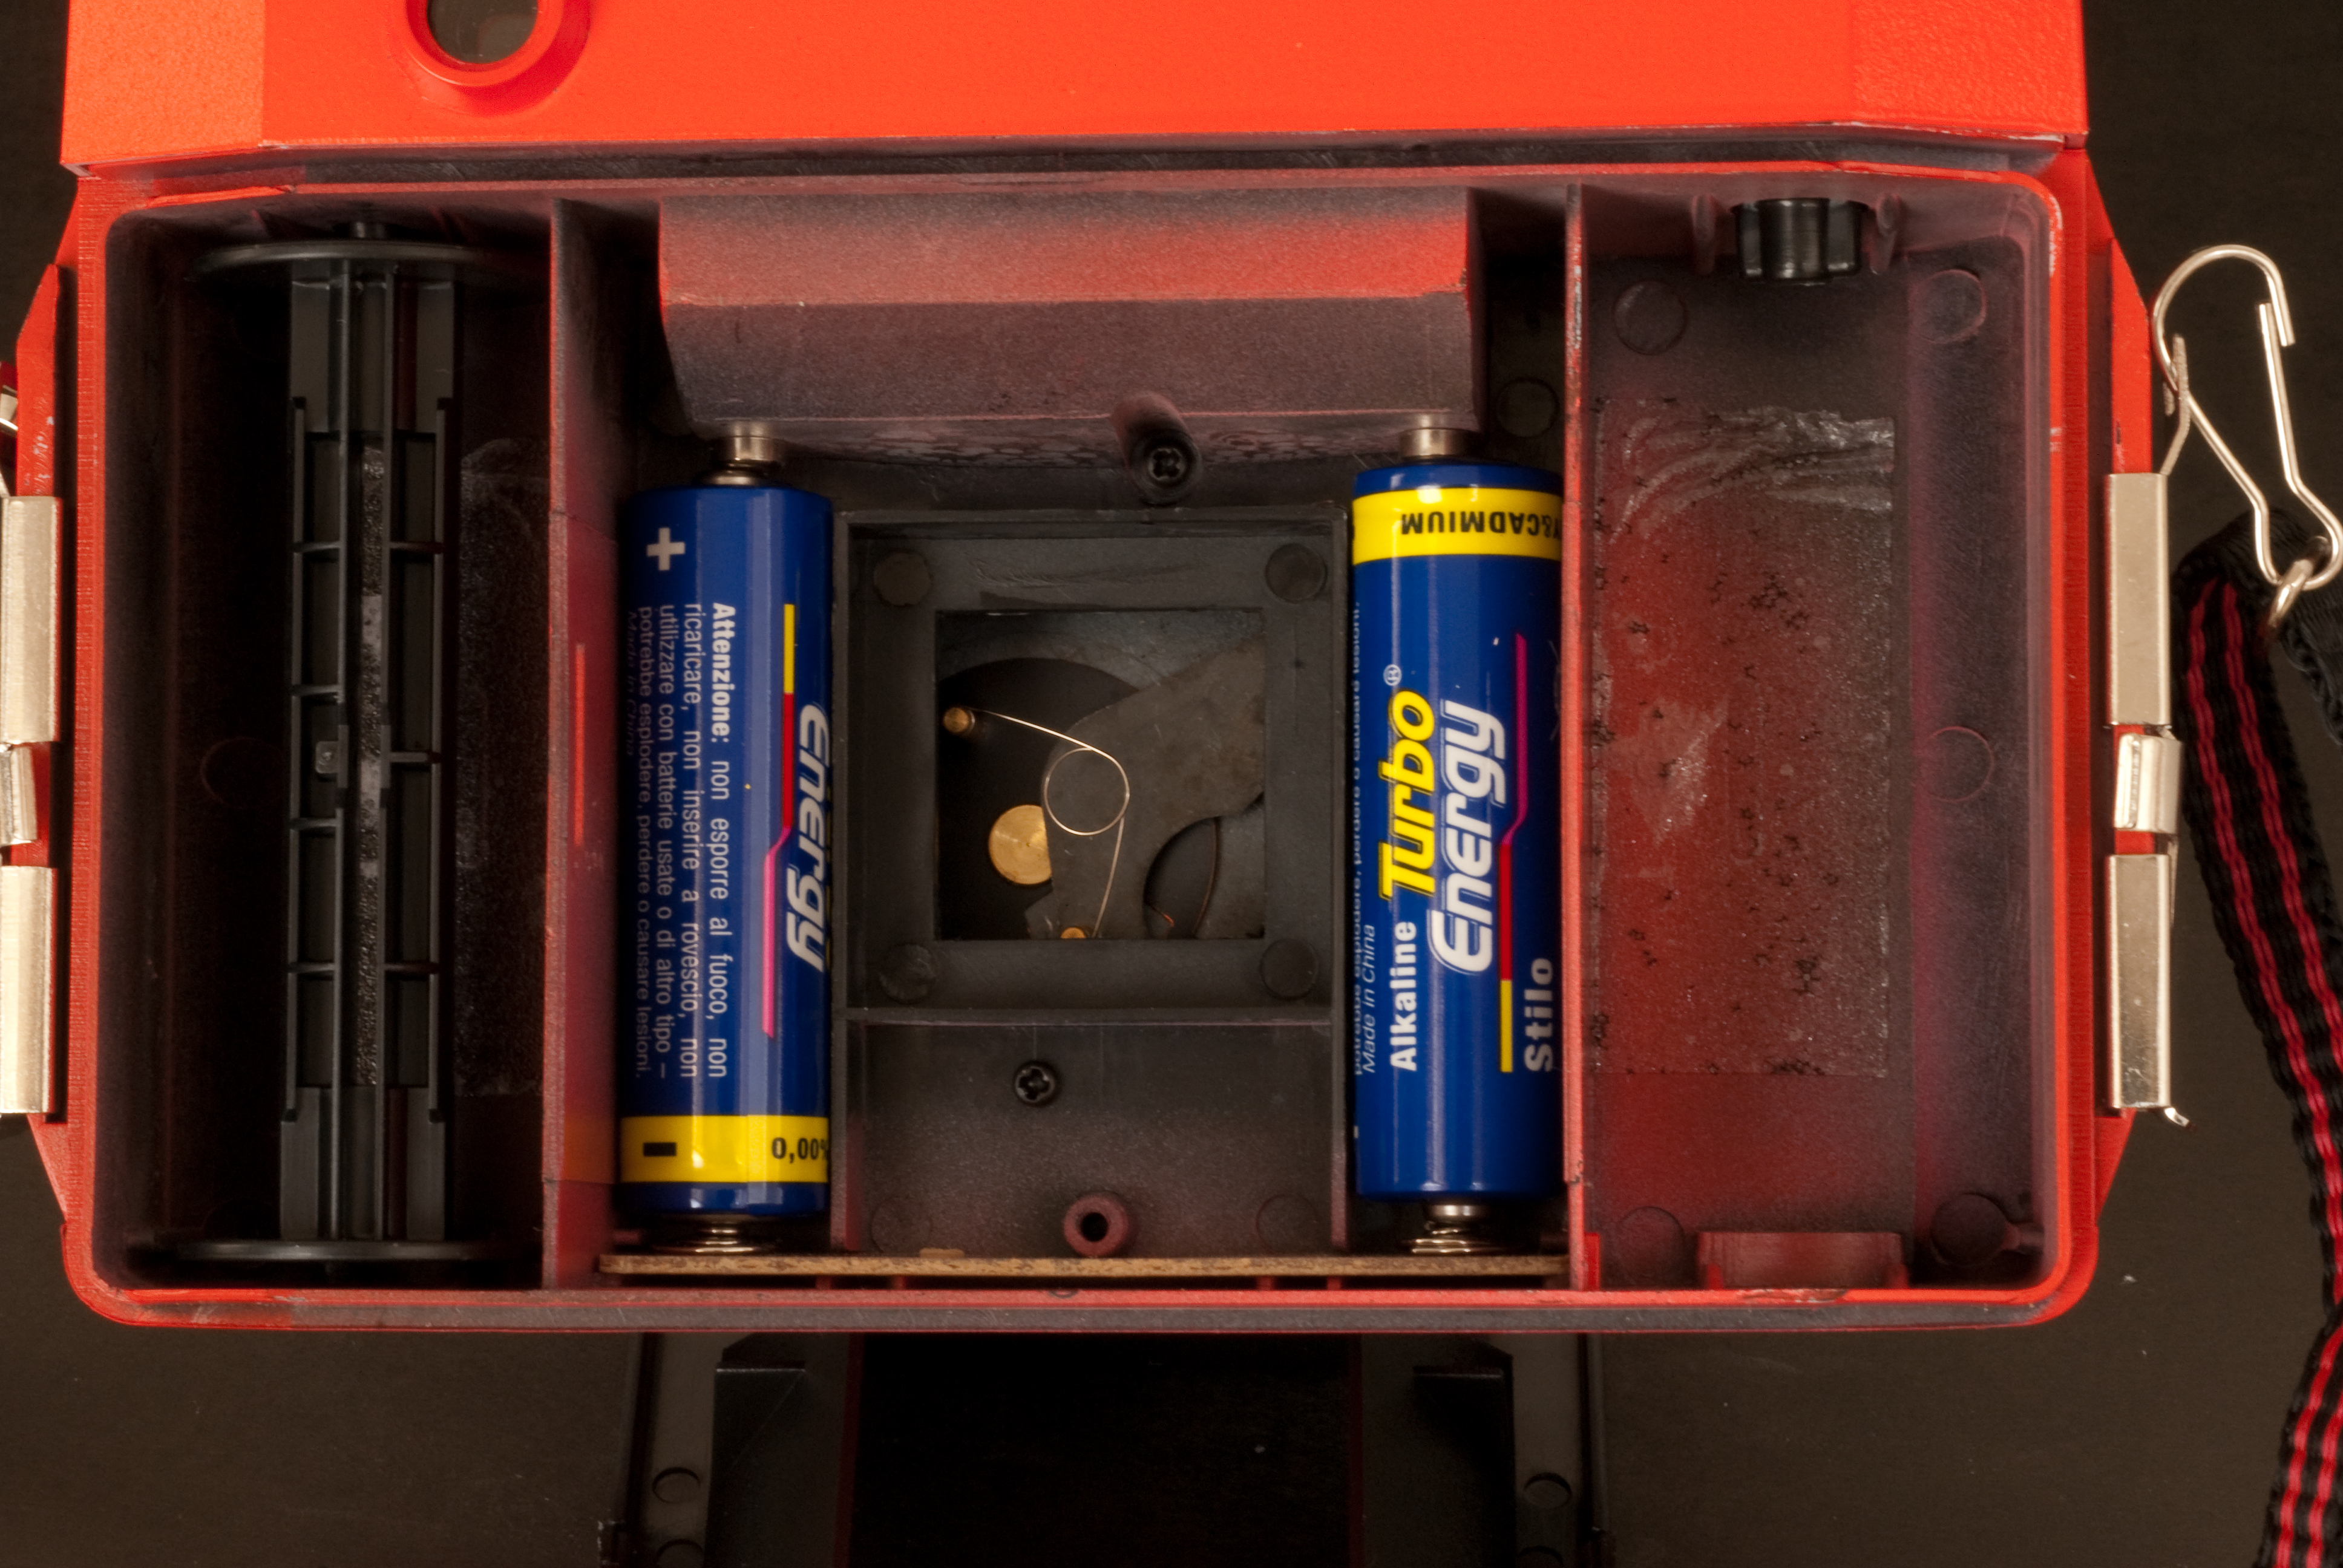
Holga 120 CNF – a view from the shutter (120 film adapter removed) – According to the brochure, you should not expect to transmit it to your grand children.
In the street, the camera attracts lost of attention. People notice the bright red color (Holgas are also available in black, kaki and in a unique blue and yellow combination), and are intrigued by the cheap aspect of the camera. It looks like a toy, and people are surprised to see an adult using it.
Rome – View of the Curia from the Campidoglio – Holga 120 CFN
The camera has very few controls and is easy to use, with a decent viewfinder and relatively smooth commands, and provides a user experience very similar the “boxes” that Kodak used to sell before the launch of the Instamatic cameras.
The result?
Having the rolls processed proved as difficult as buying the film in the first place. Costco and the proximity drugstores don’t process anything larger than 35mm film, and the rolls had be sent to a professional lab (some of them charge up to $20.00 per roll). When you receive the pictures, you discover the “Holga paradox”: you’re not attracted to the almost “normal” images, but by the most severely flawed. The pictures with the fewer technical faults are just bad (with vignetting and all sorts of aberrations), while some of the images plagued with the worst of the problems (involuntary multiple exposures, light leaks) have a surrealist quality that the most creative of the photographers would struggle to get from a digital picture processed in Photoshop.
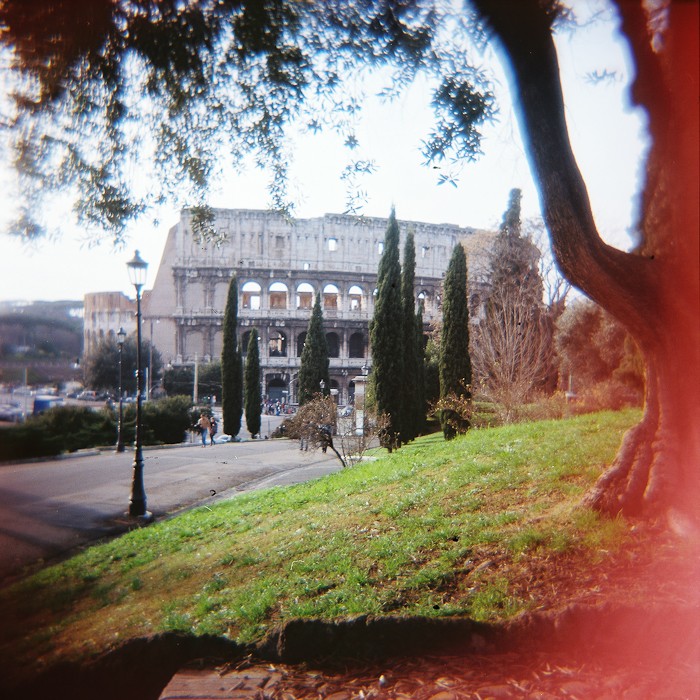
Rome-Coliseum-Holga 120 CFN – This is one of the pictures with the fewest defects.
Holga, what for?
“Normal” photographers are supposed to spend thousands of dollars in the equipment which will help them produce pictures as perfect as possible from a technical point of view – in focus, sharp, with the right exposure, no vignetting, no distortion, and no chromatic aberration.
Straight from the Holga – at least the bright red camera attracts smiles
Deviations from the norm of the technically perfect picture are supposed to be voluntary, in order to convey an emotion or a message. They’re not supposed to have been brought randomly by a poorly designed camera.
Holgas don’t follow the rule. They’re not “normal”, and they’re not what “normal” photographers would be looking for. Their results are totally unpredictable. When nothing went really wrong, the results are dull. It’s only when they are massively flawed that the pictures start being surprising and interesting.
Using a Holga reminded me of the “Exquisite Corpse” creativity method used by the Surrealist movement at the beginning of the XXth century. With a Holga you will rely on chance to create something new and different. Using the bright red Holga, I started believing that chance could be an artist on its own right. And you end up loving that little camera for that very reason.
More about Holgas
A few decades ago, photographers in Austria discovered the “Lomos” (copies of Cosina point and shoot cameras made in the USSR), and liked the – flawed – pictures made by those very imperfect little cameras so much that they launched the “lomography” movement. They started distributing the “Lomos” in Austria and Germany, and progressively added other cameras from Eastern Europe and China to their catalog. Lomos and Holgas are now widely distributed, and can also be purchased directly from the Lomography web site, where a red Holga 120 CFN can be found for $75. That’s a lot of money for such a low tech object. Bargain hunters can also find Holgas on eBay, for far less.
[The production of the Holga ceased in November 2015, but Freestyle Photo still have a few of them available – only in black, unfortunatelly. Lomography are proposing a camera, the Diana F, that seems to follow the same recipeas the original Holga, and is available in multiple colors.]
Holga CNF 120 – view of the back
Holga 120 CNF – the commands
Holga 120 CFN – Portrait
Rome – Campidoglio – Michelangelo betrayed by Holga
A few weeks ago I tested the JJC Negative Scanning Kit – my goal was primarily to digitize my stash of negatives, so that I could upload and reference them in Lightroom.
B&W and negative color film – the differences
I was pleasantly surprised by the quality of the scans – but I came to the conclusion that until I spent money in Lightroom Classic (or Photoshop) and a good plug-in, converting the color negative into a usable image was going to be labor intensive and yield inconsistent results. Since I had the equipment in place, I also tried my luck at converting B&W negatives instead.
Kodak Plus X Negative – July 2010. As “scanned” last week with the JJC Digitizer. Kodak Plus X was a conventional B&W film.
Black and White film can be of two types – conventional B&W film (also defined as “Crystal Gelatine” or “Silver Halide”) is made of silver crystal salts (the silver halide) suspended in gelatine. To cut a long story short, during the development process, the silver halides are reduced into silver metal – and the developed film still contains silver.
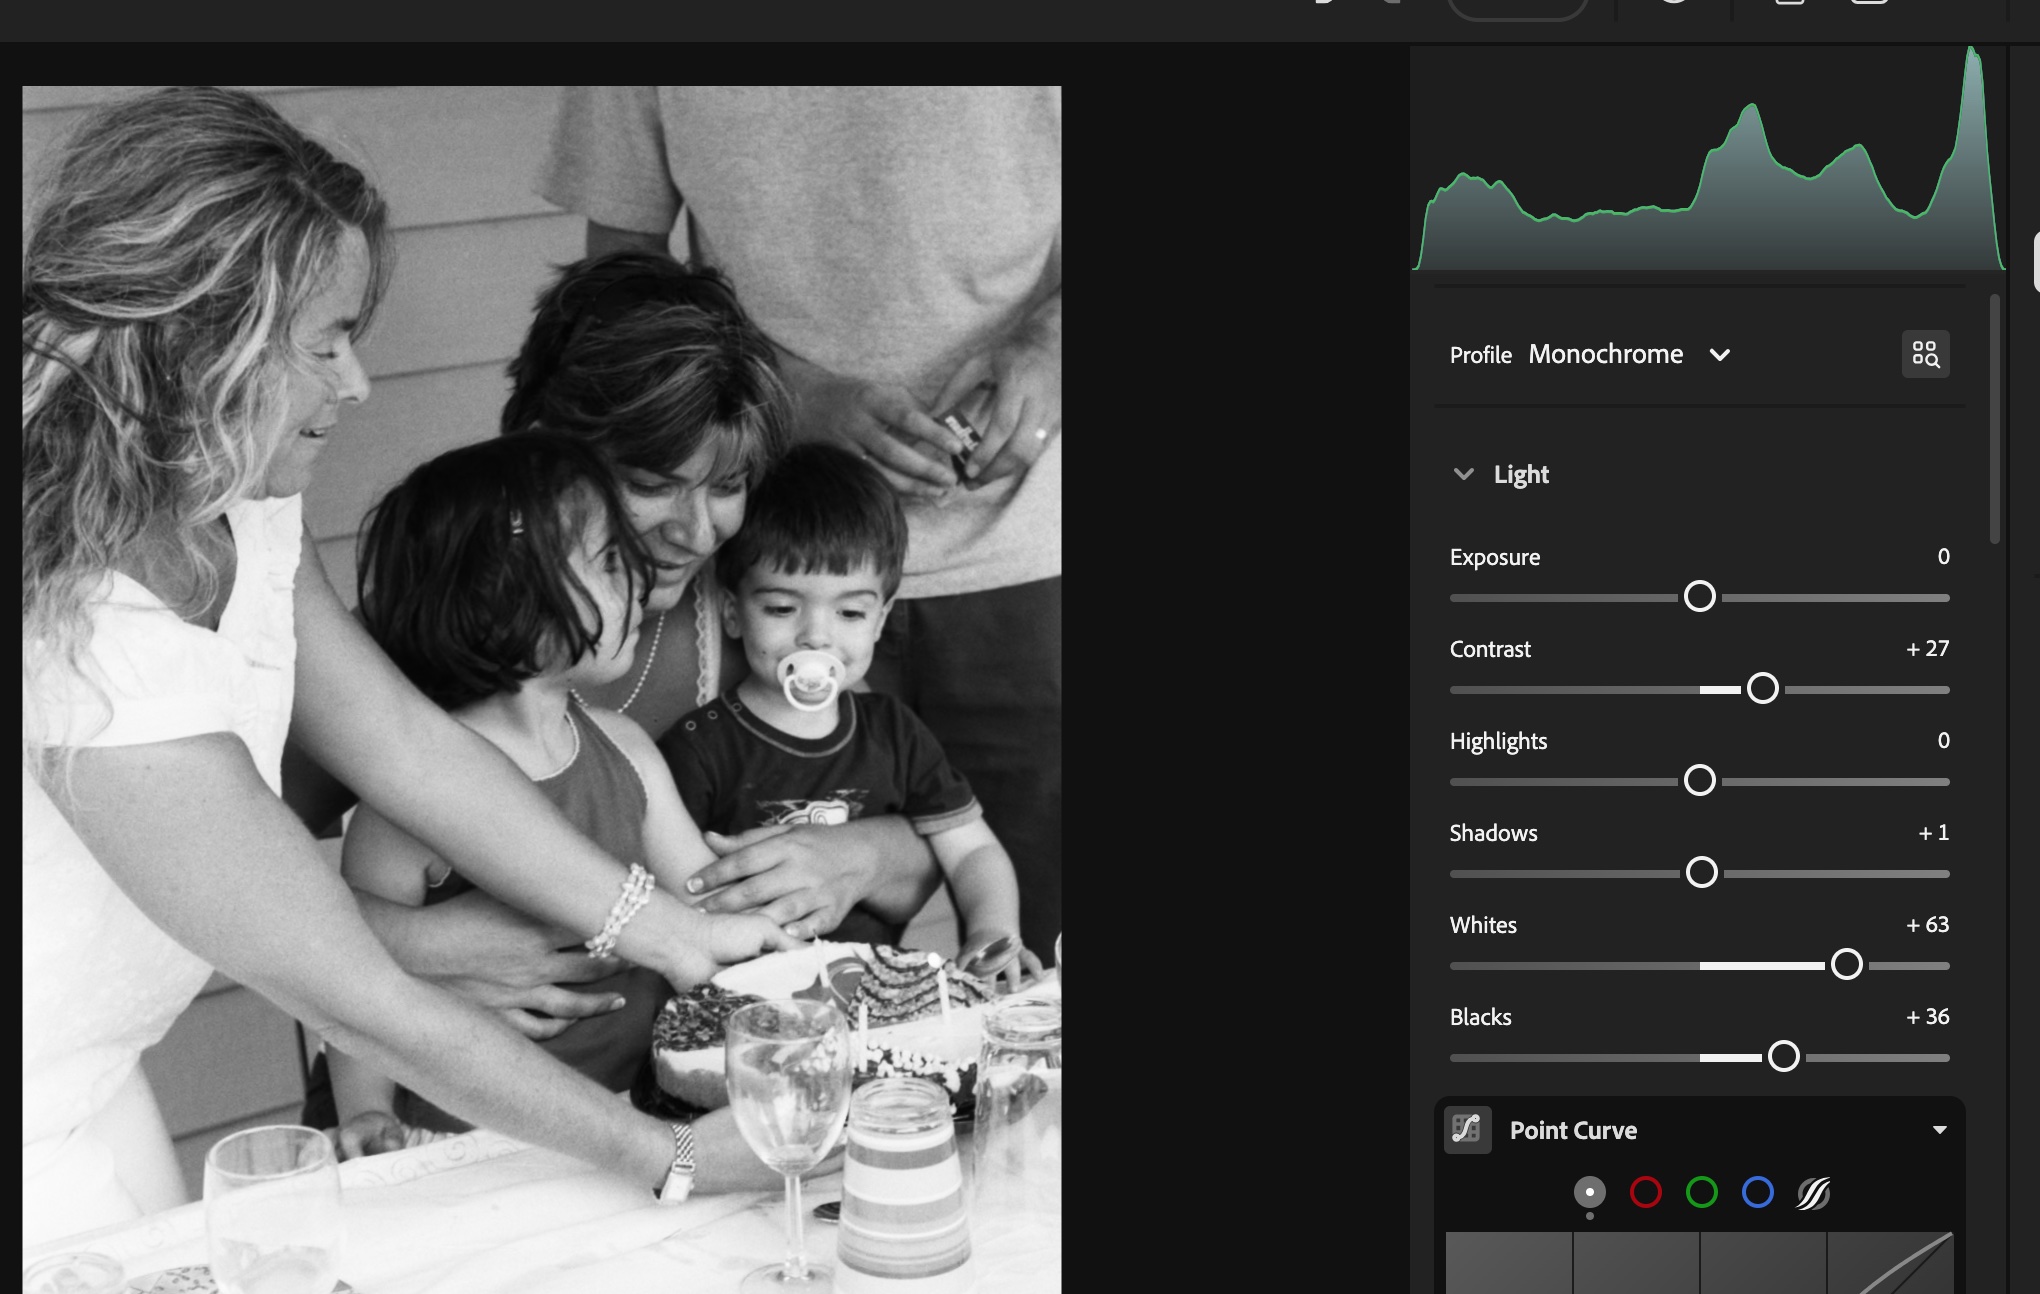
Image processing in Lightroom
Negative Color film works a bit differently. In this type of film, it’s a mix of silver halide and dye couplers that is suspended in gelatine; during the development process, the developer reacts with the dye couplers and the silver halide to produce visible dyes, while the silver is totally eliminated from the developed film (the labs catch that silver in the exhausted fixer and reclaim it).
The digitized negative after some work in Lightroom. For an amateur, conventional B&W film is easier to work with than chromogenic film.
Because minilabs were ubiquitous and only equipped to process negative color film, it made sense for Kodak and Ilford to propose B&W film engineered to be processed like negative color film – the chromogenic B&W film. Kodak had the BWCN400, Ilford the XP2. Besides the convenience of relying on local minilabs for processing, I also liked the exposure latitude of the BWCN400 and the smooth look of its images, and it was my B&W go-to film for years. Until Kodak stopped manufacturing it 10 years ago (Ilford still have the XP2 in their catalog).
Digitizing B&W film with the JJC Film Digitizing Adapter
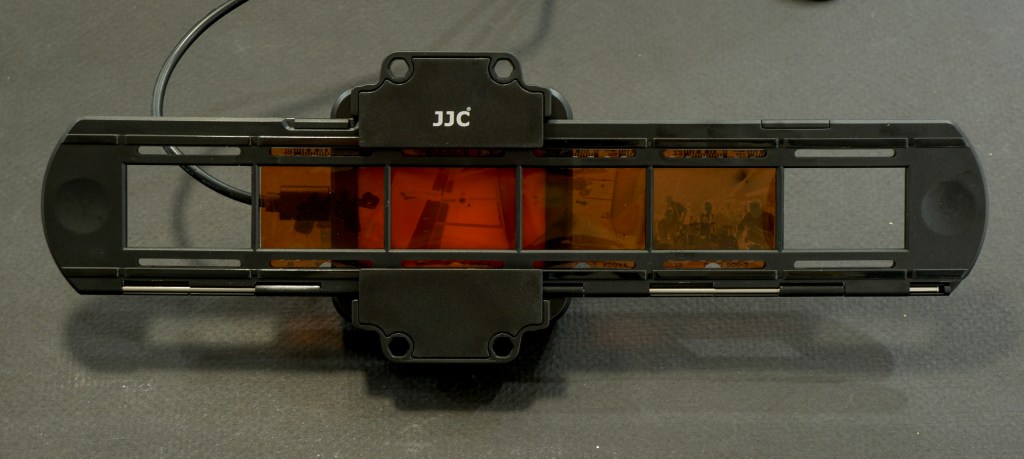
The JJC Film Digitizing Adapter is a sort of clone of Nikon’s ES2 kit – both are designed to be placed in front of a macro lens attached to a digital interchangeable lens camera (m43, APS and Full Frame cameras are supported by the JJC system).
Chromogenic film is not as difficult to digitize as color negative film (you don’t have to take care of the color channels), but it still presents challenges, and some work on the S-Curve is needed because all the information contained in the film is concentrated in a relatively narrow band in the middle of the histogram. I will not be posting any self-made scan of my chromogenic pictures yet, because I’m not happy with the results – too crappy to be shared.
On the other hand, conventional Silver Halide film is much more analog in its behavior, and once the negative is inverted – I was using the same free online service as before (https://invert.imageonline.co), almost no adjustment is needed in a photo editor and the image is ready to be published.
Since conventional B&W film is easy to develop, even at home and without a dark room (we’ll come to it in the next paragraph), a darkroom-free process becomes a distinct possibility – develop the film in daylight, digitize with a JJC or ES-2 kit, adjust to taste in Lightroom and share to the destination of your choice.
Developing film in full daylight
Amateurs typically develop 35mm film in Developing Tanks – it starts in a darkroom, where the film is removed from its cassette and placed on the reel and the reel in the tank, then the tank’s lid is closed and the rest of the film processing (develop, stop, fix, rinse) can take place in full daylight.
What a stainless steel tank and the reel look like – nicer than more modern plastic tanks.
Companies like Paterson will also sell you “changing bags”, where you will first place your empty developing tank, its reel, a pair of scissors and your 35mm film cassette. When everything is in place in the bag, you insert your hands in the bag through the sleeves, and attempt to load your exposed film on the reel, separate it from the cassette, place the spiral in the tank, and close the tank, without seeing what your hands are doing. Not easy at the beginning, but with some practice, it becomes a second nature.
Paterson Changing Bag
Our good friends of Lomography have just released a “daylight developing tank” that should make the process easier. In full daylight, place the film cassette in the tank, close the tank, and simply turn the crank to load the film on the reel. When the film is totally loaded on the reel, press a button to cut the film and separate it from the cassette, open the tank, remove the cassette, close the tank again, and start the normal development process.
I just ordered one. I’ll let you know how it goes.
I’ve always been intrigued by the first G series micro four third (m43) cameras of Panasonic – and I’ve always found the red ones particularly cute and desirable. But never enough to buy one, until today. Another eBay find.
Launched between 2008 and 2011, the G1, G2 and G3 now qualify as “old gear” and deserve a place in those pages. Whether one of those cameras, which were once revolutionary, will find a new life in my camera bag – is another story, and that’s what we’re going to determine.
Those early G models look like a dSLR shrunk to 1/2 scale, and were available in three body colors (black of course, but also red and blue) in the Western markets (*). Because they were the first representants of a totally new category of cameras, Panasonic did not seem to have a clear positioning for the G Series – were they targeting novice photographers or enthusiasts, and at what price point?
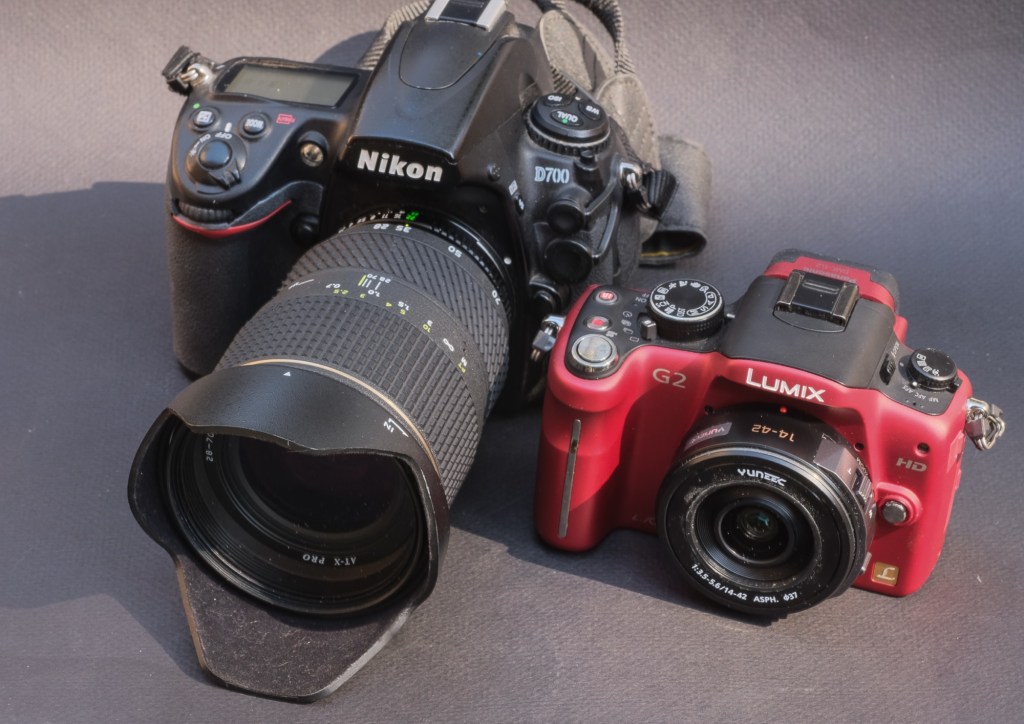
Panasonic G2 and Nikon D700 – two interchangeable lens cameras with 12 Megapixels sensors with a trans-standard zoom. The size difference is striking.
By 2010, they had made up their mind, and started launching smaller and simpler GF models to encourage smartphone and compact digicam users to step up to Interchangeable Lens Cameras (ILCs), while the subsequent G Series models became larger and more serious looking. The current models look no different (and are not really smaller) than conventional APS-C dSLRs.
Why mirrorless?
It all started when the image sensors used in dSLRs became capable of capturing video in addition to still images.
With the D90, Nikon were the first to propose a dSLR that could also shoot HD videos, but the architecture of single lens reflex cameras (with their flipping mirror located between the lens and the image sensor) is not video-friendly; when it was capturing videos, the D90 was reconfigured to operate like a compact digital camera, forcing the videographer to forget about the optical viewfinder, and compose from the LCD at the back of the camera. To make the matters worse, the very efficient phase detect autofocus system of the photo section of the camera could not be used when shooting videos (the flipping mirror again), and after some trial and error, the manufacturers had to implement a second autofocus system in the video section of their new dSLRs, contrast based this time. Two cameras in one.
With no legacy in the SLR and dSLR space, and access to state of the art electronic components, Panasonic was in an ideal position to propose a simpler and more elegant solution to the photo/video hybrid challenge. Their new “mirrorless” photo/video hybrids would not be based on a “reflex” camera anymore (no flipping mirror, no optical viewfinder) – their electronic viewfinder and their LCD display would both be fed directly by the image sensor – and a single autofocus system (contrast based) would be implemented. For the operator of the camera, there would be no difference between shooting still images and videos.
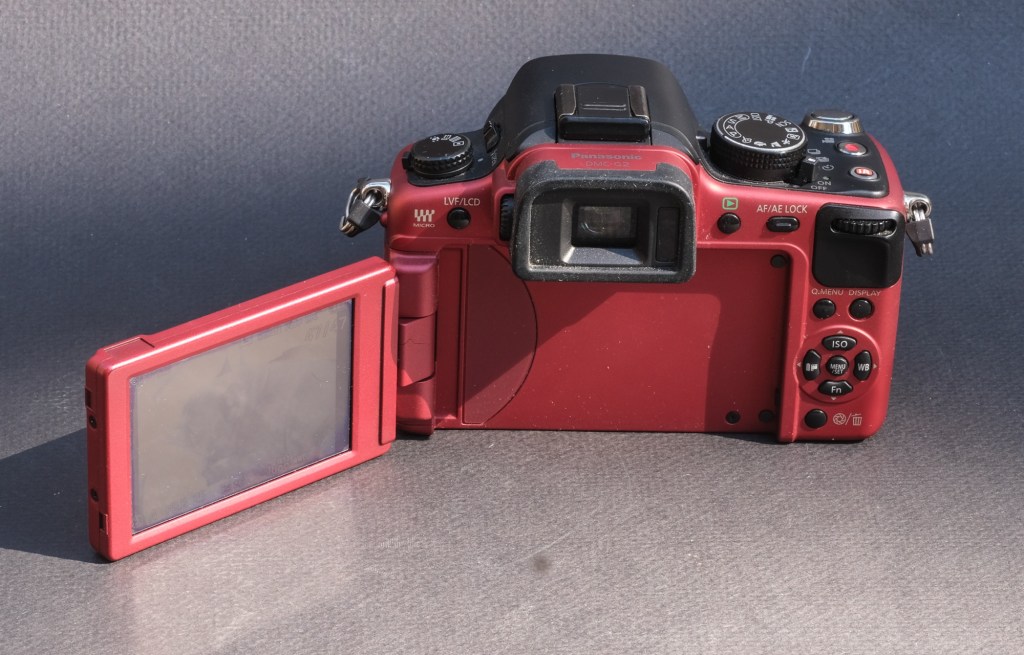
Panasonic G2 – the fully articulated display is great for selfies and for videos.The touch screen is not very reactive, there’s only one control wheel but the presence of the AF/AE lock is a nice touch.
The mirrorless architecture had another significant advantage – because they were not built around the constraints imposed by the mirror box of a dSLR, the cameras and their lenses could be made significantly smaller.
It was a small revolution (and it was perceived as such by the press when the G1 was launched). Sony and Olympus followed rapidly, then Fujifilm, then finally Canon and Nikon.
For the anecdote, the G1 – in spite of being architected as the perfect photo-video hybrid, could only shoot still images. All the models that followed, starting with the GH1 of 2009, shoot stills and videos, the GH models being more video-oriented than the G models, but we’re talking nuances here – nothing fundamental.
Shooting in 2025 with the Panasonic DMC-G2
In the early G series line-up, the G2 looks like a good pick. It addresses most of the limitations of the G1, and its user interface is more enthusiast oriented than the G3’s (more physical controls). The sensor is still a 12 Mpixels unit (the GH2 and the G3 made the jump to 16 Mpixels a few months later) but on a 15 year old camera the performance of the jpeg processing engine, the way it manages noise and the dynamic range are more of a concern than the resolution of the sensor.
Panasonic G2 and Yuneec 14-42 pancake zoom – more physical controls than on an entry level ILC.
Using the G2 today, you understand why the press was so impressed with Panasonic’s new mirrorless cameras. They had nailed the essentials – offering a very compact, well rounded, pleasant to use camera, seamlessly integrating an excellent electronic viewfinder and a fully articulated rear display to shoot stills and movies without the acrobatics needed to do the same with conventional DSLRs. Even the autofocus is (relatively) fast and accurate. The fast movers among the competitors (Olympus, Sony, Fujifilm) would need three good years to catch up.
On a spec sheet, the G2 has everything an amateur will need – multiple exposure modes, including “intelligent” modes that recognize the scene for the photographer and adjust the parameters accordingly, multiple autofocus modes, and a very informative viewfinder.
Atlanta, Piedmont Park – Jpeg Straight out of the camera – note the 4×3 proportions of the picture.
Once you get used to its menus, the camera is easy to configure to one’s desires, and does not get in the way. It’s so light you don’t feel its weight, and wakes up quickly if it had entered a sleep mode. Only the operation of the touch screen leaves to be desired – it’s unresponsive and requires a significant pressure from the finger – and can’t be compared to the responsiveness of a modern smartphone in that regard.
Atlanta, Piedmont Park
What about the pictures?
There are cameras from the same vintage that immediately impress you with the quality of their JPEGs – you shoot with them for the first time and are like “wow!” – I’ve had that sort of moment with my first Fujifilm camera, the original X100. No such thing with the G2. You look at the pictures and you simply think – “not bad, but it needs some post-processing to show the scene like I really saw it”.
Sweetwater Creek Park – GA – jpeg image boosted by Lightroom AI
The JPEGs are generally pleasant to look at but lack punch, and will benefit from some limited post processing (with the G2, I tend to systematically add vibrance and clarity in Lightroom). In some of the landscapes I shot (facing the sun, admittedly), the images seemed to be rendered in a scale of grey, with almost no color – which points to dynamic range limitations.
Fishing – Shot in RAW. Processed in Lightroom Mobile
Photographers willing to spend more time on their images will shoot in RAW, and spend a few minutes adjusting each picture in Lightroom. The files respond well to post-processing, which tends to indicate that the potential of the sensor is hindered by the JPEG rendering engine of the camera.
As a conclusion
Shooting with a great film camera from the nineteen seventies or eighties is an experience to be relished. It’s so different from shooting with a modern digital camera. Cameras like the Canon AT-1/AE-1, the Nikon FM/FE or the Olympus OM-1/OM-2 series reconnect you with the basics of photography. Even if you own a state of the art digital camera, you will still feel the need to shoot with a FE2 or an OM-2 from time to time, because they’re such great instruments and using them is so rewarding.
Wildlife on the Chattahoochee River. Shot in RAW. Processed in Lightroom Mobile
You can’t say the same of the Panasonic G2 – it’s a modern digital camera, but not as advanced as the most recent models from Panasonic and all other major camera makers. In 2010, it was an impressive tour de force, already very mature for a 1.1 release. Today, it’s still remarkably compact, but the Jpeg processing engine, the sensor, the viewfinder – although usable – are 15 years behind the current best of the bunch.
The G2 is a cute and easy to use oldie, but if you also own a more modern, more enthusiast oriented ILC, you will not be tempted to shoot with the G2 when you could be shooting with a more recent, more flexible camera that will deliver better pictures in more situations, straight out of the camera.
Or you will be looking for a camera as compact and pleasant to use as the G2, but more modern.
Panasonic G2 with Pentax 35mm f/2 lens and Fotasy adapter – Mirrorless cameras (in general) can easily work with vintage lenses. There is an adapter for almost every lens mount ever made (here, 42mm to m43).
On the other hand, if you’ve only shot photos and videos with a smartphone so far, a Panasonic G2 is a good stepping stone into the world of dedicated cameras. With a Yuneec 14-42mm power zoom (**), it forms one of the cheapest ways to get a taste for what shooting with a good interchangeable lens camera really is about.
You will have to shoot RAW to get the best results, and will have to learn about the S curve and the histograms. But it’s a knowledge worth acquiring.
The m43 system is still alive with Panasonic and Olympus keeping on developing new cameras and new lenses, and when you will feel the desire for a more recent camera, all the experience you will have accumulated shooting with the G2 – and the money you’ll have eventually spent on extra m43 lenses – will not be lost.
Tree – shot in RAW in the Chattahoochee River National Park. Processed in Lightroom Mobile
(*) Panasonic also shipped the early G models in other color combinations, but primarily on the Japanese Domestic Market (JDM). Cameras sold on the Japanese domestic market very often have a Japanese language-only firmware, and can’t be reflashed to show menus in other languages than Japanese. This situation is not specific to Panasonic – all Japanese cameras manufacturers have had (and some still have) references in their line-up which are strictly reserved for their home market and only support Japanese. Generally the ones with the fancy colors. Too bad.
(**) Yuneec is a Chinese manufacturer of drones and electrically propelled aircraft. At some point they used to integrate Panasonic m43 cameras and lenses in their drones – simply relabeling them. The Yuneec 14-42 power zoom is assumed to be identical to its Panasonic branded equivalent. The drones have probably reached the end of their life a long time ago, but enough lenses seem to have survived them, and there is a significant supply of Yuneec branded zooms on the second hand market. The Yuneec-labeled 14-42 mm zoom is identical and – in my experience – fully compatible with its Panasonic branded sibling.
A refurbished Yuneec zoom typically sells for a bit less than $100.00, a nice second hand G2 can be had for less than $150, making the G2+Yuneec 14-42mm combo one of the cheapest way to shoot with a good mirrorless interchangeable lens camera today. Not a penalty camera by any mean…
Sweetwater Creek State Park – straight out of the camera – I was facing the sun when I shot this picture.
Sweetwater Creek State Park – GA – image settings optimized by Lightroom AI.This image is closer to what I had in mind when I pressed the shutter.
Sweetwater Creek State Park – Straight out of camera.
Sweetwater Creek State Park – vibrance and clarity boosted in Lightroom